
Kia Seltos: Body Electrical System / Audio/AVNT System
Contents:
- Components and Components Location
- Description and Operation
- On Vehicle Inspection
- Audio/AVNT Head Unit Terminal Function
- Audio/AVNT Head Unit Removal and Installation
- AVNT Monitor Removal and Installation
- Audio/AVNT Keyboard Terminal Function
- Audio/AVNT Keyboard Removal and Installation
- Speaker Removal and Installation
- Speaker Inspection
- External AMP Terminal Function
- External AMP Removal and Installation
- Multimedia Jack Terminal Function
- Multimedia Jack Removal and Installation
- Steering Wheel Remote Controller (SWRC) Terminal Function
- Steering Wheel Remote Controller (SWRC) Removal and Installation
- Antenna Removal and Installation
- Mic Removal and Installation
- Mic Inspection
Components and Components Location
| Component |
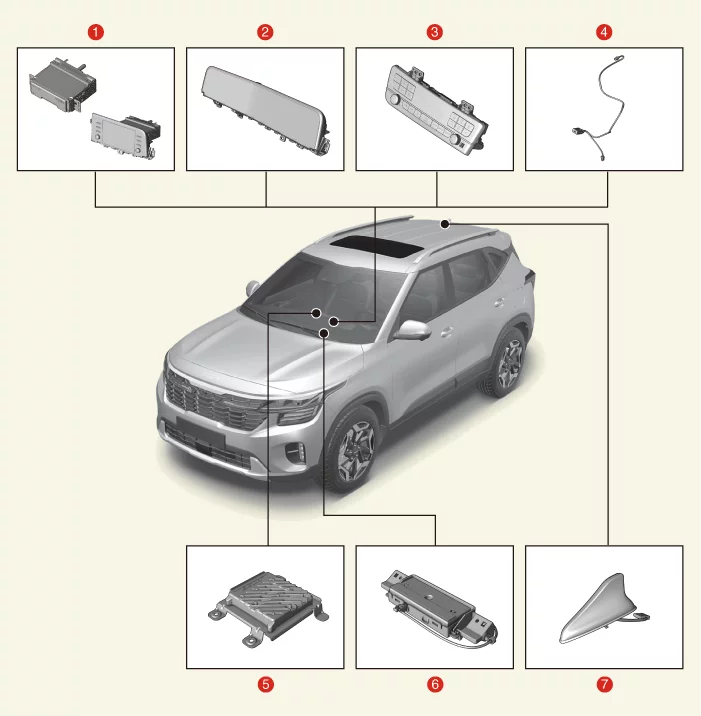
| 1. Audio/AVNT Head Unit 2. AVNT Monitor 3. AVNT Keyboad 4. Multimedia Jack |
5. External Amplifier 6. Crash Pad Antenna 7. Roof Antenna |
Description and Operation
| Description |
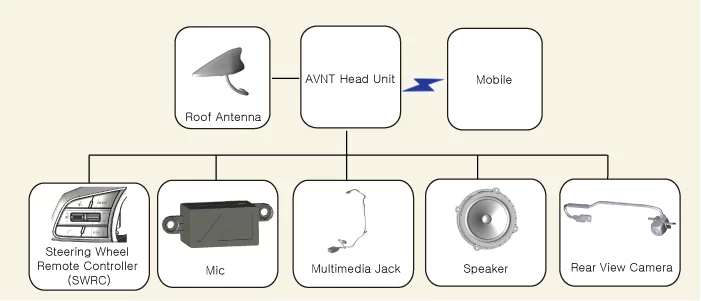
On Vehicle Inspection
| On Vehicle Inspection |
| Diagnosis with KDS |
| 1. |
The audio/AVNT system can be more quickly diagnosed for problems with the KDS (Refer to "DTC guide").
|
Refer to the KDS screen for operating conditions and details.
|

Audio/AVNT Head Unit Terminal Function
| Connector and Terminal Function |
| [Display Audio Head Unit] |
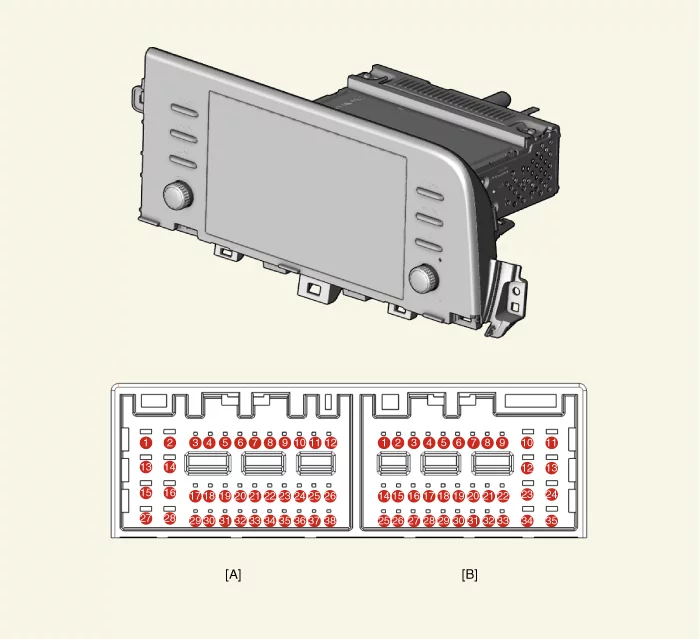
| Terminal |
Function |
|
|
Connector A |
Connector B |
|
|
1 |
Left rear door speaker ( + ) |
- |
|
2 |
Left rear door speaker ( - ) |
Mic ( + ) |
|
3 |
- |
- |
|
4 |
- |
- |
|
5 |
- |
- |
|
6 |
Rear view camera power |
Illumination ( + ) |
|
7 |
Rear view camera video |
M-CAN (High) |
|
8 |
- |
- |
|
9 |
- |
- |
|
10 |
- |
Battery (+) |
|
11 |
USB (DTC) |
Battery (+) |
|
12 |
Steering wheel remote control switch |
Ground |
|
13 |
Left front door speaker ( + ) |
Ground |
|
14 |
Left front door speaker ( - ) |
- |
|
15 |
Right front door speaker ( - ) |
Mic ( - ) |
|
16 |
Right front door speaker ( + ) |
- |
|
17 |
- |
- |
|
18 |
- |
- |
|
19 |
- |
Illumination ( - ) |
|
20 |
Rear view camera power (Ground) |
M-CAN (Low) |
|
21 |
Rear view camera video (Ground) |
- |
|
22 |
- |
ACC |
|
23 |
- |
- |
|
24 |
- |
- |
|
25 |
- |
- |
|
26 |
Steering wheel remote control switch (ground) |
- |
|
27 |
Right rear door speaker ( - ) |
- |
|
28 |
Right rear door speaker ( + ) |
- |
|
29 |
- |
- |
|
30 |
- |
- |
|
31 |
- |
- |
|
32 |
- |
- |
|
33 |
Rear view camera shield (ground) |
IG 1 |
|
34 |
- |
- |
|
35 |
- |
- |
|
36 |
- |
|
|
37 |
- |
|
|
38 |
Vehicle speed signal |
|
|
USB Connector |
Terminal |
Function |
|
|
1 |
USB VCC |
|
2 |
USB Data (Low) |
|
|
3 |
USB Data (High) |
|
|
4 |
USB Ground |
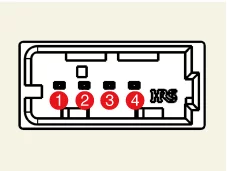
|
GPS Antenna connector |
Terminal |
Function |
|
|
1 |
Signal |
| 2 |
Ground |
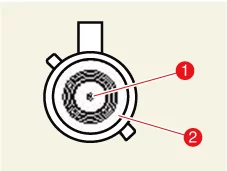
|
Radio Antenna connector |
Terminal |
Function |
|
|
1 |
AM/FM |
| 2 |
Ground |
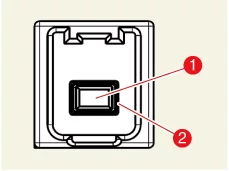
|
LTE Main antenna connector |
Terminal |
Function |
|
|
1 |
Signal |
| 2 |
Ground |
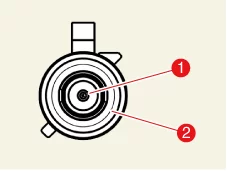
| [AVNT Head Unit] |
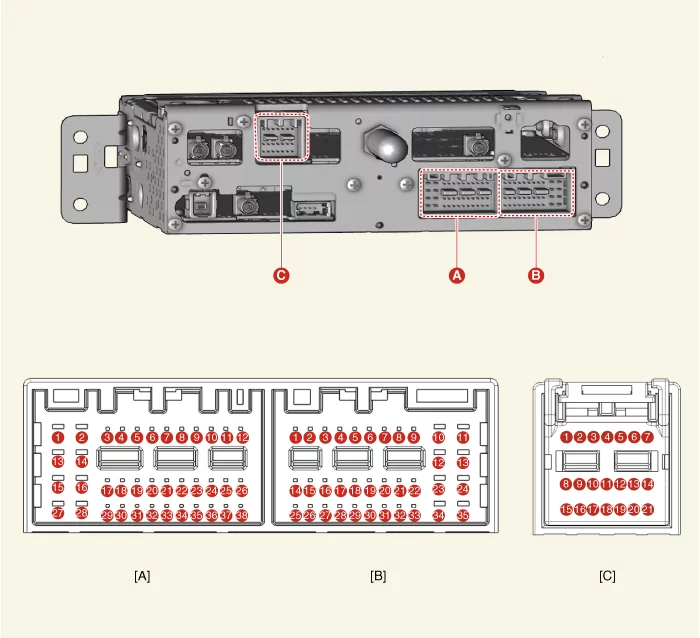
| Terminal |
Function |
|||||
| Connector A |
Connector A |
Connector B |
Connector C |
|||
| Built-in amplifier |
External amplifier |
|||||
|
RVM Type |
SVM Type |
RVM Type |
SVM Type |
|||
|
1 |
Left rear door speaker ( + ) |
- |
Mic2 ( + ) |
- |
||
|
2 |
Left rear door speaker ( - ) |
- |
Mic1 ( + ) |
I-CAN (High) |
||
|
3 |
- |
Amplifier navigation voice ( - ) |
- |
- |
||
|
4 |
- |
Amplifier SPDIF (High) |
- |
- |
||
|
5 |
Reset |
- |
- |
|||
|
6 |
Rear view camera power |
- |
Rear view camera power |
- |
Illumination ( + ) |
- |
|
7 |
Rear view camera video |
- |
Rear view camera video |
- |
M-CAN (High) |
- |
|
8 |
- |
- |
- |
|||
|
9 |
- |
- |
I-CAN (Low) |
|||
|
10 |
- |
Battery (+) |
- |
|||
|
11 |
USB (DTC) |
Battery (+) |
- |
|||
|
12 |
Steering wheel remote control switch |
Mic1 (ground) |
- |
|||
|
13 |
Left front door speaker ( + ) |
- |
Mic2 (ground) |
- |
||
|
14 |
Left front door speaker ( - ) |
- |
Mic2 ( - ) |
- |
||
|
15 |
Right front door speaker ( - ) |
- |
Mic1 ( - ) |
- |
||
|
16 |
Right front door speaker ( + ) |
- |
- |
MTS Key pad |
||
|
17 |
- |
Amplifier navigation voice ( + ) |
- |
- |
||
|
18 |
- |
Amplifier SPDIF (Low) |
- |
- |
||
|
19 |
- |
Amplifier SPDIF (ground) |
Illumination ( - ) |
- |
||
|
20 |
Rear view camera power (Ground) |
- |
Rear view camera power (Ground) |
- |
M-CAN (Low) |
- |
|
21 |
Rear view camera video (Ground) |
- |
Rear view camera video (Ground) |
- |
- |
- |
|
22 |
- |
ACC |
||||
|
23 |
- |
- |
||||
|
24 |
- |
Monitor power |
||||
|
25 |
- |
- |
||||
|
26 |
Steering wheel remote control switch (ground) |
- |
||||
|
27 |
Right rear door speaker ( - ) |
- |
- |
|||
|
28 |
Right rear door speaker ( + ) |
- |
- |
|||
|
29 |
- |
- |
||||
|
30 |
- |
- |
||||
|
31 |
- |
- |
||||
|
32 |
- |
Ground |
- |
Ground |
- |
|
|
33 |
Rear view camera shield (ground) |
- |
Rear view camera shield (ground) |
- |
IGN (+ ) |
|
|
34 |
- |
- |
||||
|
35 |
- |
Monitor power (ground) |
||||
|
36 |
- |
|||||
|
37 |
- |
|||||
|
38 |
Vehicle speed signal |
|||||
|
USB Connector |
Terminal |
Function |
|
|
1 |
USB VCC |
|
2 |
USB Data (Low) |
|
|
3 |
USB Data (High) |
|
|
4 |
USB Ground |
|
GPS Antenna connector |
Terminal |
Function |
|
|
1 |
Signal |
| 2 |
Ground |
|
Radio antenna connector |
Terminal |
Function |
|
|
1 |
Signal |
| 2 |
Ground |
|
LTE Sub antenna connector |
Terminal |
Function |
|
|
1 |
Signal |
| 2 |
Ground |
|
LTE Main antenna connector |
Terminal |
Function |
|
|
1 |
Signal |
| 2 |
Ground |
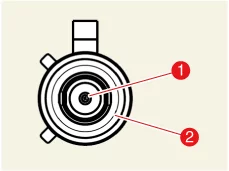
|
Monitor connector |
Terminal |
Function |
|
|
1 |
Monitor |
| 2 |
Ground |
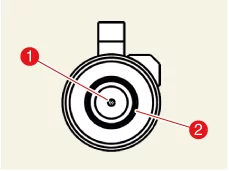
Audio/AVNT Head Unit Removal and Installation
| Removal |
| 1. |
Remove the cluster [Standard Type].
(Refer to Instrument Cluster - "Cluster")
|
| 2. |
Remove the center fascia upper panel (A) by using the remover.
|
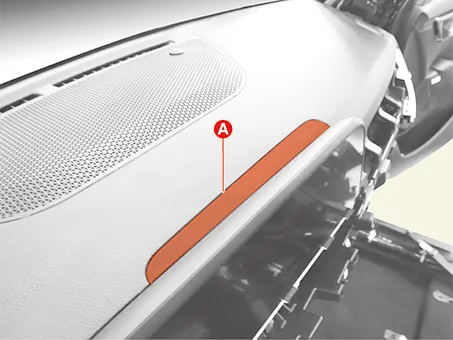
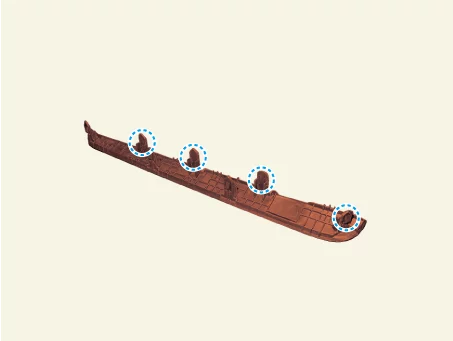

| 3. |
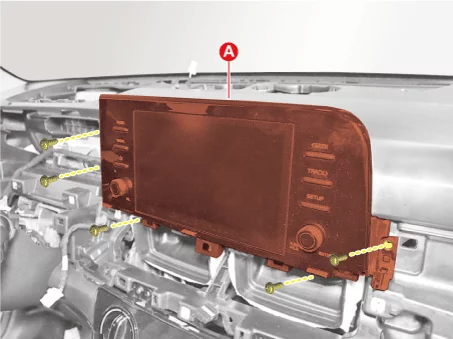
Remove the display audio head unit (A) after removing the screws.
|
| 4. |
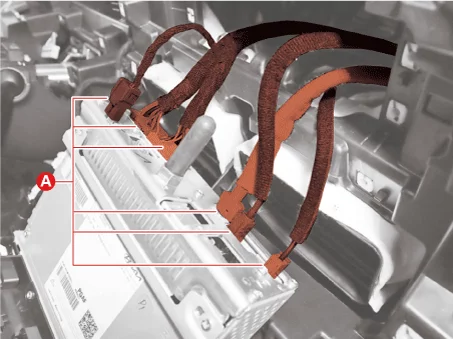
Disconnect the display audio head unit connectors (A).
|
| 1. |
Remove the cluster [Option Type].
(Refer to Instrument Cluster - "Cluster")
|
| 2. |
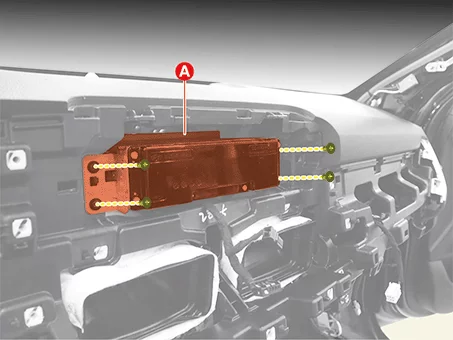
Remove the AVNT head unit after removing the screws.
|
| 3. |
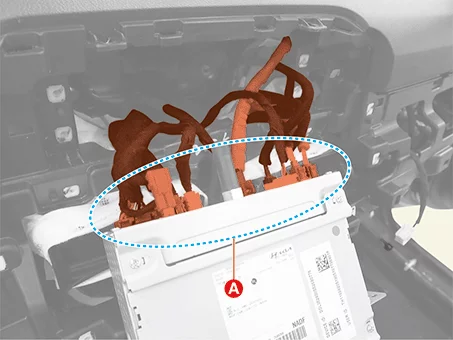
Disconnect the AVNT head unit connectors (A).
|
| Installation |
| 1. |
Install in reverse order of removal.
|
AVNT Monitor Removal and Installation
| Removal |
| 1. |
Remove the cluster [Option Type].
(Refer to Instrument Cluster - "Cluster")
|
| Installation |
| 1. |
Install in reverse order of removal.
|
Audio/AVNT Keyboard Terminal Function
| Terminal Function |
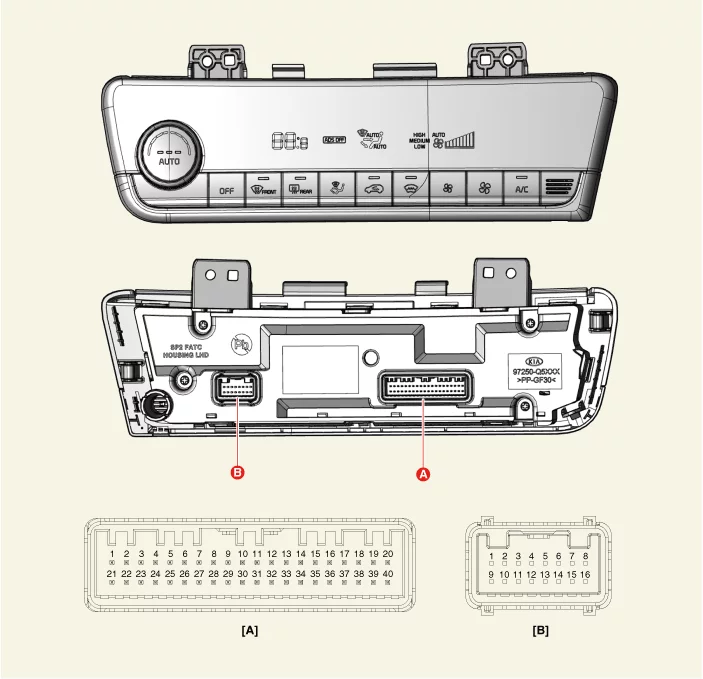
|
Pin No |
Connector A |
Connector B |
|
1 |
Battery ( + ) |
- |
|
2 |
- |
- |
|
3 |
ILL ( + ) (TAIL) |
- |
|
4 |
Sensor ground REF (+5V) |
Defogging actuator (Feedback) |
|
5 |
Mode control actuator (Feedback) |
Defogging actuator (Open) |
|
6 |
Temperature actuator (Feedback) |
Defogging actuator (Close) |
|
7 |
Intake actuator (Feedback) |
- |
|
8 |
Evaporator temperature sensor (+) |
Rear glass defogger indicator |
|
9 |
Ambient temperature senor (+) |
Rear glass defogger switch |
|
10 |
Mode control actuator (Vent) |
- |
|
11 |
Mode control actuator (Def) |
- |
|
12 |
Temperature actuator (Cool) |
Defog (TEMP) |
|
13 |
Temperature actuator (Warm) |
Defog (SCK) |
|
14 |
Intake actuator (Fresh) |
Defog (DATA) |
|
15 |
Intake actuator (Recirculation) |
- |
|
16 |
HTD (Rear defog indicator) |
Ground |
|
17 |
Rear defogging switch |
|
|
18 |
Blower relay |
|
|
19 |
- |
|
|
20 |
ILL ( + ) (RHEOSTAT) |
|
|
21 |
IG2 |
|
|
22 |
IG 1 |
|
|
23 |
Blower motor (+) |
|
|
24 |
Photo sensor (-) |
|
|
25 |
- |
|
|
26 |
- |
|
|
27 |
- |
|
|
28 |
- |
|
|
29 |
- |
|
|
30 |
AVNT head unit keyboard reset |
|
|
31 |
Detent out ( - ) |
|
|
32 |
- |
|
|
33 |
P-CAN (HIGH) |
|
|
34 |
P-CAN (LOW) |
|
|
35 |
FET (Drain Feedback) |
|
|
36 |
FET (Gate) |
|
|
37 |
ECV ( + ) |
|
|
38 |
ECV ( - ) |
|
|
39 |
Sensor ground (-) |
|
|
40 |
Ground ( - ) |
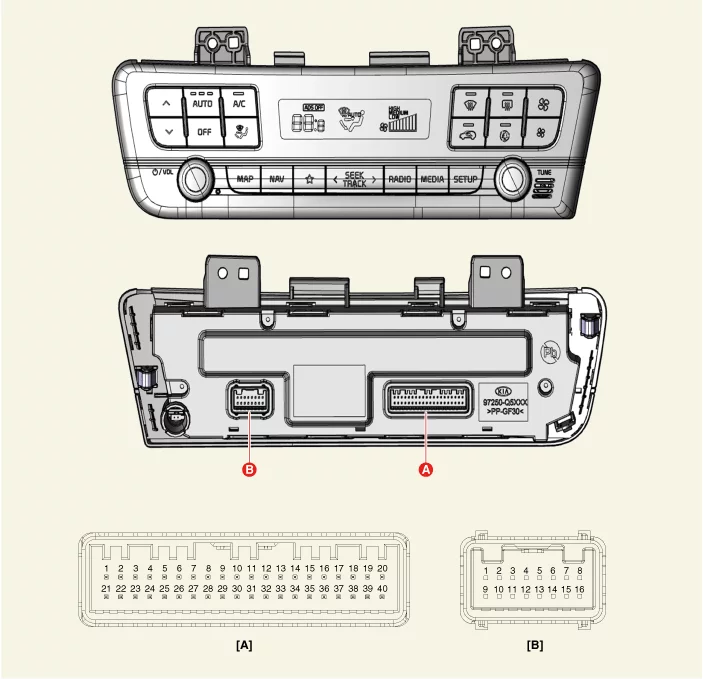
|
Pin No |
Connector A |
Connector B |
|
1 |
Battery ( + ) |
- |
|
2 |
- |
- |
|
3 |
ILL ( + ) (TAIL) |
- |
|
4 |
Sensor ground REF (+5V) |
Defogging actuator (Feedback) |
|
5 |
Mode control actuator (Feedback) |
Defogging actuator (Open) |
|
6 |
Temperature actuator (Feedback) |
Defogging actuator (Close) |
|
7 |
Intake actuator (Feedback) |
- |
|
8 |
Evaporator temperature sensor (+) |
Rear glass defogger indicator |
|
9 |
Ambient temperature senor (+) |
Rear glass defogger switch |
|
10 |
Mode control actuator (Vent) |
- |
|
11 |
Mode control actuator (Def) |
- |
|
12 |
Temperature actuator (Cool) |
Defog (TEMP) |
|
13 |
Temperature actuator (Warm) |
Defog (SCK) |
|
14 |
Intake actuator (Fresh) |
Defog (DATA) |
|
15 |
Intake actuator (Recirculation) |
- |
|
16 |
HTD (Rear defog indicator) |
Ground |
|
17 |
Rear defogging switch |
|
|
18 |
Blower relay |
|
|
19 |
- |
|
|
20 |
ILL ( + ) (RHEOSTAT) |
|
|
21 |
IG2 |
|
|
22 |
IG 1 |
|
|
23 |
Blower motor (+) |
|
|
24 |
Photo sensor (-) |
|
|
25 |
- |
|
|
26 |
- |
|
|
27 |
- |
|
|
28 |
- |
|
|
29 |
- |
|
|
30 |
AVNT head unit keyboard reset |
|
|
31 |
Detent out ( - ) |
|
|
32 |
- |
|
|
33 |
P-CAN (HIGH) |
|
|
34 |
P-CAN (LOW) |
|
|
35 |
FET (Drain Feedback) |
|
|
36 |
FET (Gate) |
|
|
37 |
ECV ( + ) |
|
|
38 |
ECV ( - ) |
|
|
39 |
Sensor ground (-) |
|
|
40 |
Ground ( - ) |
Audio/AVNT Keyboard Removal and Installation
| Removal |
| 1. |
Remove the center air vent.
(Refer to Body - "Crash Pad Air Vent")
|
| 2. |
Remove the Audio/AVNT keyboard (A) after removing the screws.
|
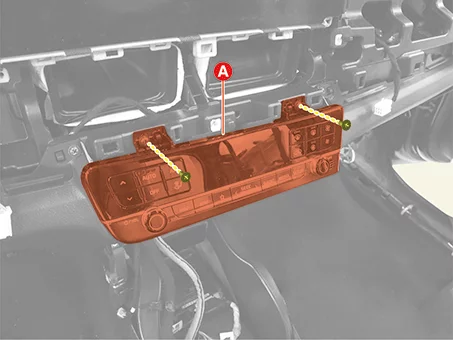
| 3. |
Disconnect the audio/AVNT keyboard connector (A) and the Heater & A/C control unit hose (B).
|
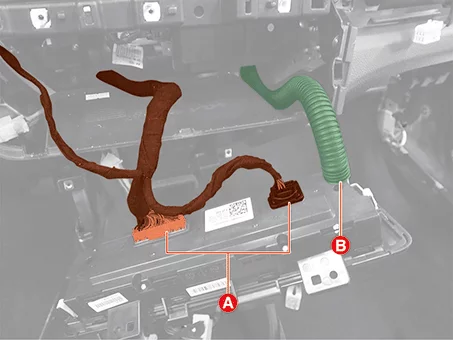
| Installation |
| 1. |
Install in reverse order of removal.
|
Speaker Removal and Installation
| Removal |
| 1. |
Disconnect the negative ( - ) battery terminal.
|
| 2. |
Remove the front center speaker grille.
|
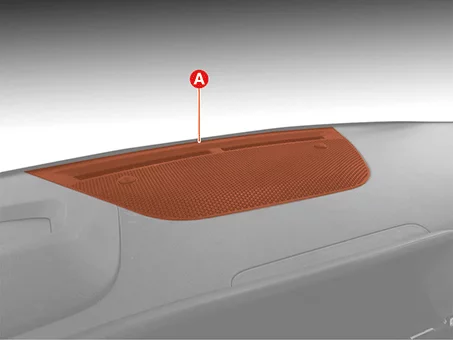
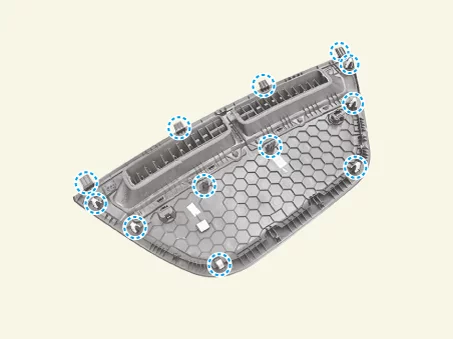
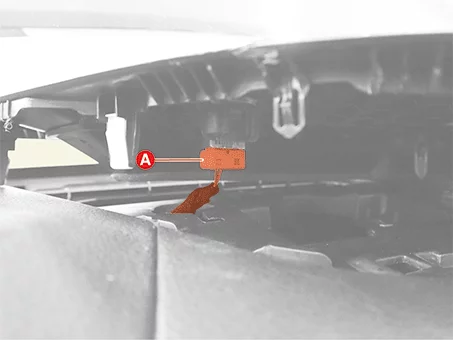
| 3. |
Remove the front center speaker (A) after removing the screws.
|
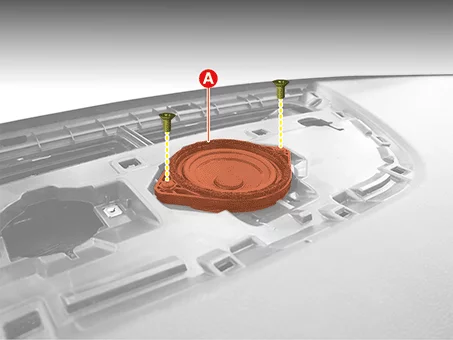
| 4. |
Disconnect the front center speaker connector (A).
|
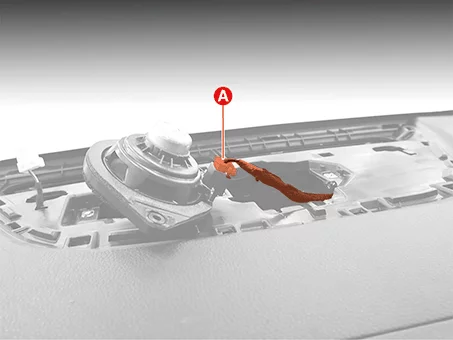
| 1. |
Disconnect the negative ( - ) battery terminal.
|
| 2. |
Remove the front door trim.
(Refer to Body - "Front Door Trim")
|
| 3. |
Disconnect the front tweeter speaker connector (A).
|
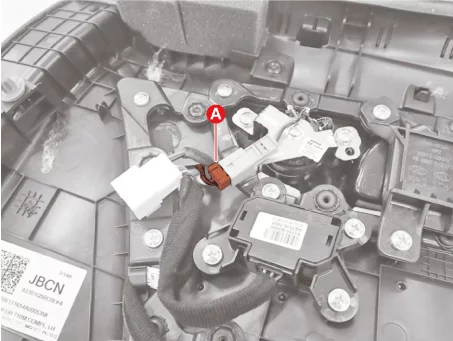
| 4. |
Remove the front tweeter speaker (A) after removing the screws.
|
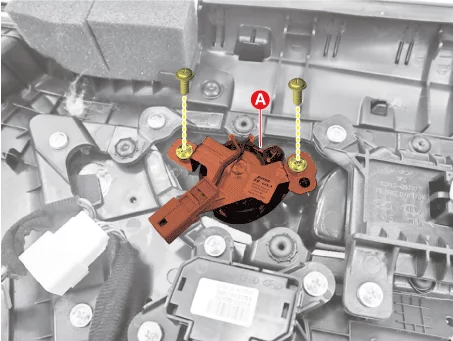
| 1. |
Remove the front door trim.
(Refer to Body - "Front Door Trim")
|
| 2. |
Disconnect the front door speaker connector (A).
|
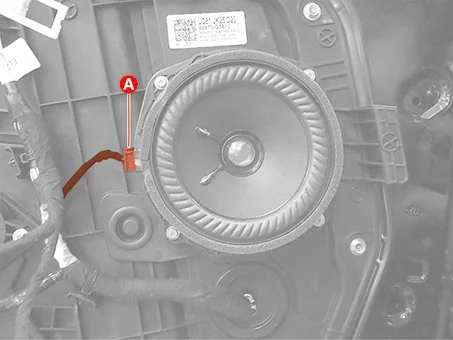
| 3. |
Remove the front door speaker (A) after removing the bolts.
|
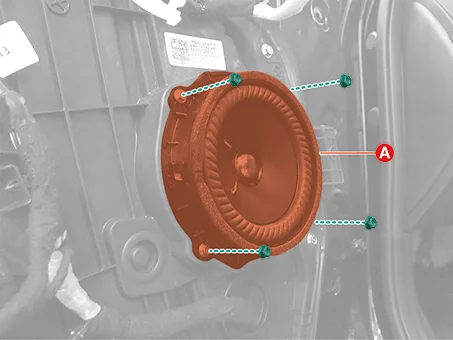
| 1. |
Remove the rear door trim.
(Refer to Body - "Rear Door Trim")
|
| 2. |
Disconnect the rear door speaker connector (A).
|
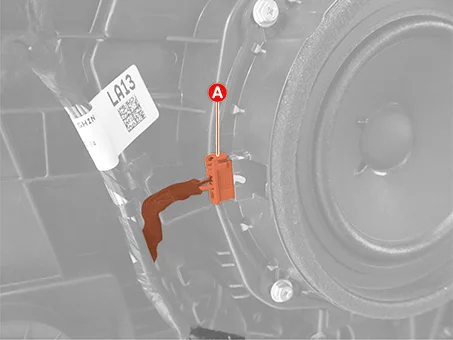
| 3. |
Remove the rear door speaker (A) after removing the bolts.
|
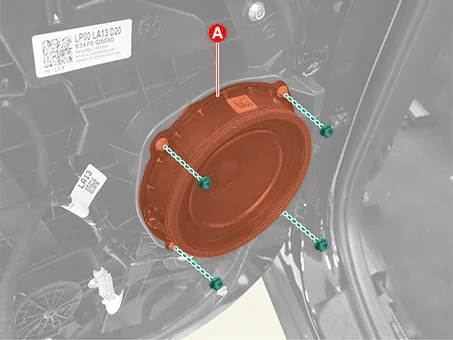
| 1. |
Disconnect the negative ( - ) battery terminal.
|
| 2. |
Remove the luggage side trim [RH].
(Refer to Body - "Luggage Side Trim")
|
| 3. |
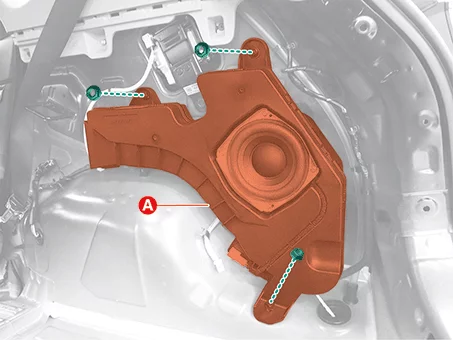
Disconnect the subwoofer speaker connector (A).
|
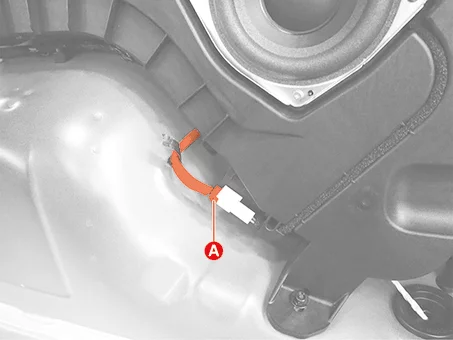
| 4. |
Remove the subwoofer speaker (A) after removing the nuts.
|
| Installation |
| 1. |
Install in reverse order of removal.
|
Speaker Inspection
| Inspection |
| 1. |
Remove the screws to rule out the interference from the body trims and surrounding parts and then remove
the speaker.
|
| 2. |
After removing the speaker, check the sound quality of the speaker with the connector plugged in.
|
| 1. |
Abnormal vibration
|
| 2. |
Noise
|
| 3. |
Malfunctions
|
External AMP Terminal Function
| Connector and Terminal Function |
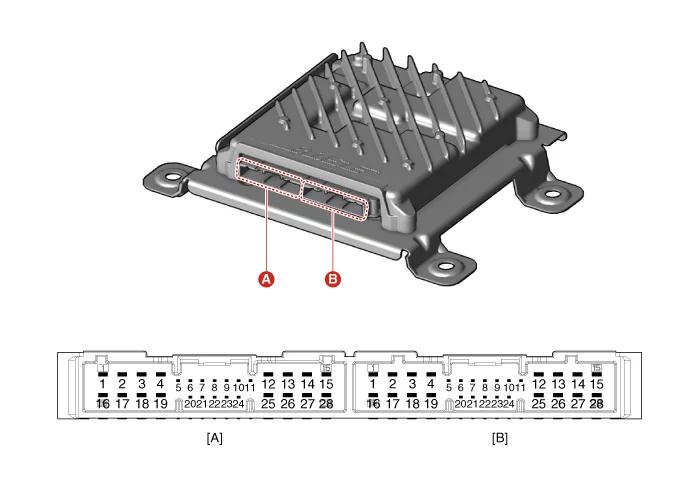
| Terminal |
Function |
|
|
Connector A |
Connector B |
|
|
1 |
Battery (+) |
Driver's tweeter speaker ( + ) |
|
2 |
Battery (+) |
Passenger's tweeter speaker ( + ) |
|
3 |
Battery (+) |
Subwoofer speaker ( + ) |
|
4 |
Battery (+) |
- |
|
5 |
- |
- |
|
6 |
MM-CAN (High) |
- |
|
7 |
MM-CAN (Low) |
External amplifier navigation voice ( + ) |
|
8 |
ACC |
- |
|
9 |
- |
- |
|
10 |
- |
- |
|
11 |
- |
- |
|
12 |
- |
Right rear door speaker ( + ) |
|
13 |
- |
Left rear door speaker ( + ) |
|
14 |
- |
Front center speaker ( + ) |
|
15 |
- |
- |
|
16 |
Ground |
Driver's tweeter speaker ( - ) |
|
17 |
Ground |
Passenger's tweeter speaker ( - ) |
|
18 |
Ground |
Subwoofer speaker ( - ) |
|
19 |
Ground |
- |
|
20 |
External amplifier SPDIF (high) |
- |
|
21 |
External amplifier SPDIF (low) |
External amplifier navigation voice ( - ) |
|
22 |
External amplifier SPDIF (ground) |
- |
|
23 |
- |
- |
|
24 |
IG 1 |
- |
|
25 |
- |
Right rear door speaker ( - ) |
|
26 |
- |
Left rear door speaker ( - ) |
|
27 |
- |
Front center speaker ( - ) |
|
28 |
- |
- |
External AMP Removal and Installation
| Removal |
| 1. |
Remove the front seat assembly [Passenger's seat].
(Refer to Body - "Front Seat Assembly")
|
| 2. |
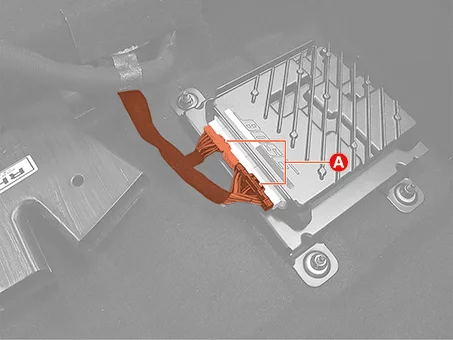
Disconnect the external amplifier connectors (A).
|
| 3. |
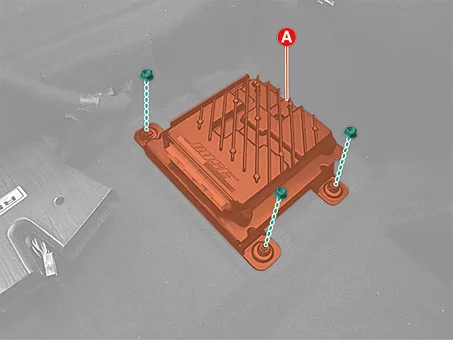
Remove the external amplifier (A) after removing the mounting nuts.
|
| Installation |
| 1. |
Install in reverse order of removal.
|
Multimedia Jack Terminal Function
| Connector and Terminal Function |
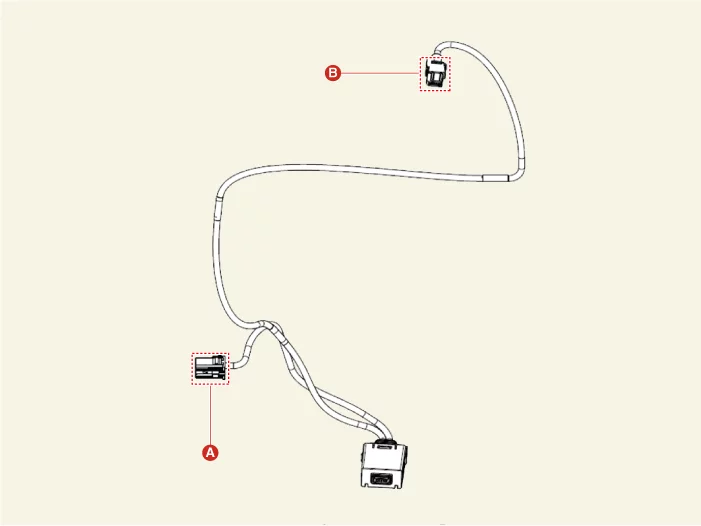
|
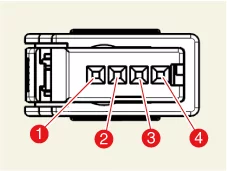
Connector A |
Terminal |
Function |
|
|
1 |
DTC |
|
2 |
- |
|
|
3 |
Illumination ( + ) |
|
|
4 |
Illumination ( - ) |
|
|
5 |
Ground |
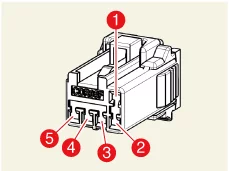
|
Connector B |
Terminal |
Function |
|
|
1 |
USB Ground |
|
2 |
USB Data (High) |
|
|
3 |
USB Data (Low) |
|
|
4 |
USB vcc |
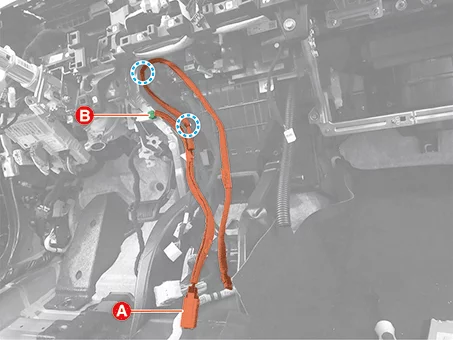
Multimedia Jack Removal and Installation
| Removal |
| 1. |
Remove the main crash pad assembly.
(Refer to Body - "Main Crash Pad Assembly")
|
| 2. |
Remove the multimedia jack.
|
| Installation |
| 1. |
Install in reverse order of removal.
|
Steering Wheel Remote Controller (SWRC) Terminal Function
| Connector and Terminal Function |
| [Audio + Bluetooth + Voice] |
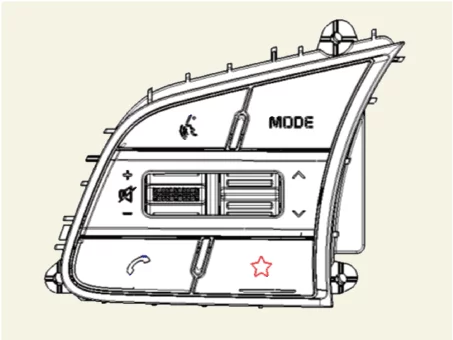
|
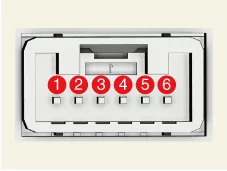
Connector |
Terminal |
Function |
|
|
1 |
Audio switch ( + ) |
|
2 |
- |
|
|
3 |
Illumination ( + ) |
|
|
4 |
- |
|
|
5 |
Illumination ( - ) |
|
|
6 |
Audio switch ( + ) |
| [Trip + SCC + LFA] |
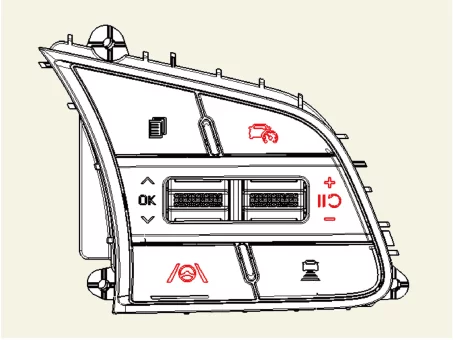
|
Connector |
Terminal |
Function |
|
|
1 |
Trip switch 1 ( + ) |
|
2 |
Trip switch 2 ( + ) |
|
|
3 |
Illumination ( + ) |
|
|
4 |
- |
|
|
5 |
Illumination ( - ) |
|
|
6 |
Trip switch ( - ) |
Steering Wheel Remote Controller (SWRC) Removal and Installation
| Removal |
| 1. |
Remove the steering wheel.
(Refer to Steering System - "Steering Wheel")
|
| 2. |
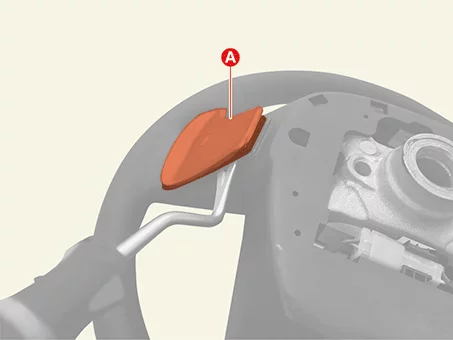
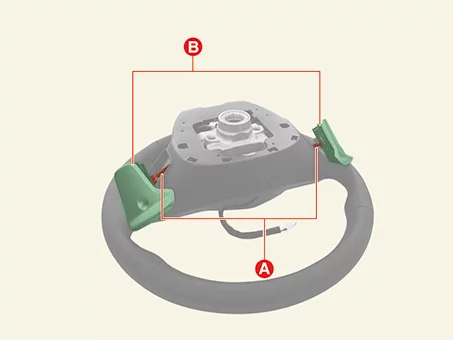
Remove the paddle shifter switches.
|
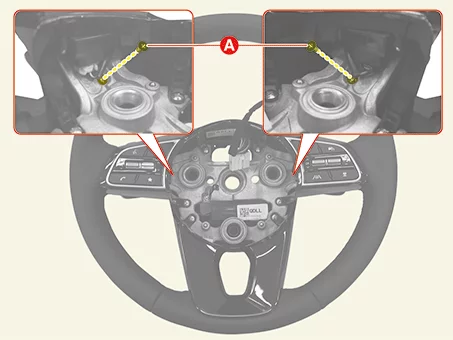
| 3. |
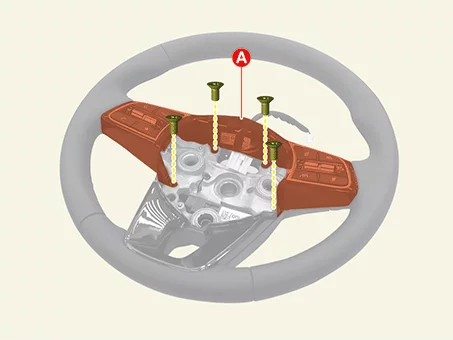
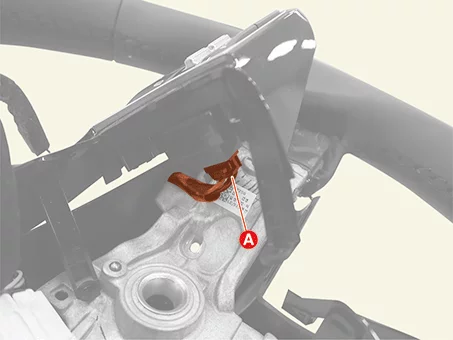
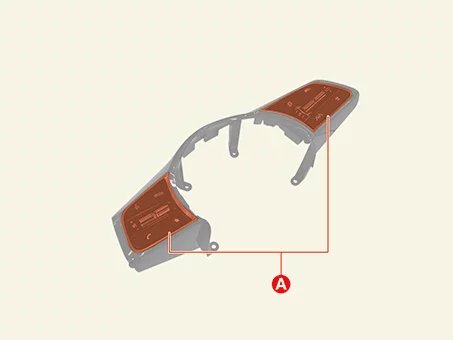
Remove the Steering Wheel Remote Control (SWRC) switch and bezel (A).
|
| 4. |
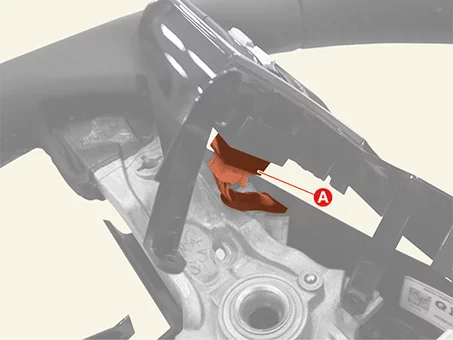
Disconnect the SWRC switch connectors (A).
|
| 5. |
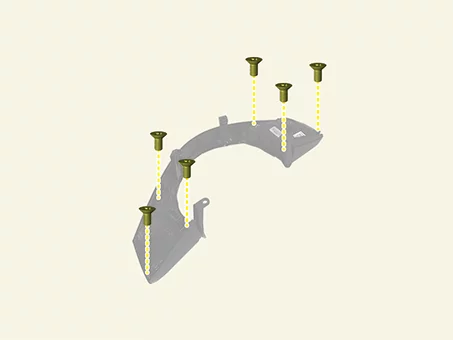
Remove the SWRC (A) after removing the screws.
|
| Installation |
| 1. |
Install in reverse order of removal.
|
Antenna Removal and Installation
| Removal |
| 1. |
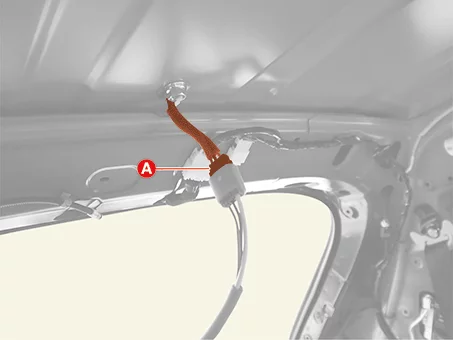
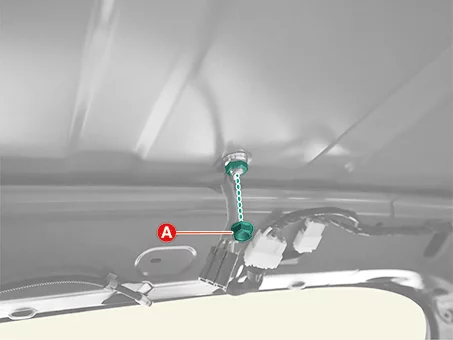
Remove the roof trim assembly.
(Refer to Body - "Roof Trim Assembly")
|
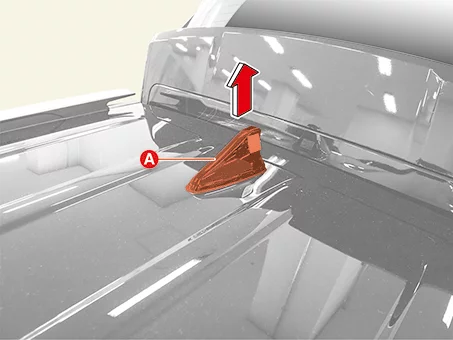
| 2. |
Remove the roof antenna.
|
| 1. |
Remove the audio/AVNT head unit
(Refer to Audio/AVNT System - "Audio/AVNT Head Unit")
|
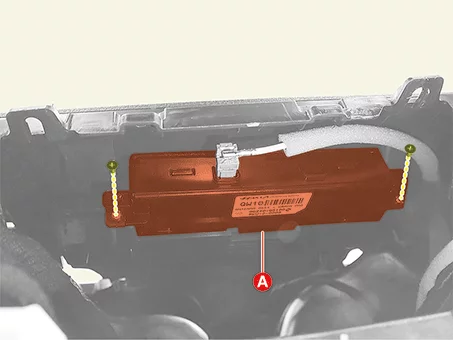
| 2. |
Remove the crash pad antenna (A) after removing the screws.
|
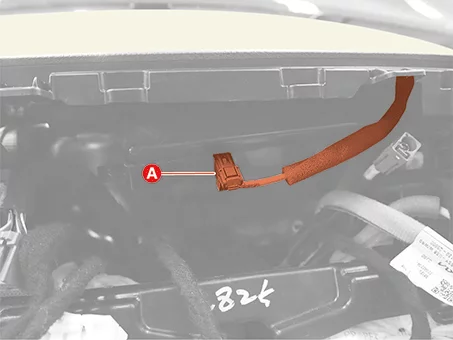
| 3. |
Disconnect the crash pad antenna connector (A).
|
| Installation |
| 1. |
Install in reverse order of removal.
|
Mic Removal and Installation
| Removal |
| 1. |
Remove the overhead console lamp.
(Refer to Lighting System - "Overhead Console Lamp")
|
| 2. |
Remove the handsfree mic (A) after removing the screws.
[LH]
[RH]
|
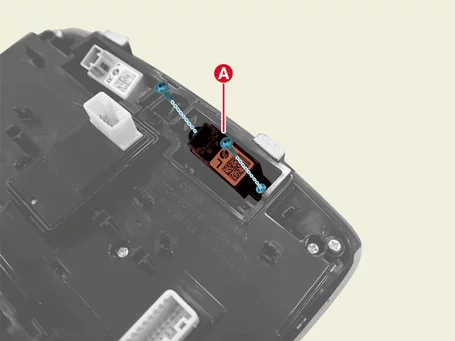
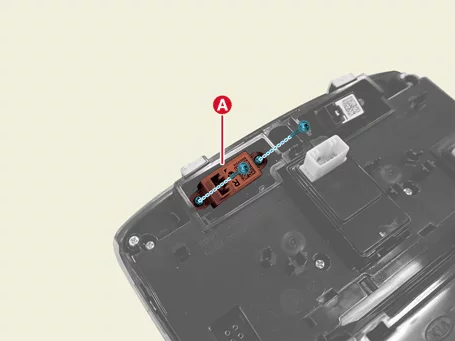
| Installation |
| 1. |
Install in reverse order of removal.
|
Mic Inspection
| Inspection |
| 1. |
Remove the overhead console lamp.
(Refer to Lighting System - "Overhead Console Lamp")
|
| 2. |
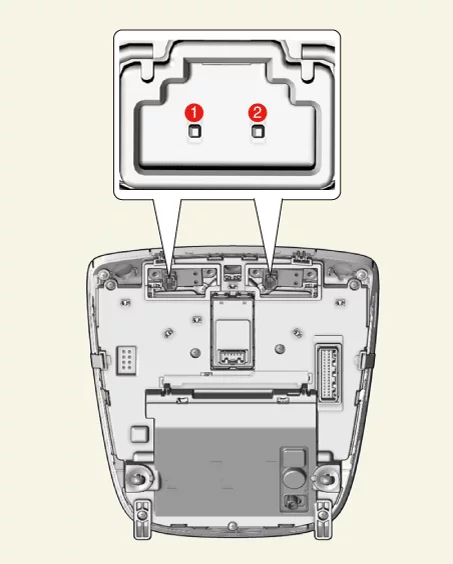
Check the continuity of between terminals.
|


Other information:
Kia Seltos SP2 (2021-2026) Service Manual: Installing a CRS
After selecting the correct child seat for your child, check that it fits properly in the Kia Seltos seating position where it will be used. Follow all instructions provided by the child restraint manufacturer when installing the seat. These general steps can help when installing a CRS in your Kia Seltos: Properly secure the child restraint to the vehicle.Kia Seltos SP2 (2021-2026) Service Manual: Automatic transmission operation
The automatic transmission in the Kia Seltos provides 8 forward speeds and one reverse speed. The transmission selects each gear automatically according to the shift lever position, vehicle speed, engine load, and driving conditions. NOTICE The first several shifts on a new Kia Seltos, or after the battery has been disconnected, may feel slightly abrupt.