Owner's library Kia Seltos Manuals Owner's manual pages, service notes, maintenance references and practical Kia Seltos help in one clean library.

Kia Seltos reference pages

Manuals, maintenance notes and quick owner help.

Find Kia Seltos operating instructions, warning light explanations, service information and owner guidance without digging through a full PDF.

Kia Seltos: Body (Interior and Exterior) / Front Bumper

Contents:

Components and Components Location

Component
Removal and Installation

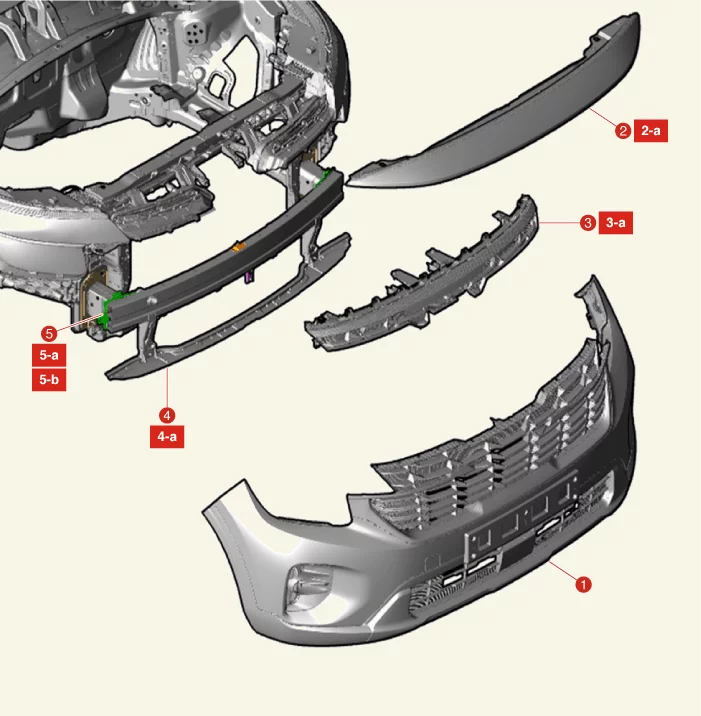
Body (Interior and Exterior) — Front Bumper / Components and Components Location / Component illustration

1. Front Bumper Assembly
2. Radiator Grille Upper Cover
2-a. 8.8 - 12.7 N·m (0.9 - 1.3 kgf·m, 6.5 - 9.4 lb·ft)
3. Radiator Grille Upper Garnish
3-a. 8.8 - 12.7 N·m (0.9 - 1.3 kgf·m, 6.5 - 9.4 lb·ft)
4. Front Bumper Stiffener
4-a. 3.9 - 5.9 N·m (0.4 - 0.6 kgf·m, 2.9 - 4.3 lb·ft, 34.7 - 52.1 lb·in)
5. Front Bumper Beam Assembly
5-a. 21.6 - 26.5 N·m (2.2 - 2.7 kgf·m, 15.9 - 19.5 lb·ft)
5-b. 3.9 - 5.9 N·m (0.4 - 0.6 kgf·m, 2.9 - 4.3 lb·ft, 34.7 - 52.1 lb·in)

Disassembly and Reassembly

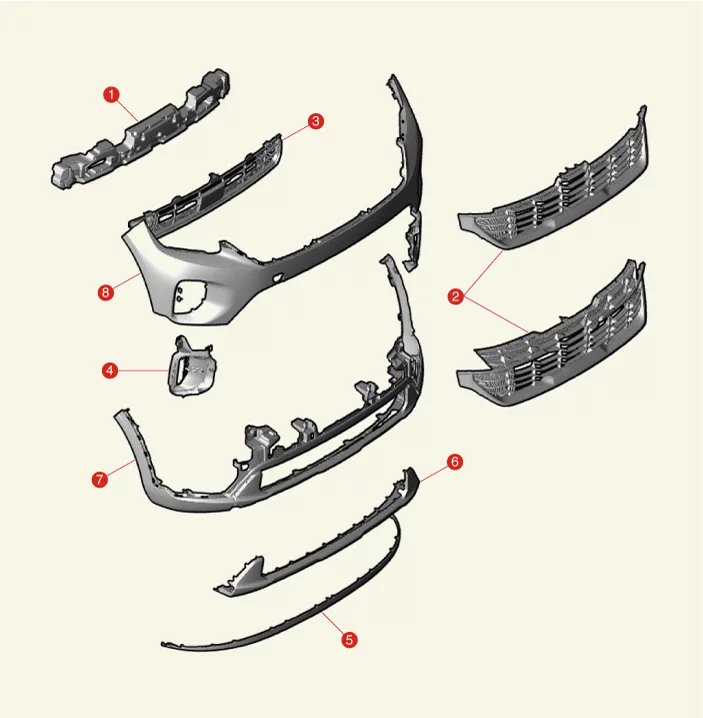
Body (Interior and Exterior) — Front Bumper / Components and Components Location / Component illustration

1. Front Bumper Energy Absorber
2. Radiator Grille
3. Front Bumper Grille
4. Front Bumper Fog Lamp Cover
5. Front Bumper Lip
6. Front Bumper Skid Plate
7. Front Bumper Lower Cover
8. Front Bumper Upper Cover

Front Bumper Assembly Removal and Installation

Removal
Front Bumper Assembly
1.
Disconnect the battery negative ( - ) terminal.
2.
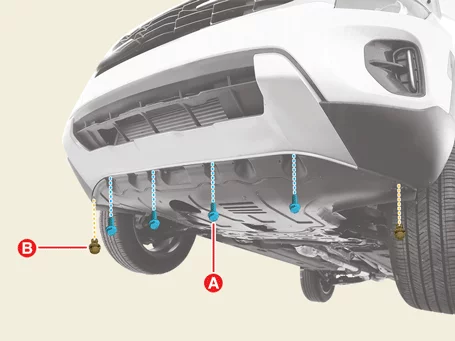
Remove the engine room under cover bolts (A) and clips (B).

Body (Interior and Exterior) — Front Bumper / Front Bumper Assembly / Removal and Installation / Removal illustration

3.
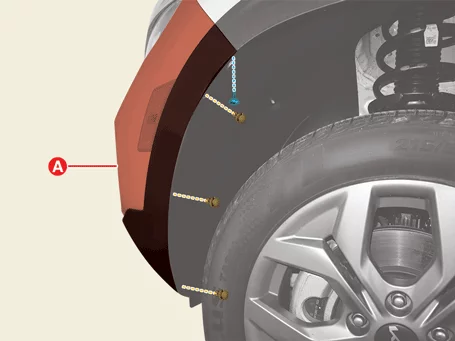
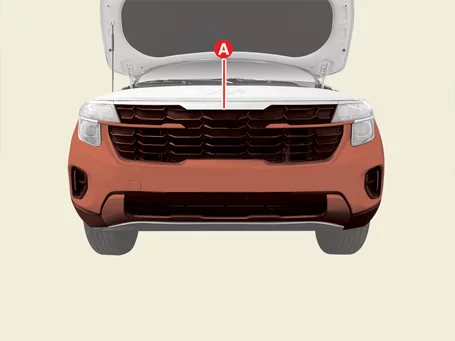
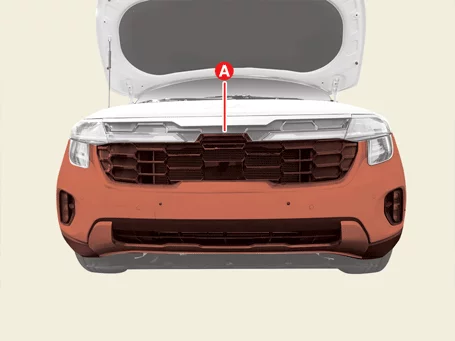
Separate the left and right sides of the front bumper (A) after removing the screw and clips.

Body (Interior and Exterior) — Front Bumper / Front Bumper Assembly / Removal and Installation / Removal illustration

4.
Remove the front bumper assembly (A).
[Standard Type]

Body (Interior and Exterior) — Front Bumper / Front Bumper Assembly / Removal and Installation / Removal illustration

[Option Type]

Body (Interior and Exterior) — Front Bumper / Front Bumper Assembly / Removal and Installation / Removal illustration

Note    
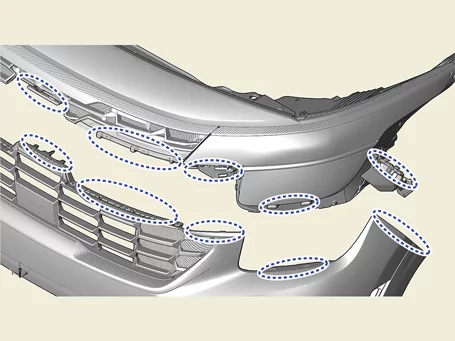
Avoid damage to the front bumper clips and hooks.

Body (Interior and Exterior) — Front Bumper / Front Bumper Assembly / Removal and Installation / Removal illustration

Information    
Clip position :

Body (Interior and Exterior) — Front Bumper / Front Bumper Assembly / Removal and Installation / Removal illustration

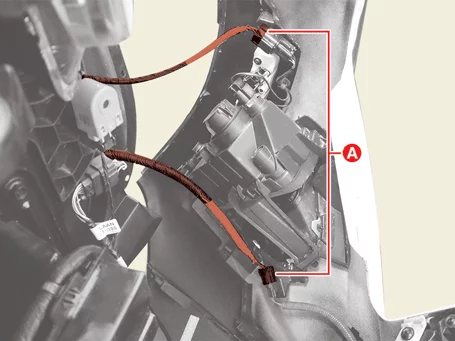
5.
Disconnect the front bumper connectors (A).

Body (Interior and Exterior) — Front Bumper / Front Bumper Assembly / Removal and Installation / Removal illustration

Radiator Grille Upper Cover
1.
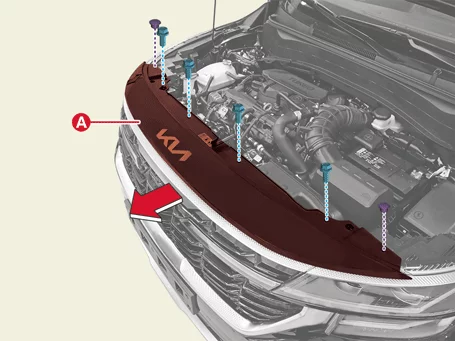
Remove the radiator grille upper cover (A) in the direction of the arrow after removing the bolts and clips.

Tightening torque :
8.8 - 12.7 N·m (0.9 - 1.3 kgf·m, 6.5 - 9.4 lb·ft)

Body (Interior and Exterior) — Front Bumper / Front Bumper Assembly / Removal and Installation / Removal illustration

Body (Interior and Exterior) — Front Bumper / Front Bumper Assembly / Removal and Installation / Removal illustration

Information    
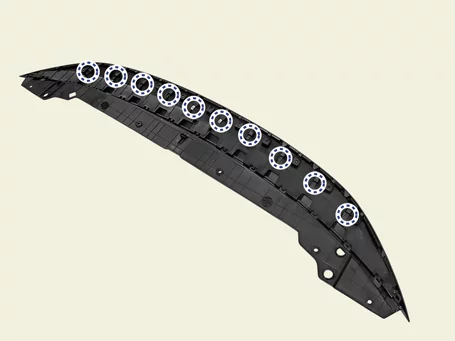
Clip position :

Body (Interior and Exterior) — Front Bumper / Front Bumper Assembly / Removal and Installation / Removal illustration

Radiator Grille Upper Garnish
1.
Remove the front bumper assembly.
2.
Remove the radiator grille upper cover.
3.
Remove the radiator grille upper garnish.
[Standard Type]
(1)
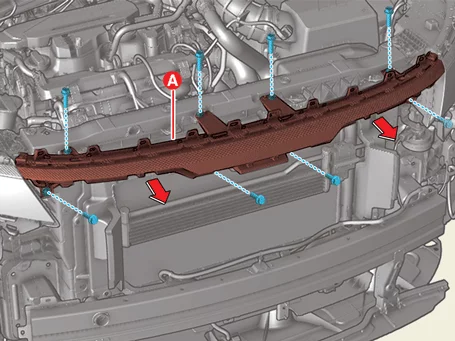
Remove the radiator grille upper garnish (A) in the direction of the arrow after removing the bolts.

Tightening torque :
8.8 - 12.7 N·m (0.9 - 1.3 kgf·m, 6.5 - 9.4 lb·ft)

Body (Interior and Exterior) — Front Bumper / Front Bumper Assembly / Removal and Installation / Removal illustration

[Option Type]
(1)
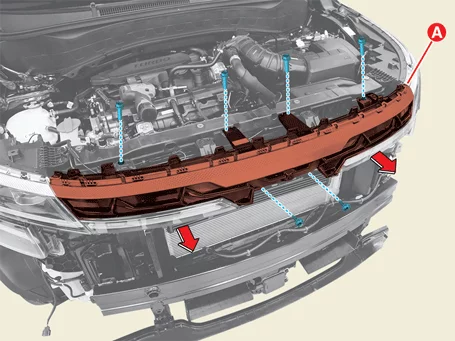
Remove the radiator grille upper garnish (A) in the direction of the arrow after removing the bolts and screws.

Tightening torque :
8.8 - 12.7 N·m (0.9 - 1.3 kgf·m, 6.5 - 9.4 lb·ft)

Body (Interior and Exterior) — Front Bumper / Front Bumper Assembly / Removal and Installation / Removal illustration

Installation
1.
Install in reverse order of removal.

Front Bumper Assembly Disassembly and Reassembly

Disassembly
1.
Remove the fog lamp.
(Refer to Body Electrical System - "Fog Lamp")
2.
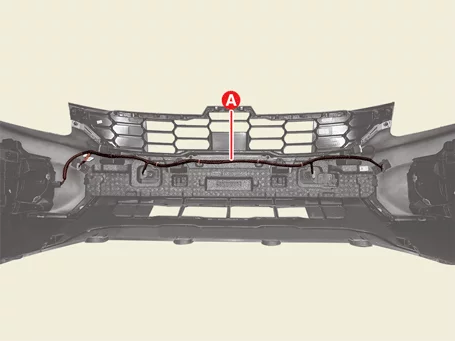
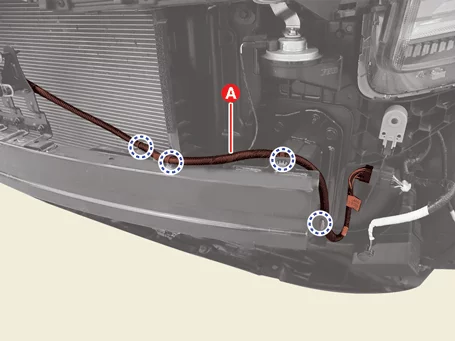
Remove the front bumper wiring harness (A).

Body (Interior and Exterior) — Front Bumper / Front Bumper Assembly / Disassembly and Reassembly / Disassembly illustration

3.
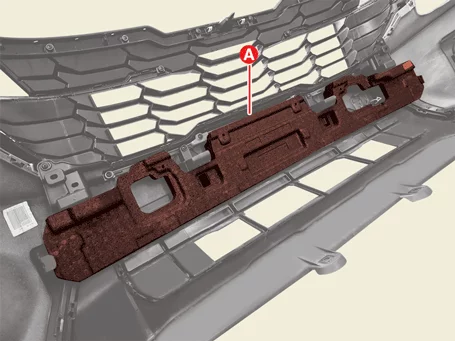
Remove the energy absorber (A).

Body (Interior and Exterior) — Front Bumper / Front Bumper Assembly / Disassembly and Reassembly / Disassembly illustration

4.
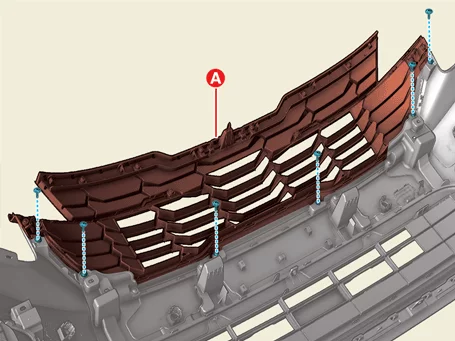
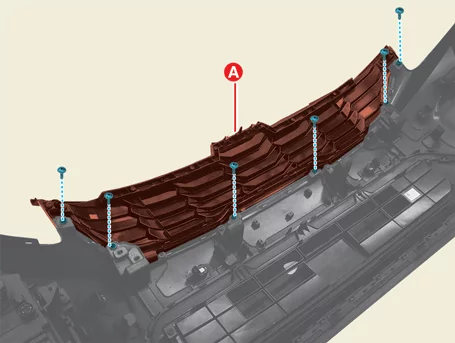
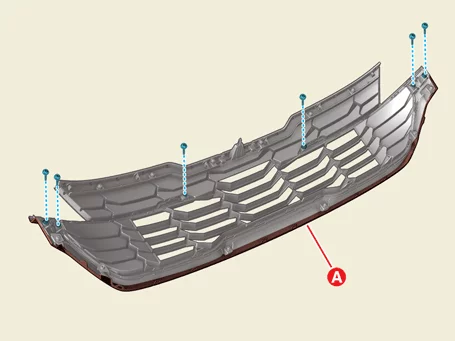
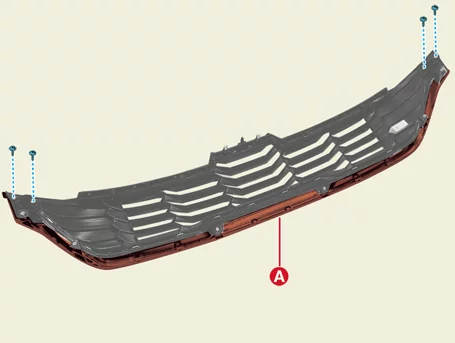
Remove the radiator grille (A) after removing the screws.
[Standard Type]

Body (Interior and Exterior) — Front Bumper / Front Bumper Assembly / Disassembly and Reassembly / Disassembly illustration

[Option Type]

Body (Interior and Exterior) — Front Bumper / Front Bumper Assembly / Disassembly and Reassembly / Disassembly illustration

5.
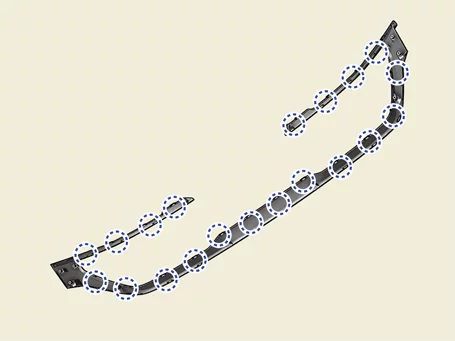
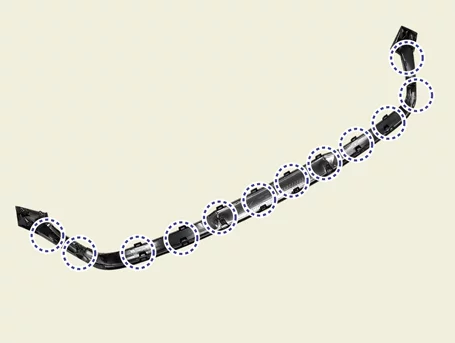
Remove the radiator molding (A) after removing the screws.
[Standard Type]

Body (Interior and Exterior) — Front Bumper / Front Bumper Assembly / Disassembly and Reassembly / Disassembly illustration

Body (Interior and Exterior) — Front Bumper / Front Bumper Assembly / Disassembly and Reassembly / Disassembly illustration

Information    
Clip position :

Body (Interior and Exterior) — Front Bumper / Front Bumper Assembly / Disassembly and Reassembly / Disassembly illustration

[Option Type]

Body (Interior and Exterior) — Front Bumper / Front Bumper Assembly / Disassembly and Reassembly / Disassembly illustration

Body (Interior and Exterior) — Front Bumper / Front Bumper Assembly / Disassembly and Reassembly / Disassembly illustration

Information    
Clip position :

Body (Interior and Exterior) — Front Bumper / Front Bumper Assembly / Disassembly and Reassembly / Disassembly illustration

6.
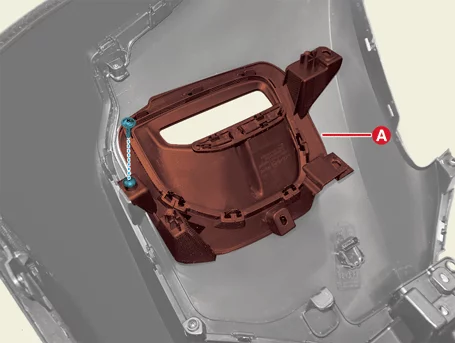
Remove the fog lamp cover (A) after removing the screw.

Body (Interior and Exterior) — Front Bumper / Front Bumper Assembly / Disassembly and Reassembly / Disassembly illustration

7.
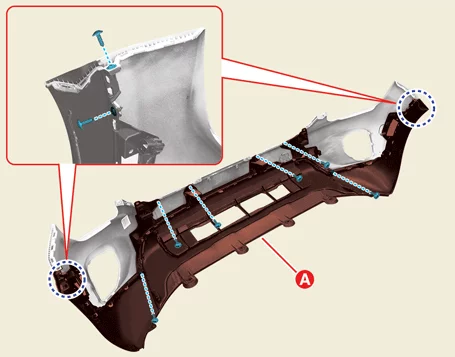
Remove the front bumper lower cover (A) after removing the screws.

Body (Interior and Exterior) — Front Bumper / Front Bumper Assembly / Disassembly and Reassembly / Disassembly illustration

8.
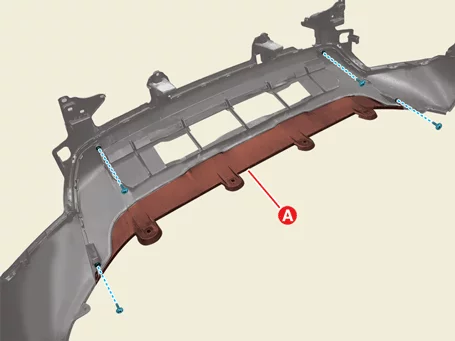
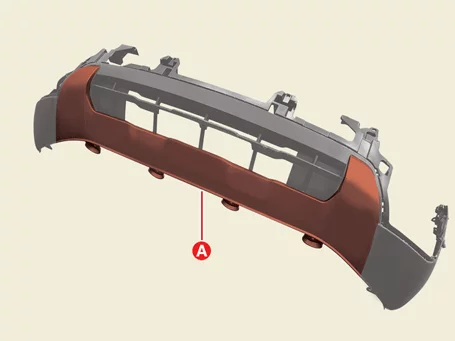
Remove the front bumper skid plate (A) after removing the screws.

Body (Interior and Exterior) — Front Bumper / Front Bumper Assembly / Disassembly and Reassembly / Disassembly illustration

Body (Interior and Exterior) — Front Bumper / Front Bumper Assembly / Disassembly and Reassembly / Disassembly illustration

Reassembly
1.
Reassemble in the reverse order of disassembly.

Front Bumper Beam Assembly Removal and Installation

Removal
Front Bumper Beam Assembly
1.
Remove the front bumper assembly.
(Refer to Front Bumper - "Front Bumper Assembly")
2.
Remove the front radar.
(Refer to Advanced Driver Assistance System (ADAS) - "Front Radar")
3.
Remove the ambient temperature sensor.
(Refer to Heating,Ventilation And Air Conditioning - "Ambient Temperature Sensor")
4.
Separate the front bumper beam wiring (A).

Body (Interior and Exterior) — Front Bumper / Front Bumper Beam Assembly / Removal and Installation / Removal illustration

5.
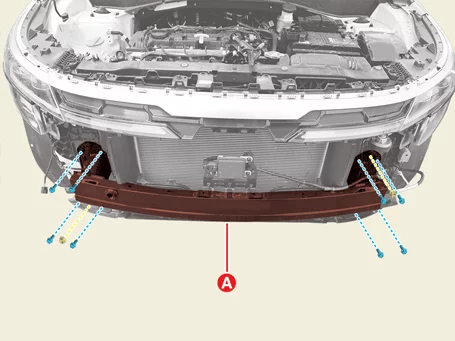
Remove the front bumper beam assembly (A) after removing the bolts and nuts.

Tightening torque
Bolt : 21.6 - 26.5 N·m (2.2 - 2.7 kgf·m, 15.9 - 19.5 lb·ft)
Nut : 3.9 - 5.9 N·m (0.4 - 0.6 kgf·m, 2.9 - 4.3 lb·ft)

Body (Interior and Exterior) — Front Bumper / Front Bumper Beam Assembly / Removal and Installation / Removal illustration

Installation
1.
Install in reverse order of removal.
Note    
Installation/calibration is required when reinstalled after the front radar is removed.
(Refer to Advanced Driver Assistance System (ADAS) - "Front Radar")

Other information:

Kia Seltos SP2 (2021-2026) Service Manual: Windows

The doors of the Kia Seltos are equipped with power windows that can be operated using the window switches. The power window system provides convenient control for the driver and passengers, while the driver can also restrict rear window operation when needed. Driver's door power window switch Front passenger's door power window switch Rear door left power window switch Rear door right power window switch Window opening and closing Automatic power window up*/down* Power window lock switch *: if equipped NOTICE In cold and wet weather, the power windows may not operate properly because of freezing conditions.

Kia Seltos SP2 (2021-2026) Service Manual: Automatic transmission operation

The automatic transmission in the Kia Seltos provides 8 forward speeds and one reverse speed. The transmission selects each gear automatically according to the shift lever position, vehicle speed, engine load, and driving conditions. NOTICE The first several shifts on a new Kia Seltos, or after the battery has been disconnected, may feel slightly abrupt.