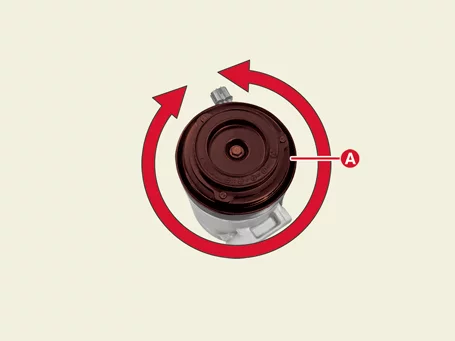
Owner's library Kia Seltos Manuals Owner's manual pages, service notes, maintenance references and practical Kia Seltos help in one clean library.

Kia Seltos reference pages

Manuals, maintenance notes and quick owner help.

Find Kia Seltos operating instructions, warning light explanations, service information and owner guidance without digging through a full PDF.

Kia Seltos: Heating,Ventilation And Air Conditioning / Air conditioning System

Contents:

General Safety Information and Caution ➤

Description and Operation

Description and Operation
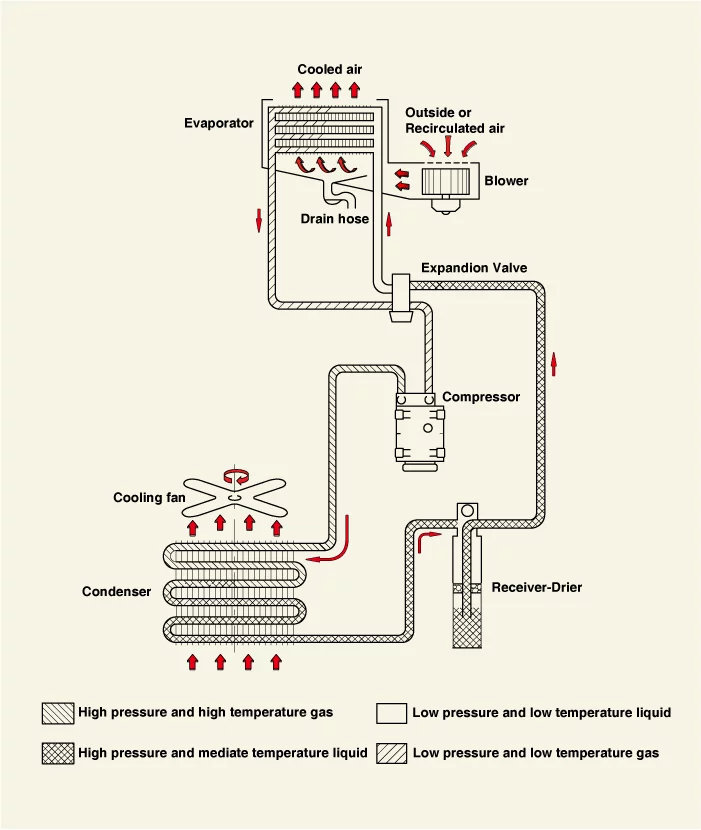
The component of the air conditioner is basically as shown in the figure below. As the refrigerant circulates between each part, it continuously changes to liquid → gas → liquid, creating a cooling effect.

Heating,Ventilation And Air Conditioning — Air conditioning System / Description and Operation illustration

Information    
•
Evaporator : Atomized refrigerant evaporates into gas while taking heat away from the surroundings the action of the blower fan. (The surroundings will be cooled.)
•
Blower : Feeds air in the vehicle under pressure to the evaporator and feeds cooled air into the vehicle.
•
Expansion valve : Allows the refrigerant to rapidly expand into low pressure and low temperature liquid. (atomized)
•
Compressor : Low pressure (low temperature) gas into high pressure (high temperature) gas and supply it to the condenser.
•
Condenser : This is installed in front of the radiator, It cools high pressure and high temperature refrigerant to its condensation point and returns it to high pressure liquid.
•
Receiver drier : This is a single body type with the condenser and installed at the side of the condenser, It stores refrigerant and removes water and foreign material in the refrigerant.

Refrigerant Recovery/Recycling/Charging/Vacuum/Leak Test

Refrigerant Recovery/Recycling/Charging/Vacuum (R-1234yf)
Equipped with R-1234yf recovery/recycling/charging equipment
1.
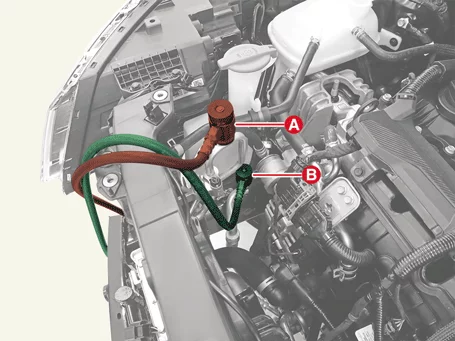
Connect the R-1234yf recovery/recycling/charging equipment to the high-pressure service port (A) and low-pressure service port (B) by reading the refrigerant recovery/recycling/charging equipment instruction manual.

Heating,Ventilation And Air Conditioning — Air conditioning System / Refrigerant Recovery/Recycling/Charging/Vacuum/Leak Test / Refrigerant Recovery/Recycling/Charging/Vacuum (R-1234yf) illustration

Note    
Refrigerant charging equipment should be installed on a flat surface so that it is easy to recover the refrigerant and in particular, the refrigerant can be accurately injected.
Refrigerant recovery operation
1.
With the high and low pressure valves open, the refrigerant is recovered by using R-1234yf recovery/recycling/charging equipment.
Note    
•
Refrigerant recovery too quickly causes compressor oil to drain from the system.
•
Never disconnect the air conditioning system until the refrigerant has been completely recovered. If it is separated before the recovery of the refrigerant is completed, the refrigerant and oil are discharged into the vehicle by the pressure in the air conditioner system, which causes contamination.
•
Refrigerant recovery must be performed with the high and low pressure valves opened. If only one valve is opened, the refrigerant recovery time increases.
2.
Measure the amount of compressor oil drained from the air conditioner system after the recovery operation is completed. Supplement the compressor oil drained when charging the air conditioner refrigerant.
Refrigerant system vacuum operation
Note    
When charging the refrigerant, the air conditioner system must be evacuated. This evacuating operation is performed to remove all the air and moisture that have flowed into the unit, and the system vacuums for more than 10 minutes after each part is installed.
1.
Perform the vacuum by using R-1234yf recovery/recycling/charging equipment while the high and low pressure valves open.
2.
If the gauge remains in the vacuum zone for 10 minutes while the high and low pressure valves closed, vacuum has been performed normally. If the pressure increases, it is a leak in the system, so repair the leak by the following order.
(1)
Charging the system with refrigerant charging equipment. (Refer to Refrigerant charging)
(2)
Check the refrigerant leak with leak detector and repair if leak is found. (Refer to Refrigerant leak test)
(3)
Drain the refrigerant again and evacuate the system.
3.
After evacuating for more than 10 minutes, check the vacuum and close both high and low pressure valves. This state is ready for charging.
Note    
Compressor oil must be applied to the O-ring when assembling air conditioner parts, and cleanliness must be maintained to avoid foreign substances, especially gloves.
Refrigerant charge
1.
Replenish the amount of discharged compressor oil by using R-1234yf recovery/recycling/charging equipment while the high pressure valve is opened after evacuating the air conditioner system.
Note    
If additional oil is not added when charging the refrigerant, the lubricity deteriorates due to insufficient oil in the system, which cause problem such as compressor sticking.
2.
Charge the refrigerant with specified amount while the high-pressure valve open by using the R-1234yf recovery/recycling/charging equipment and then close the high-pressure valve.

Regulated refrigerant amount : 450 ± 25 g (15.9 ± 0.88 oz.)

Note    
Do not overcharge the refrigerant as there is a risk of damage to the compressor.
3.
Check that the refrigerant is not leaking from the system with leak detector. (Refer to refrigerant leak test)
Refrigerant leak test
When a refrigerant leak is suspected or the connection part is disassembled or loosened, perform the leak test with an electronic leak detector.
1.
Check the torque of the connection part, and if it is too loose, check the gas leak with leak detector after tightening it to the specified tightening torque.
2.
If leakage continues even after re-tightening the connection part, drain the refrigerant and separate the connection part to check the contact surface for damage. If there is even a small damage, replace it with a new one.
3.
Check the compressor oil and add oil if necessary.
4.
Charging the system and check for gas leakage. If there is no problem, evacuate the system before charging.

Components and Components Location

Component
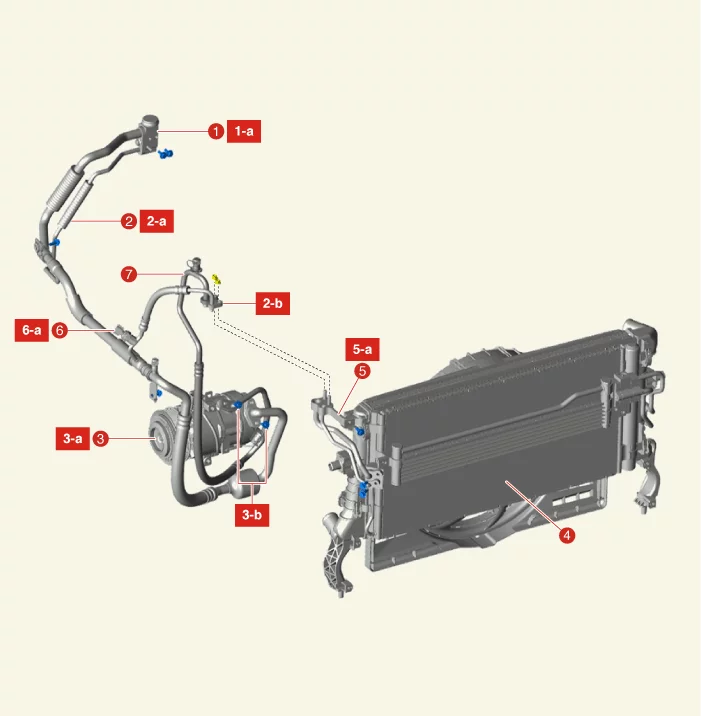
G 1.6 T-GDI GAMMA II

Heating,Ventilation And Air Conditioning — Air conditioning System / Components and Components Location / Component illustration

1. Expansion Valve
1-a. 8.8 - 13.7 N·m (0.9 - 1.4 kgf·m, 6.5 - 10.1 lb·ft)
2. Suction & Liquid Hose Assembly
2-a. 7.8 - 11.8 N·m (0.8 - 1.2 kgf·m, 5.8 - 8.7 lb·ft)
2-b. 19.6 - 23.5 N·m (2.0 - 2.4 kgf·m, 14.5 - 17.4 lb·ft)
3. Compressor
3-a. 19.6 - 33.3 N·m (2.0 - 3.4 kgf·m, 14.5 - 24.6 lb·ft)
3-b. 19.6 - 23.5 N·m (2.0 - 2.4 kgf·m, 14.5 - 17.4 lb·ft)
4. Condenser
5. Condenser Pipe
5-a. 8.8 - 13.7 N·m (0.9 - 1.4 kgf·m, 6.5 - 10.1 lb·ft)
6. A/C Pressure Transducer
6-a. 9.8 - 11.8 N·m (1.0 - 1.2 kgf·m, 7.2 - 8.7 lb·ft)
7. Discharge Hose Assembly


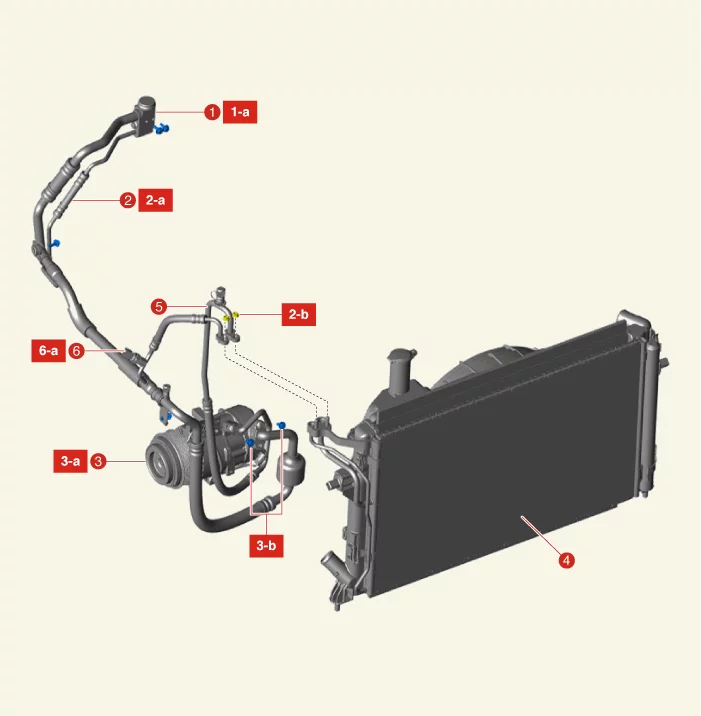
G 2.0 MPI NU

Heating,Ventilation And Air Conditioning — Air conditioning System / Components and Components Location / Component illustration

1. Expansion Valve
1-a. 8.8 - 13.7 N·m (0.9 - 1.4 kgf·m, 6.5 - 10.1 lb·ft)
2. Suction & Liquid Hose Assembly
2-a. 7.8 - 11.8 N·m (0.8 - 1.2 kgf·m, 5.8 - 8.7 lb·ft)
2-b. 19.6 - 23.5 N·m (2.0 - 2.4 kgf·m, 14.5 - 17.4 lb·ft)
3. Compressor
3-a. 19.6 - 33.3 N·m (2.0 - 3.4 kgf·m, 14.5 - 24.6 lb·ft)
3-b. 19.6 - 23.5 N·m (2.0 - 2.4 kgf·m, 14.5 - 17.4 lb·ft)
4. Condenser
5. Discharge Hose Assembly
6. A/C Pressure Transducer
6-a. 9.8 - 11.8 N·m (1.0 - 1.2 kgf·m, 7.2 - 8.7 lb·ft)


On Vehicle Inspection

On Vehicle Inspection
Diagnosis with KDS
1.
The heating,ventilation and air conditioning system can be more quickly diagnosed for problems with the KDS (Refer to "DTC guide").
(1)
Self diagnosis : Inspect the Diagnostic Trouble Code (DTC) with the KDS.
(Refer to DTC guide when fault code is found.)
Information    
Refer to the KDS screen for operating conditions and details.

Compressor Oil Inspection

Oil inspection
Oil is used to lubricate the compressor. Since the oil circulates into the system during operation of the compressor, the oil must be replenished to maintain the total amount of the original oil when replacing the parts in the system or when a large amount of gas is leaked.

Total amount of oil in the system : TOTAL Planetelf PAG K 30, 120 ± 10g (4.23 ± 0.35 oz.)

1.
Oil handling tips
(1)
Prevent moisture, dust and metal particles from entering the oil.
(2)
Do not mix oil.
(3)
If the oil is left in the air for a long time after using it, the oil absorbs moisture, so be sure to close the container immediately after use.
2.
Oil return operation
When checking and adjusting the oil level, set the control set to maximum cooling, maximum blower speed and allow the engine to idle for 20 to 30 minutes to restore oil to the compressor.
3.
Before putting oil into the compressor in use, the compressor oil must be checked in the following order.
(1)
Stop the engine after performing the oil return operation, drain the refrigerant and then remove the compressor from the vehicle.
(2)
Drain the oil from the air conditioning system line connection part.
Note    
It is often difficult to drain the oil when the compressor is cooled. In this case, heat the compressor a little (about 40 - 50°C (104 - 122°F)) before draining the oil.
(3)
Measure the amount of drained oil. If the capacity of less than 70 cc (2.37 oz.), the oil has leaked, so perform a leak test at the connection part of each system and repair or replace the defective part if necessary.
(4)
Adjust the oil level after checking the oil for contamination.
Amount of drained oil
Adjustment method
70 cc (2.37 oz.) or above
Since the oil level is normal, add the amount of oil drained.
Below 70 cc (2.37 oz.)
Since the oil level is low, fill it up to 70 cc (2.37 oz.).

4.
Oil filling when replacing the parts.
–
Oil replenishment is performed according to the weight difference between the old and new parts.
Information    
Perform oil replenishment by referring to the table below if weight comparison is not possible.
Amount of drained oil
Oil replenishment capacity [cc (oz.)]
Evaporator core
50 (1.76)
Condenser
30 (1.06)
Receiver drier
30 (1.06)
Suction & liquide hose assembly
10 (0.35)
Discharge hose
10 (0.35)

Refrigerant Line Removal and Installation

Removal
Suction & Liquid Hose Assembly
[G 1.6 T-GDI GAMMA II]
1.
If the compressor is operable, run the engine at idle speed, and let the air conditioner operates for a few minutes, then shut the engine off.
2.
Disconnect the battery negative ( - ) terminal.
3.
Recover the refrigerant with Recovery/Recycling/Charging equipment.
(Refer to Air conditioning System - "Refrigerant Recovery/Recycling/Charging/Vacuum/Leak Test")
4.
Remove the engine room under cover.
(Refer to Engine Mechanical System - "Engine Room Under Cover")
5.
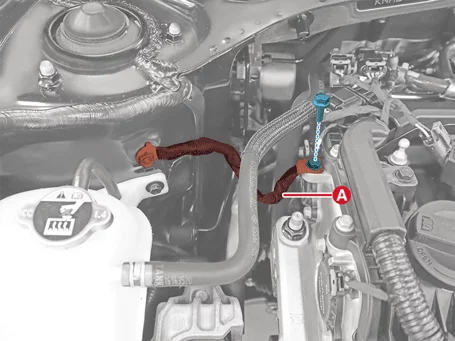
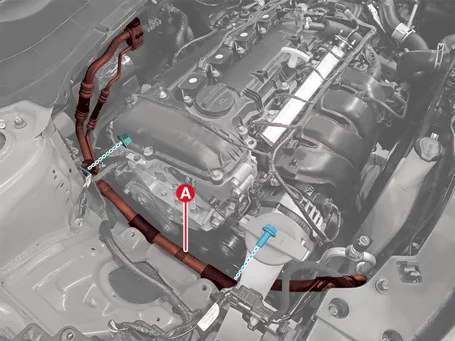
Separate the engine ground cable (A) after removing the bolt.

Tightening torque :
10.8 - 13.7 N·m (1.1 - 1.4 kgf·m, 8.0 - 10.1 lb·ft)

Heating,Ventilation And Air Conditioning — Air conditioning System / Refrigerant Line / Removal and Installation / Removal illustration

6.
Remove the engine mounting bracket.
(Refer to Engine Mechanical System - "Engine Mounting")
7.
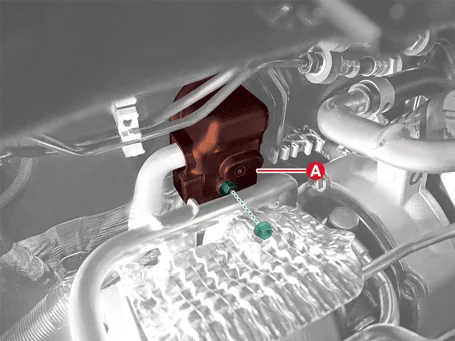
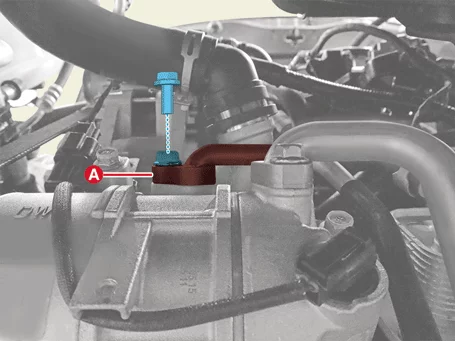
Remove the expansion valve cover (A) after removing the nut.

Tightening torque :
8.8 - 13.7 N·m (0.9 - 1.4 kgf·m, 6.5 - 10.1 lb·ft)

Heating,Ventilation And Air Conditioning — Air conditioning System / Refrigerant Line / Removal and Installation / Removal illustration

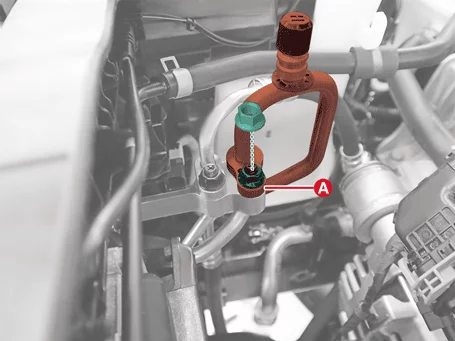
8.
Remove the expansion valve (A) from the evaporator core after removing the bolts.

Tightening torque :
8.8 - 13.7 N·m (0.9 - 1.4 kgf·m, 6.5 - 10.1 lb·ft)

Heating,Ventilation And Air Conditioning — Air conditioning System / Refrigerant Line / Removal and Installation / Removal illustration

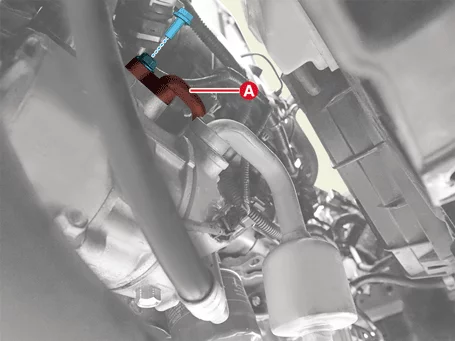
9.
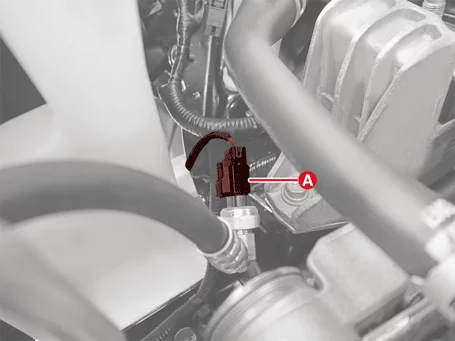
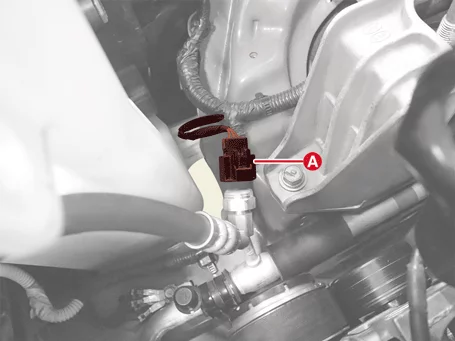
Disconnect the A/C pressure transducer connector (A).

Heating,Ventilation And Air Conditioning — Air conditioning System / Refrigerant Line / Removal and Installation / Removal illustration

10.
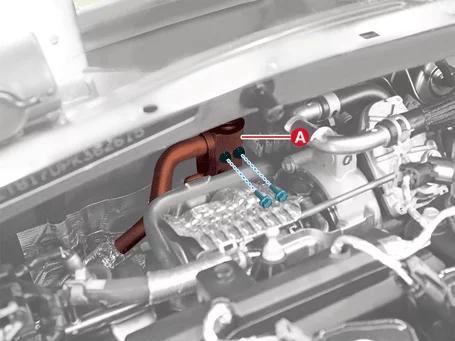
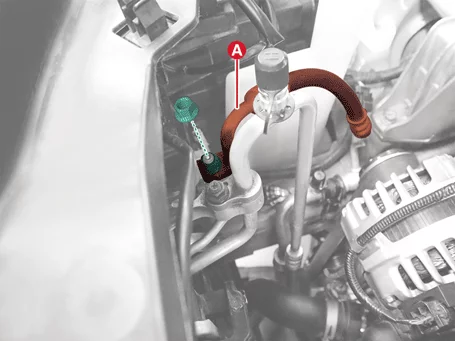
Separate the suction & liquid hose assembly (A) after removing the nut.

Tightening torque :
19.6 - 23.5 N·m (2.0 - 2.4 kgf·m, 14.5 - 17.4 lb·ft)

Heating,Ventilation And Air Conditioning — Air conditioning System / Refrigerant Line / Removal and Installation / Removal illustration

11.
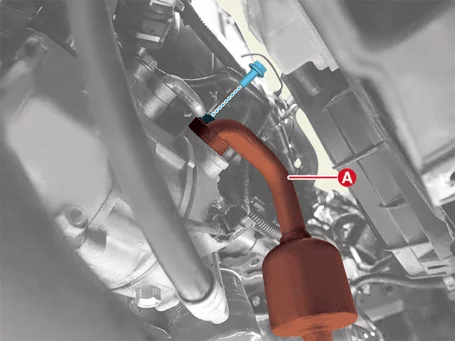
Separate the suction & liquid hose assembly (A) after removing the bolt.

Tightening torque :
19.6 - 23.5 N·m (2.0 - 2.4 kgf·m, 14.5 - 17.4 lb·ft)

Heating,Ventilation And Air Conditioning — Air conditioning System / Refrigerant Line / Removal and Installation / Removal illustration

12.
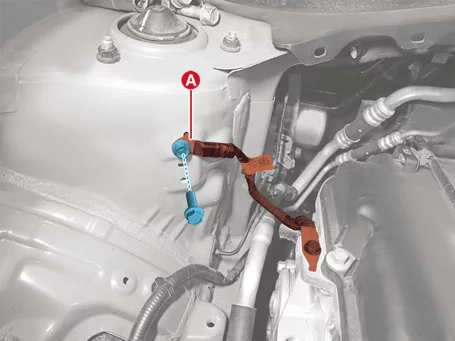
Remove the suction & liquid hose assembly (A) after removing the bolt and nut.

Tightening torque :
7.8 - 11.8 N·m (0.8 - 1.2 kgf·m, 5.8 - 8.7 lb·ft)

Heating,Ventilation And Air Conditioning — Air conditioning System / Refrigerant Line / Removal and Installation / Removal illustration

[G 2.0 MPI NU]
1.
If the compressor is operable, run the engine at idle speed, and let the air conditioner operates for a few minutes, then shut the engine off.
2.
Disconnect the battery negative ( - ) terminal.
3.
Recover the refrigerant with Recovery/Recycling/Charging equipment.
(Refer to Air conditioning System - "Refrigerant Recovery/Recycling/Charging/Vacuum/Leak Test")
4.
Remove the engine room under cover.
(Refer to Engine Mechanical System - "Engine Room Under Cover")
5.
Remove the engine mounting bracket.
(Refer to Engine Mechanical System - "Engine Mounting")
6.
Remove the expansion valve (A) from the evaporator core after removing the bolts.

Tightening torque :
8.8 - 13.7 N·m (0.9 - 1.4 kgf·m, 6.5 - 10.1 lb·ft)

Heating,Ventilation And Air Conditioning — Air conditioning System / Refrigerant Line / Removal and Installation / Removal illustration

7.
Disconnect the A/C pressure transducer connector (A).

Heating,Ventilation And Air Conditioning — Air conditioning System / Refrigerant Line / Removal and Installation / Removal illustration

8.
Remove the suction & liquid hose assembly (A) after removing the nut.

Tightening torque :
19.6 - 23.5 N·m (2.0 - 2.4 kgf·m, 14.5 - 17.4 lb·ft)

Heating,Ventilation And Air Conditioning — Air conditioning System / Refrigerant Line / Removal and Installation / Removal illustration

9.
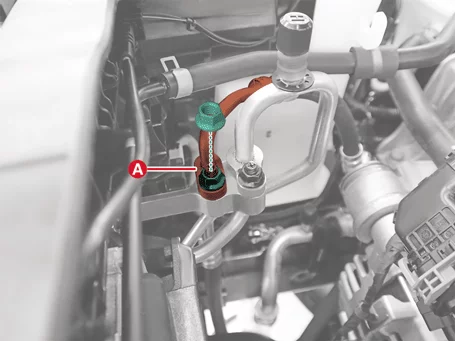
Disconnect the suction & liquid hose assembly (A) after removing the bolt.

Tightening torque :
19.6 - 23.5 N·m (2.0 - 2.4 kgf·m, 14.5 - 17.4 lb·ft)

Heating,Ventilation And Air Conditioning — Air conditioning System / Refrigerant Line / Removal and Installation / Removal illustration

10.
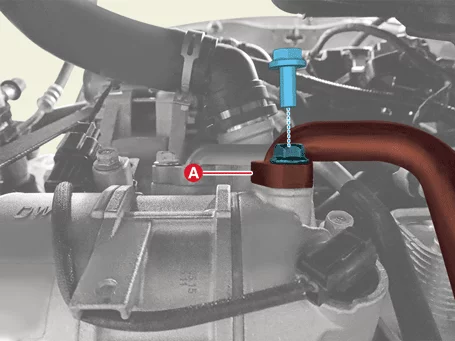
Separate the engine ground cable (A) after removing the bolt.

Tightening torque :
10.8 - 13.7 N·m (1.1 - 1.4 kgf·m, 8.0 - 10.1 lb·ft)

Heating,Ventilation And Air Conditioning — Air conditioning System / Refrigerant Line / Removal and Installation / Removal illustration

11.
Remove the suction & liquid hose assembly (A) after removing the bolt and nut.

Tightening torque :
7.8 - 11.8 N·m (0.8 - 1.2 kgf·m, 5.8 - 8.7 lb·ft)

Heating,Ventilation And Air Conditioning — Air conditioning System / Refrigerant Line / Removal and Installation / Removal illustration

Discharge Hose
[G 1.6 T-GDI GAMMA II]
1.
If the compressor is operable, run the engine at idle speed, and let the air conditioner operates for a few minutes, then shut the engine off.
2.
Recover the refrigerant with Recovery/Recycling/Charging equipment.
(Refer to Air conditioning System - "Refrigerant Recovery/Recycling/Charging/Vacuum/Leak Test")
3.
Remove the engine room under cover.
(Refer to Engine Mechanical System - "Engine Room Under Cover")
4.
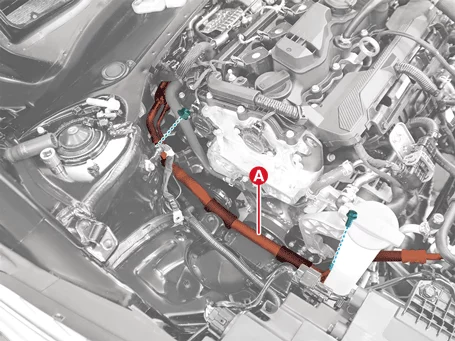
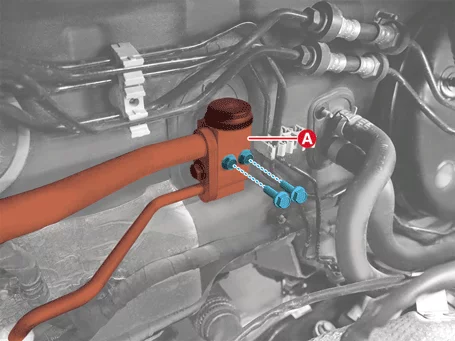
Remove the discharge hose (A) after removing the bolt and nut.

Tightening torque :
19.6 - 23.5 N·m (2.0 - 2.4 kgf·m, 14.5 - 17.4 lb·ft)

Heating,Ventilation And Air Conditioning — Air conditioning System / Refrigerant Line / Removal and Installation / Removal illustration

Heating,Ventilation And Air Conditioning — Air conditioning System / Refrigerant Line / Removal and Installation / Removal illustration

[G 2.0 MPI NU]
1.
If the compressor is operable, run the engine at idle speed, and let the air conditioner operates for a few minutes, then shut the engine off.
2.
Recover the refrigerant with Recovery/Recycling/Charging equipment.
(Refer to Air conditioning System - "Refrigerant Recovery/Recycling/Charging/Vacuum/Leak Test")
3.
Remove the engine room under cover.
(Refer to Engine Mechanical System - "Engine Room Under Cover")
4.
Remove the discharge hose (A) after removing the bolt and nut.

Tightening torque :
19.6 - 23.5 N·m (2.0 - 2.4 kgf·m, 14.5 - 17.4 lb·ft)

Heating,Ventilation And Air Conditioning — Air conditioning System / Refrigerant Line / Removal and Installation / Removal illustration

Heating,Ventilation And Air Conditioning — Air conditioning System / Refrigerant Line / Removal and Installation / Removal illustration

Installation
1.
Install in reverse order of removal.
Note    
•
Perform refrigerant leak Test / vacuum / charging.
(Refer to Air conditioning System - "Refrigerant Recovery/Recycling/Charging/Vacuum/Leak Test")
•
Perform the compressor oil inspection.
(Refer to Air conditioning System - "Compressor Oil")

Compressor Description and Operation

Description
The compressor is the power unit of the air conditioning system, mounted on the side of the engine block and driven by the engine drive belt. The compressor changes the low pressure and low temperature refrigerant to high pressure and high temperature.

Compressor Removal and Installation

Removal
[G 1.6 T-GDI GAMMA II]
1.
Disconnect the battery negative ( - ) terminal.
2.
Recover the refrigerant with Recovery/Recycling/Charging equipment.
(Refer to Air conditioning System - "Refrigerant Recovery/Recycling/Charging/Vacuum/Leak Test")
3.
Remove the engine room under cover.
(Refer to Engine Mechanical System - "Engine Room Under Cover")
4.
Remove the drive belt.[G 1.6 T-GDI GAMMA II]
(Refer to Engine Mechanical System - "Drive Belt")
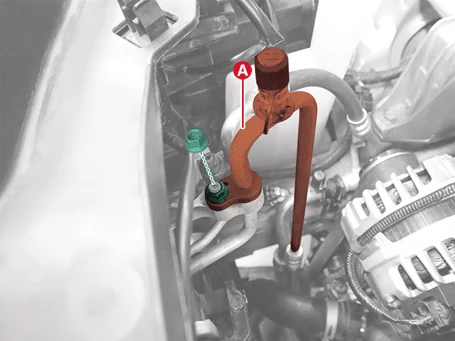
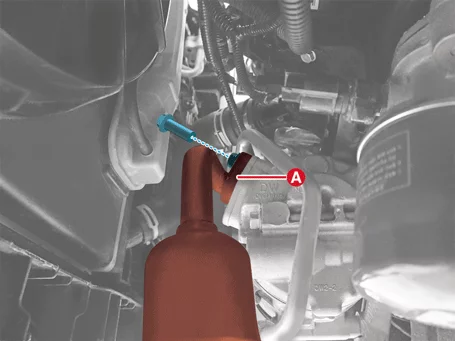
5.
Separate the suction & liquid hose assembly (A) after removing the bolt.

Tightening torque :
19.6 - 23.5 N·m (2.0 - 2.4 kgf·m, 14.5 - 17.4 lb·ft)

Heating,Ventilation And Air Conditioning — Air conditioning System / Compressor / Removal and Installation / Removal illustration

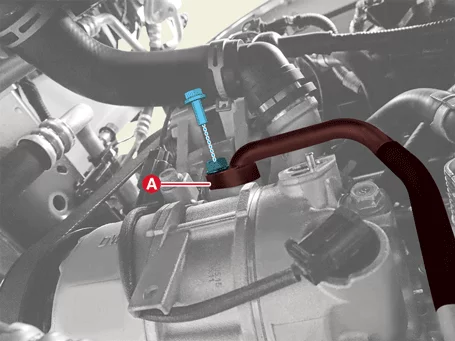
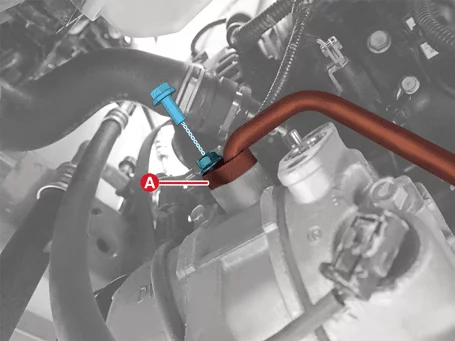
6.
Separate the discharge hose assembly (A) after removing the bolt.

Tightening torque :
19.6 - 23.5 N·m (2.0 - 2.4 kgf·m, 14.5 - 17.4 lb·ft)

Heating,Ventilation And Air Conditioning — Air conditioning System / Compressor / Removal and Installation / Removal illustration

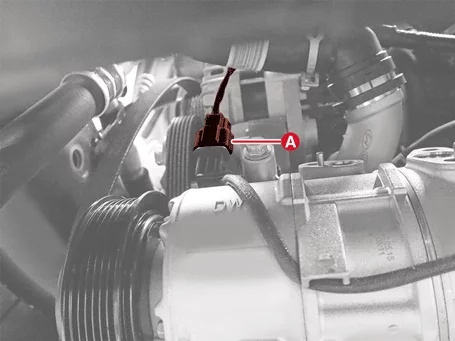
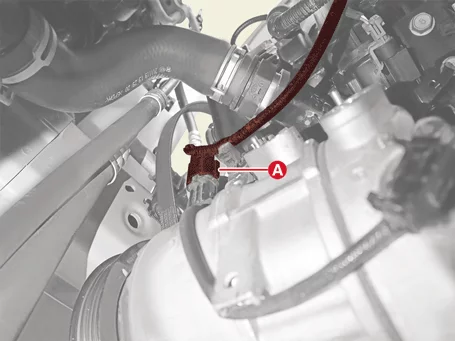
7.
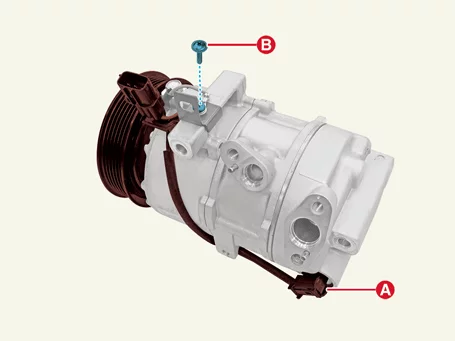
Disconnect the compressor ECV connector (A).

Heating,Ventilation And Air Conditioning — Air conditioning System / Compressor / Removal and Installation / Removal illustration

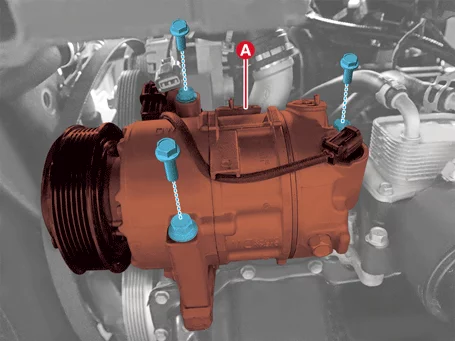
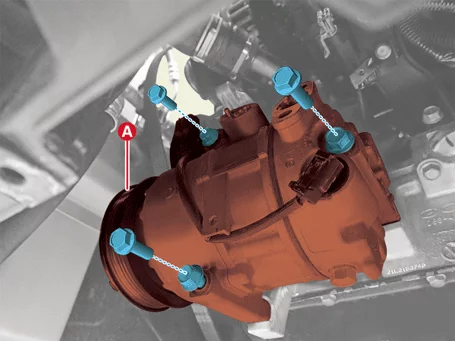
8.
Remove the compressor assembly (A) after removing the bolts.

Tightening torque :
19.6 - 33.3 N·m (2.0 - 3.4 kgf·m, 14.5 - 24.6 lb·ft)

Heating,Ventilation And Air Conditioning — Air conditioning System / Compressor / Removal and Installation / Removal illustration

[G 2.0 MPI NU]
1.
Disconnect the battery negative ( - ) terminal.
2.
Recover the refrigerant with Recovery/Recycling/Charging equipment.
(Refer to Air conditioning System - "Refrigerant Recovery/Recycling/Charging/Vacuum/Leak Test")
3.
Remove the engine room under cover.
(Refer to Engine Mechanical System - "Engine Room Under Cover")
4.
Remove the drive belt.[G 2.0 MPI NU]
(Refer to Engine Mechanical System - "Drive Belt")
5.
Disconnect the suction & liquid hose assembly (A) after removing the bolt.

Tightening torque :
19.6 - 23.5 N·m (2.0 - 2.4 kgf·m, 14.5 - 17.4 lb·ft)

Heating,Ventilation And Air Conditioning — Air conditioning System / Compressor / Removal and Installation / Removal illustration

6.
Disconnect the discharge hose assembly (A) after removing the bolt.

Tightening torque :
19.6 - 23.5 N·m (2.0 - 2.4 kgf·m, 14.5 - 17.4 lb·ft)

Heating,Ventilation And Air Conditioning — Air conditioning System / Compressor / Removal and Installation / Removal illustration

7.
Disconnect the compressor ECV connector (A).

Heating,Ventilation And Air Conditioning — Air conditioning System / Compressor / Removal and Installation / Removal illustration

8.
Remove the compressor assembly (A) after removing the bolts.

Tightening torque :
19.6 - 33.3 N·m (2.0 - 3.4 kgf·m, 14.5 - 24.6 lb·ft)

Heating,Ventilation And Air Conditioning — Air conditioning System / Compressor / Removal and Installation / Removal illustration

Installation
1.
Install in reverse order of removal.
Note    
•
Perform refrigerant leak Test / vacuum / charging.
(Refer to Air conditioning System - "Refrigerant Recovery/Recycling/Charging/Vacuum/Leak Test")
•
Perform the compressor oil inspection.
(Refer to Air conditioning System - "Compressor Oil")

Compressor Inspection

Inspection
Visual Inspection
1.
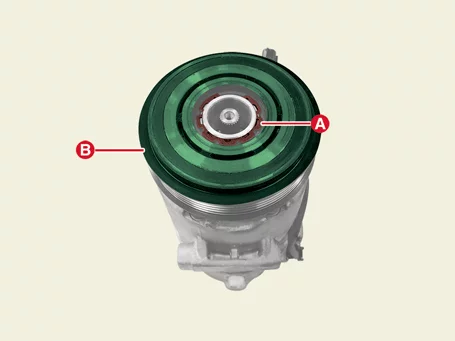
Check for damage to the disc portion of the disc and hub assembly. If there is any damage, replace the clutch set.
2.
Check the pulley (A) bearing play / drag by rotating the pulley by hand. Replace the pulley with a new one if it is noisy or has excessive play / drag.

Heating,Ventilation And Air Conditioning — Air conditioning System / Compressor / Inspection illustration

Diagnosis with KDS
The operation type of the compressor is largely divided into a fixed type compressor, an internal variable compressor, and an external variable compressor. In the case of a fixed type compressor and an internal variable compressor, the operation of the compressor can be checked by the operating sound of the clutch, but in the case of an external variable compressor, it is difficult to determine whether the compressor is operating because there is a type without a clutch. For this reason, the external variable compressor is checked with the inspection procedure using KDS as follows.
1.
"A/C Compressor test (ECV type)" is performed using KDS.
(S/W Management → Air conditioning → A/C Compressor Test (ECV Type))
Information    
Refer to the KDS screen for operating conditions and details.

Compressor Disassembly and Reassembly

Special Service Tool
Tool Name / Number
Illustration
Description
09977 - 3R000
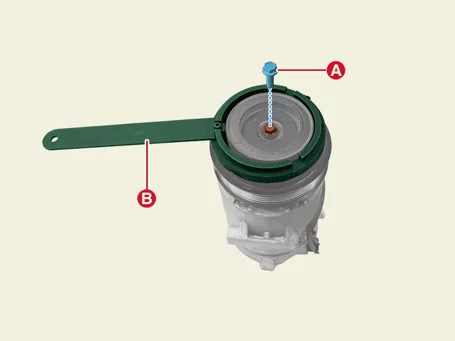
Disc & hub assembly bolt stopper

Heating,Ventilation And Air Conditioning — Air conditioning System / Compressor / Disassembly and Reassembly / Special Service Tool illustration

Used to fixing air conditioner compressor disc and hub assembly (G 2.0 MPI NU)
09977 - B9100
Disc & hub assembly bolt stopper

Heating,Ventilation And Air Conditioning — Air conditioning System / Compressor / Disassembly and Reassembly / Special Service Tool illustration

Used to fixing air conditioner compressor disc and hub assembly (G 1.6 T-GDI GAMMA II)

Disassembly
[G 1.6 T-GDI GAMMA II]
1.
Remove the front wheel guard [Passenger's side].
(Refer to Body - "Front Wheel Guard")
2.
Remove the drive belt. [G 1.6 T-GDI GAMMA II]
(Refer to Engine Mechanical System - "Drive Belt")
3.
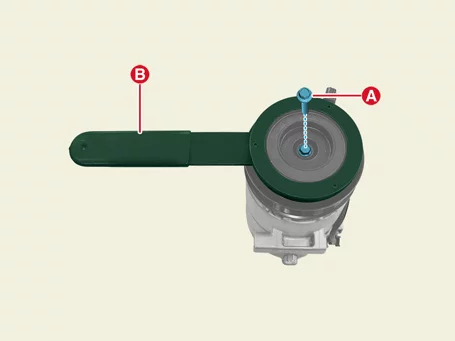
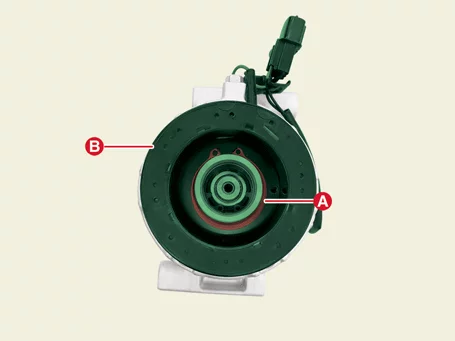
Fix the disk and hub assembly using the air conditioner compressor pulley fixing tool (09977-3R000) (B) and removing the central bolt (A).

Tightening torque :
14.7 - 20.6 N·m (1.5 - 2.1 kgf·m, 10.8 - 15.2 lb·ft)

Heating,Ventilation And Air Conditioning — Air conditioning System / Compressor / Disassembly and Reassembly / Disassembly illustration

4.
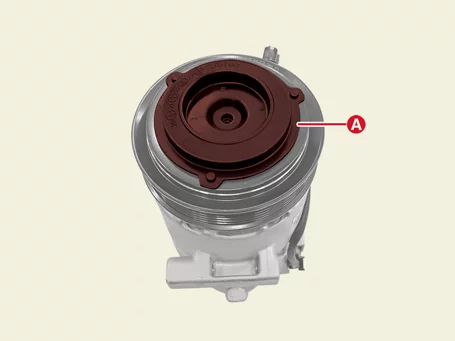
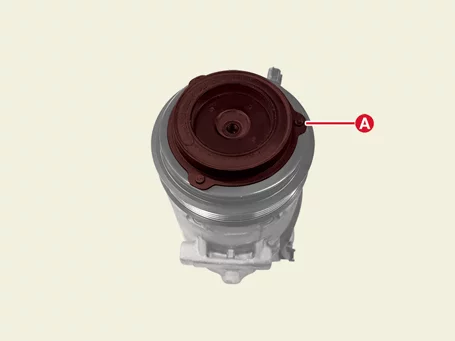
Remove the disc and hub assembly (A) by using the remover.

Heating,Ventilation And Air Conditioning — Air conditioning System / Compressor / Disassembly and Reassembly / Disassembly illustration

5.
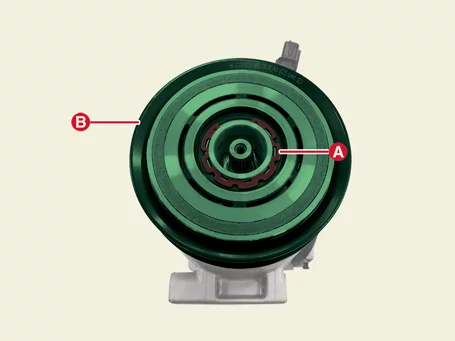
Remove the compressor pulley (B) after removing the snap ring (A) by using the snap ring plier.

Heating,Ventilation And Air Conditioning — Air conditioning System / Compressor / Disassembly and Reassembly / Disassembly illustration

6.
Disconnect the ECV connector (A) and remove the stator ground screw (B).

Heating,Ventilation And Air Conditioning — Air conditioning System / Compressor / Disassembly and Reassembly / Disassembly illustration

7.
Remove the stator assembly (B) after removing the snap ring (A) by using the snap ring plier.

Heating,Ventilation And Air Conditioning — Air conditioning System / Compressor / Disassembly and Reassembly / Disassembly illustration

[G 2.0 MPI NU]
1.
Remove the front wheel guard [Passenger's side].
(Refer to Body - "Front Wheel Guard")
2.
Remove the drive belt. [G 2.0 MPI NU]
(Refer to Engine Mechanical System - "Drive Belt")
3.
Fix the disk and hub assembly using the air conditioner compressor pulley fixing tool (09977-3R000) (B) and removing the central bolt (A).

Tightening torque :
14.7 - 20.6 N·m (1.5 - 2.1 kgf·m, 10.8 - 15.2 lb·ft)

Heating,Ventilation And Air Conditioning — Air conditioning System / Compressor / Disassembly and Reassembly / Disassembly illustration

4.
Remove the disc and hub assembly (A) by using the remover.

Heating,Ventilation And Air Conditioning — Air conditioning System / Compressor / Disassembly and Reassembly / Disassembly illustration

5.
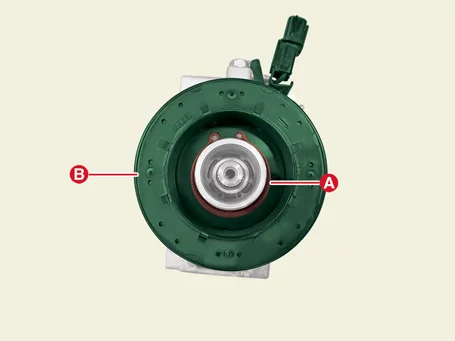
Remove the compressor pulley (B) after removing the snap ring (A) by using the snap ring pliers.

Heating,Ventilation And Air Conditioning — Air conditioning System / Compressor / Disassembly and Reassembly / Disassembly illustration

Note    
•
Be careful not to damage the pulley and compressor when disassembling/assembling.
•
Removed snap rings must be replaced with new ones.
6.
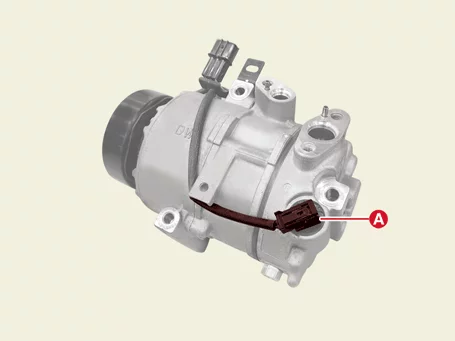
Disconnect the ECV connector (A).

Heating,Ventilation And Air Conditioning — Air conditioning System / Compressor / Disassembly and Reassembly / Disassembly illustration

7.
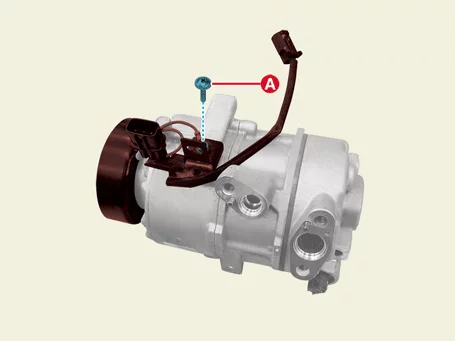
Remove the stator grounding screw (A).

Heating,Ventilation And Air Conditioning — Air conditioning System / Compressor / Disassembly and Reassembly / Disassembly illustration

8.
Remove the stator assembly (B) after removing the snap ring (A) by using the snap ring pliers.

Heating,Ventilation And Air Conditioning — Air conditioning System / Compressor / Disassembly and Reassembly / Disassembly illustration

Reassembly
1.
Reassemble in the reverse order of disassembly.
Note    
•
Wipe the moving surfaces of the pulley and compressor with a volatile solvent.
•
Make sure that the snap ring is fully seated in the groove after assembling the snap ring.
•
Make sure that the pulley rotates smoothly after assembling the pulley.
•
Removed snap rings must be replaced with new ones.

Condenser Removal and Installation

Removal
Condenser[G 1.6 T-GDI GAMMA II]
1.
Recover the refrigerant with Recovery/Recycling/Charging equipment.
(Refer to Air conditioning System - "Refrigerant Recovery/Recycling/Charging/Vacuum/Leak Test")
2.
Remove the front bumper assembly.
(Refer to Body - "Front Bumper Assembly")
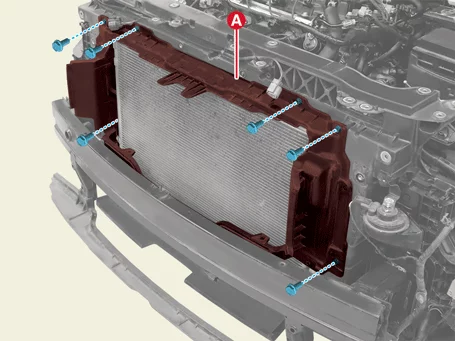
3.
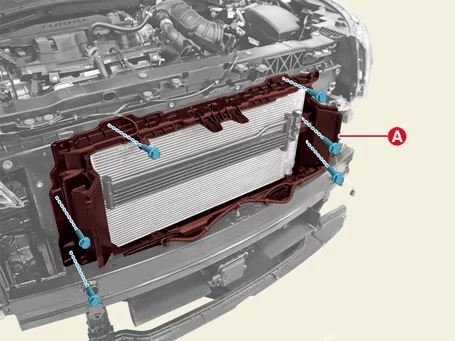
Remove the air guard (A) after removing the bolts.

Heating,Ventilation And Air Conditioning — Air conditioning System / Condenser / Removal and Installation / Removal illustration

4.
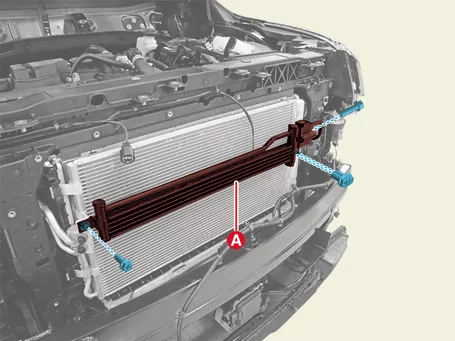
Remove the oil cooler (A) after removing the bolts.

Heating,Ventilation And Air Conditioning — Air conditioning System / Condenser / Removal and Installation / Removal illustration

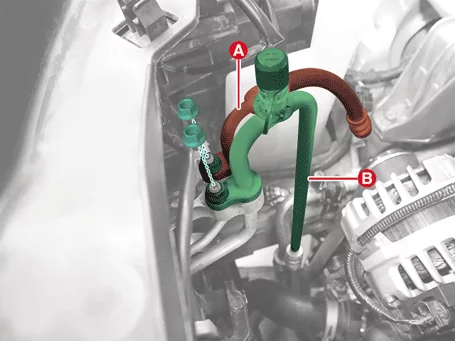
5.
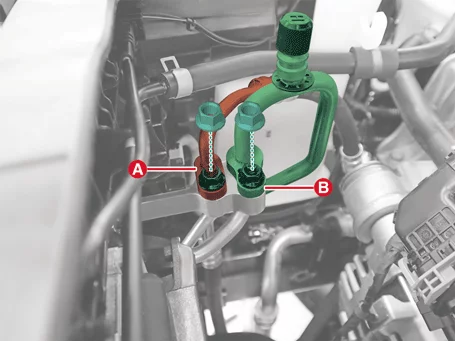
Remove the suction & liquid hose (A) and discharge hose (B) after removing the nuts.

Tightening torque :
19.6 - 23.5 N·m (2.0 - 2.4 kgf·m, 14.5 - 17.4 lb·ft)

Heating,Ventilation And Air Conditioning — Air conditioning System / Condenser / Removal and Installation / Removal illustration

6.
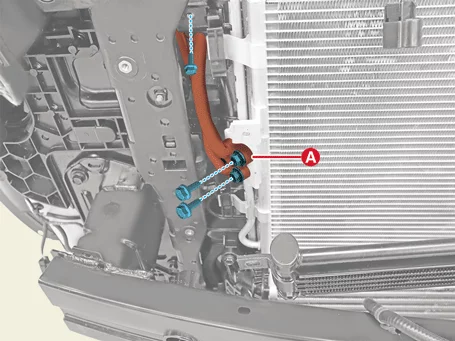
Remove the condenser pipe (A) after removing the bolts.

Tightening torque :
8.8 - 13.7 N·m (0.9 - 1.4 kgf·m, 6.5 - 10.1 lb·ft)

Heating,Ventilation And Air Conditioning — Air conditioning System / Condenser / Removal and Installation / Removal illustration

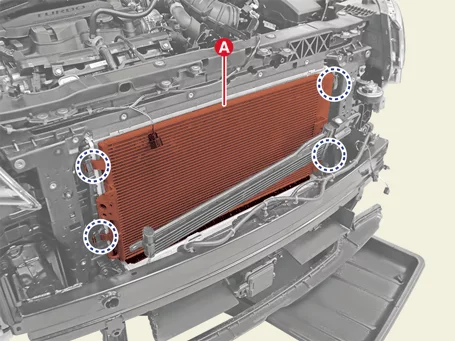
7.
Remove the condenser (A).

Heating,Ventilation And Air Conditioning — Air conditioning System / Condenser / Removal and Installation / Removal illustration

Information    
Clip position :

Heating,Ventilation And Air Conditioning — Air conditioning System / Condenser / Removal and Installation / Removal illustration

Condenser[G 2.0 MPI NU]
1.
Recover the refrigerant with Recovery/Recycling/Charging equipment.
(Refer to Air conditioning System - "Refrigerant Recovery/Recycling/Charging/Vacuum/Leak Test")
2.
Remove the front bumper assembly.
(Refer to Body - "Front Bumper Assembly")
3.
Remove the air guard (A) after removing the bolts.

Heating,Ventilation And Air Conditioning — Air conditioning System / Condenser / Removal and Installation / Removal illustration

4.
Remove the suction & liquid hose (A) and discharge hose (B) after removing the nuts.

Tightening torque :
19.6 - 23.5 N·m (2.0 - 2.4 kgf·m, 14.5 - 17.4 lb·ft)

Heating,Ventilation And Air Conditioning — Air conditioning System / Condenser / Removal and Installation / Removal illustration

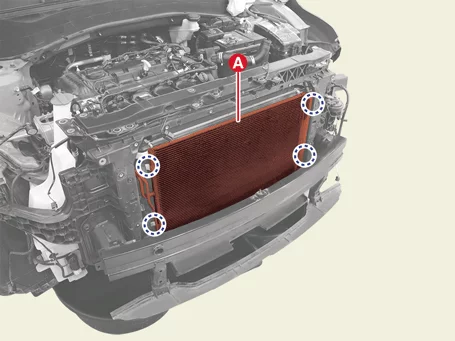
5.
Remove the condenser (A).

Heating,Ventilation And Air Conditioning — Air conditioning System / Condenser / Removal and Installation / Removal illustration

Information    
Clip position :

Heating,Ventilation And Air Conditioning — Air conditioning System / Condenser / Removal and Installation / Removal illustration

Installation
1.
Install in reverse order of removal.
Note    
•
Perform refrigerant leak Test / vacuum / charging.
(Refer to Air conditioning System - "Refrigerant Recovery/Recycling/Charging/Vacuum/Leak Test")
•
Perform the compressor oil inspection.
(Refer to Air conditioning System - "Compressor Oil")

Receiver-Drier Removal and Installation

Removal
1.
Remove the condenser.
(Refer to Air conditioning System - "Condenser")
2.
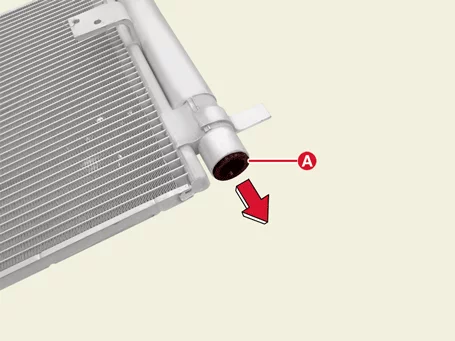
Remove the cap (A) on the lower part of the condenser by using the L wrench.

Heating,Ventilation And Air Conditioning — Air conditioning System / Receiver-Drier / Removal and Installation / Removal illustration

3.
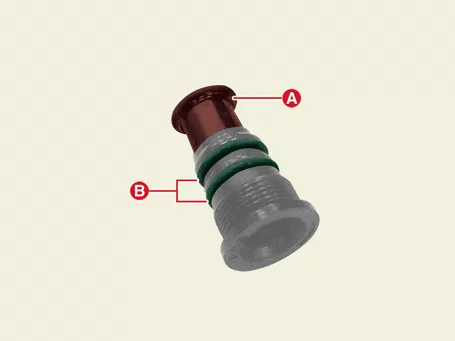
Remove the receiver drier filter (A) and O-ring (B).

Heating,Ventilation And Air Conditioning — Air conditioning System / Receiver-Drier / Removal and Installation / Removal illustration

4.
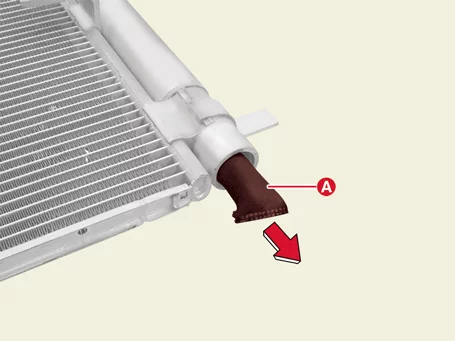
Remove the desiccant (A) in the receiver drier.

Heating,Ventilation And Air Conditioning — Air conditioning System / Receiver-Drier / Removal and Installation / Removal illustration

Installation
1.
Install in reverse order of removal.
Note    
•
Perform refrigerant leak Test / vacuum / charging.
(Refer to Air conditioning System - "Refrigerant Recovery/Recycling/Charging/Vacuum/Leak Test")
•
Perform the compressor oil inspection.
(Refer to Air conditioning System - "Compressor Oil")

A/C Pressure Transducer Description and Operation

Description
The air conditioner pressure transducer measures the pressure in the high-pressure line and converts it into a voltage value. When the converted output value is sent to the engine ECU, the engine ECU operates the cooling fan at high and low speeds to prevent pressure rise, and if the refrigerant pressure is too high or too low, the compressor stops working to optimize and protect the air conditioning system.

A/C Pressure Transducer Removal and Installation

Removal
[G 1.6 T-GDI GAMMA II]
1.
Disconnect the battery negative ( - ) terminal.
2.
Recover the refrigerant with Recovery/Recycling/Charging equipment.
(Refer to Air conditioning System - "Refrigerant Recovery/Recycling/Charging/Vacuum/Leak Test")
3.
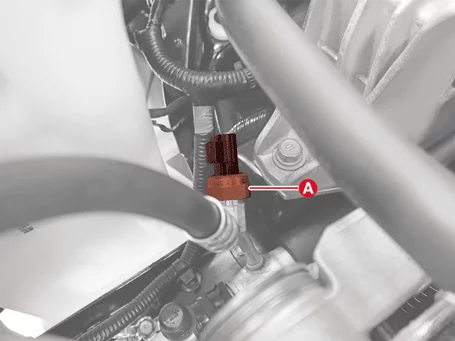
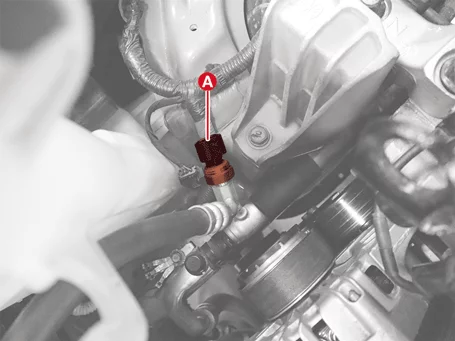
Disconnect the A/C pressure transducer connector (A).

Heating,Ventilation And Air Conditioning — Air conditioning System / A/C Pressure Transducer / Removal and Installation / Removal illustration

4.
Remove the air conditioner pressure transducer (A).

Tightening torque :
9.8 - 11.8 N·m (1.0 - 1.2 kgf·m, 7.2 - 8.7 lb·ft)

Heating,Ventilation And Air Conditioning — Air conditioning System / A/C Pressure Transducer / Removal and Installation / Removal illustration

[G 2.0 MPI NU]
1.
Disconnect the battery negative ( - ) terminal.
2.
Recover the refrigerant with Recovery/Recycling/Charging equipment.
(Refer to Air conditioning System - "Refrigerant Recovery/Recycling/Charging/Vacuum/Leak Test")
3.
Disconnect the A/C pressure transducer connector (A).

Heating,Ventilation And Air Conditioning — Air conditioning System / A/C Pressure Transducer / Removal and Installation / Removal illustration

4.
Remove the air conditioner pressure transducer (A).

Tightening torque :
9.8 - 11.8 N·m (1.0 - 1.2 kgf·m, 7.2 - 8.7 lb·ft)

Heating,Ventilation And Air Conditioning — Air conditioning System / A/C Pressure Transducer / Removal and Installation / Removal illustration

Installation
1.
Install in reverse order of removal.
Note    
•
Perform refrigerant leak Test / vacuum / charging.
(Refer to Air conditioning System - "Refrigerant Recovery/Recycling/Charging/Vacuum/Leak Test")

Evaporator Temperature Sensor Description and Operation

Description
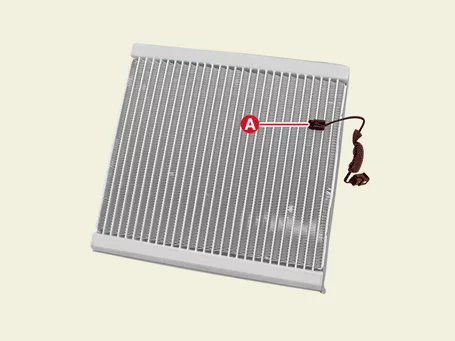
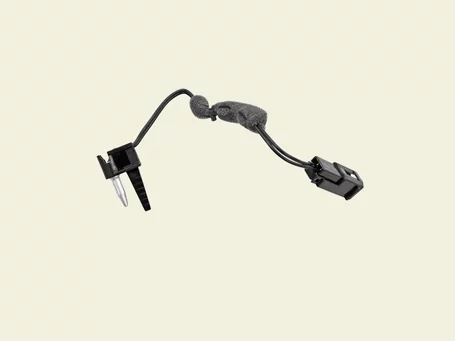
The evaporator temperature sensor is installed on the evaporator to prevent freezing by sensing the temperature of the evaporator core. A NTC thermistor is installed inside the sensor, so when the temperature decreases, the resistance value increases, and when the temperature increases, the resistance value decreases.

Evaporator Temperature Sensor Removal and Installation

Removal
1.
Remove the evaporator core.
(Refer to Heating, Ventilation And Air Conditioning - "Evaporator Core")
2.
Remove the evaporator temperature sensor (A).

Heating,Ventilation And Air Conditioning — Air conditioning System / Evaporator Temperature Sensor / Removal and Installation / Removal illustration

Heating,Ventilation And Air Conditioning — Air conditioning System / Evaporator Temperature Sensor / Removal and Installation / Removal illustration

Installation
1.
Install in reverse order of removal.
Information    
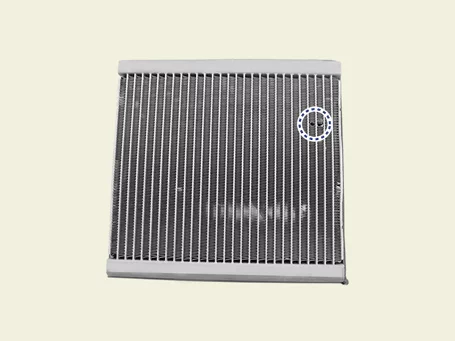
When replacing the evaporator temperature sensor, refit it to the removal position.

Heating,Ventilation And Air Conditioning — Air conditioning System / Evaporator Temperature Sensor / Removal and Installation / Installation illustration

Evaporator Temperature Sensor Inspection

Inspection
1.
Turn the IG "ON".
2.
Turn on the air conditioner switch.
3.
Measure the resistance of the ( + ) and ( - ) terminals after connecting the multimeter to the evaporator temperature sensor.

Heating,Ventilation And Air Conditioning — Air conditioning System / Evaporator Temperature Sensor / Inspection illustration

1. Evaporator Sensor ( + )
2. Sensor Ground

Temperature (°C (°F)
Resistance (kΩ)
Voltage (V)
-10 (14)
17.93
3.21
0 (32)
11.36
2.66
10 (50)
7.40
2.13
20 (68)
4.94
1.65
30 (86)
3.369
1.26
40 (104)
2.348
0.95

Photo Sensor Description and Operation

Description
The photo sensor (daylight sensor) is located above the sensor speaker grille. It has a built-in photovoltaic diode (sensing solar radiation). Luminescence appears in the part where light is received, and electric force is generated in proportion to the amount of light emission, and this electric force is transmitted to the automatic temperature control module to compensate for air volume and discharge temperature.

Photo Sensor Removal and Installation

Removal
1.
Remove the photo sensor.
(Refer to Body Electrical System - "Auto Light Sensor")
Installation
1.
Install in reverse order of removal.

Ambient Temperature Sensor Description and Operation

Description
•
It is installed on the front of the condenser and senses the temperature of the outside air. It is a NTC thermistor type in which the resistance value decreases when the temperature rises and the resistance value increases when the temperature decreases.
•
It is used for discharge temperature control, sensor compensation, temperature control door control, blower motor speed control, mix mode control, and in-vehicle humidity control.

Ambient Temperature Sensor Removal and Installation

Removal
1.
Remove the front bumper assembly.
(Refer to Body - "Front Bumper Assembly")
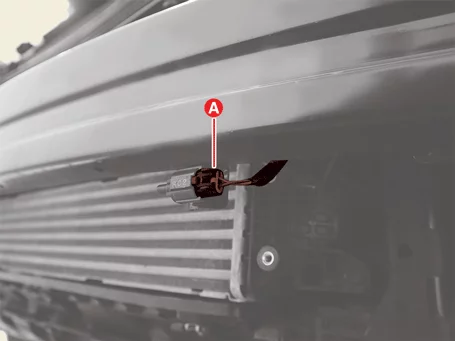
2.
Disconnect the ambient temperature sensor connector (A).

Heating,Ventilation And Air Conditioning — Air conditioning System / Ambient Temperature Sensor / Removal and Installation / Removal illustration

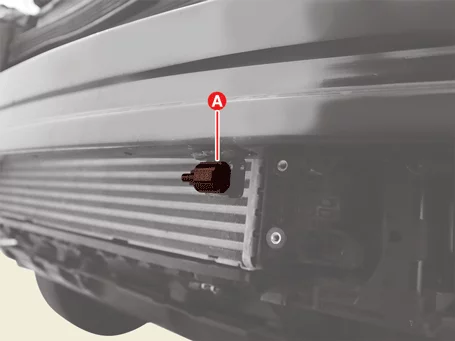
3.
Remove the ambient temperature sensor (A).

Heating,Ventilation And Air Conditioning — Air conditioning System / Ambient Temperature Sensor / Removal and Installation / Removal illustration

Installation
1.
Install in reverse order of removal.

Ambient Temperature Sensor Inspection

Inspection
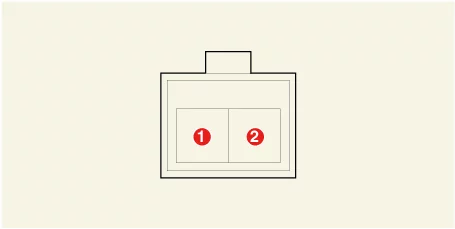
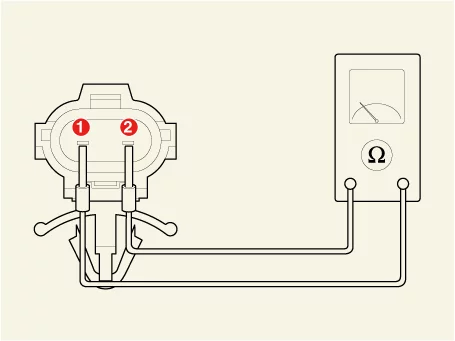
1.
Check whether the resistance values of terminals 1 and 2 change by applying the temperature change of the air to the outside temperature sensor.

Heating,Ventilation And Air Conditioning — Air conditioning System / Ambient Temperature Sensor / Inspection illustration

1. Ambient Temperature ( + )
2. Sensor Ground

Sensor resistance
Temperature [°C (°F)]
Resistance (kΩ)
-40 (-40)
927.5
-30 (-22)
507.0
-20 (-4)
284.5
-10 (10)
164.2
0 (32)
97.5
10 (50)
59.6
20 (68)
37.46
30 (86)
24.18
40 (104)
16.00
50 (122)
10.83
60 (140)
7.48
70 (158)
5.26
80 (176)
3.77

Auto Defogging Sensor Description and Operation

Description
The auto defogging sensor is installed on the vehicle's windshield to detect moisture and removes it early before fogging occurs, and improves visibility and comfort.

Auto Defogging Sensor Removal and Installation

Removal
1.
Disconnect the battery negative ( - ) terminal.
2.
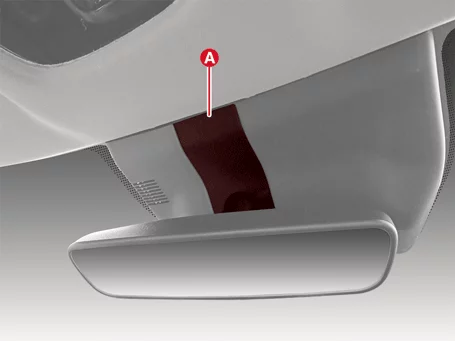
Remove the multi sensor blanking cover (A).

Heating,Ventilation And Air Conditioning — Air conditioning System / Auto Defogging Sensor / Removal and Installation / Removal illustration

3.
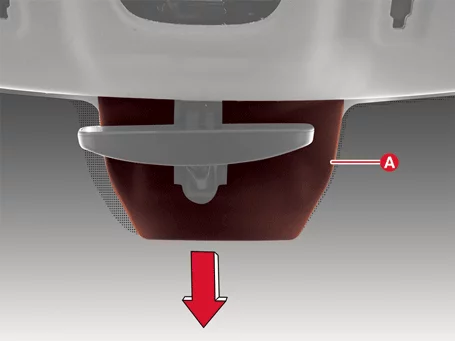
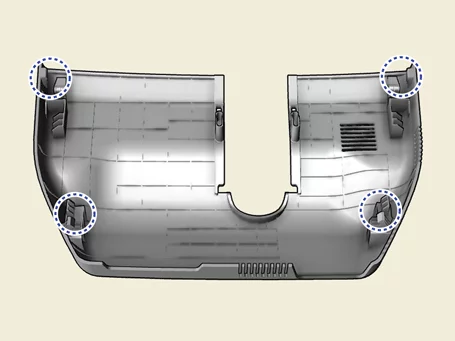
Remove the multi sensor cover (A) in the direction of the arrow.

Heating,Ventilation And Air Conditioning — Air conditioning System / Auto Defogging Sensor / Removal and Installation / Removal illustration

Heating,Ventilation And Air Conditioning — Air conditioning System / Auto Defogging Sensor / Removal and Installation / Removal illustration

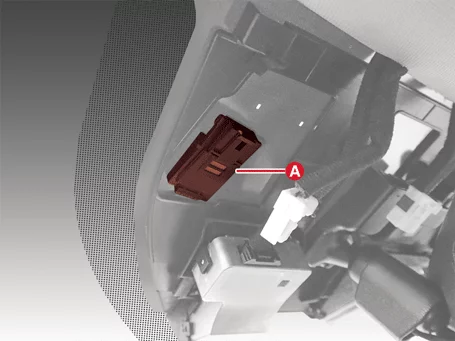
4.
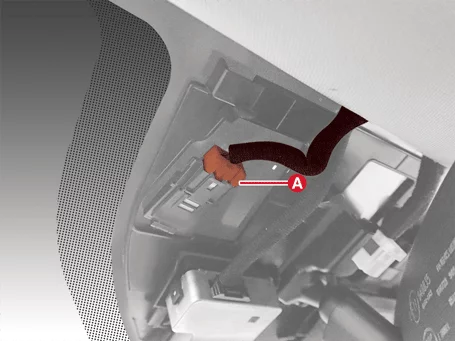
Disconnect the auto defogging sensor connector (A).

Heating,Ventilation And Air Conditioning — Air conditioning System / Auto Defogging Sensor / Removal and Installation / Removal illustration

5.
Remove the auto defogging sensor (A).

Heating,Ventilation And Air Conditioning — Air conditioning System / Auto Defogging Sensor / Removal and Installation / Removal illustration

Installation
1.
Install in reverse order of removal.

Other information:

Kia Seltos SP2 (2021-2026) Service Manual: Troubleshooting

Troubleshooting Failure Diagnosis 1. In principle, ESC and TCS controls are prohibited in case of ABS failure. 2. When ESC or TCS fails, only the failed system control is prohibited. 3.

Kia Seltos SP2 (2021-2026) Service Manual: Air Conditioner Refrigerant/Compressor Refrigerant Recovery/Recycling/Charging/Vacuum

Refrigerant Recovery/Recycling/Charging/Vacuum (R-134a) Equipped with R-134a recovery/recycling/charging equipment 1. Connect the R-134a recovery/recycling/charging equipment to the high-pressure service port (A) and low-pressure service port (B) by reading the refrigerant recovery/recycling/charging equipment instruction manual.