
Kia Seltos: Intelligent Variable Transmission (IVT) System / IVT Control System
Contents:
- Description and Operation
- Adjustment
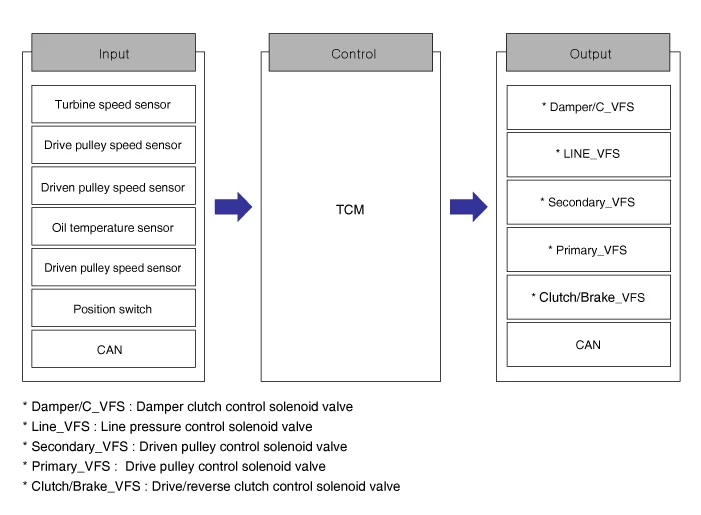
- Transaxle Control Module (TCM) Description and Operation
- Transaxle Control Module (TCM) On Vehicle Inspection
- Transaxle Control Module (TCM) Removal and Installation
- E-Module Specification
- E-Module Components and Components Location
- E-Module Description and Operation
- E-Module Removal and Installation
- Driven Pulley Pressure Sensor Specification
- Driven Pulley Pressure Sensor Components and Components Location
- Driven Pulley Pressure Sensor Description and Operation
- Driven Pulley Pressure Sensor Removal
- Driven Pulley Pressure Sensor Installation
- Driven Pulley Speed Sensor Specification
- Driven Pulley Speed Sensor Components and Components Location
- Driven Pulley Speed Sensor Description and Operation
- Driven Pulley Speed Sensor On Vehicle Inspection
- Driven Pulley Speed Sensor Removal and Installation
- Position Switch Specification
- Position Switch Components and Components Location
- Position Switch Troubleshooting
- Position Switch On Vehicle Inspection
- Position Switch Removal
- Position Switch Installation
- Parking Sprag Removal and Installation
- Parking Rod Cam Removal and Installation
- Shift Lever Components and Components Location
- Shift Lever Removal and Installation
- Shift Cable Components and Components Location
- Shift Cable Removal
- Shift Cable Installation
Description and Operation
| Description |
Adjustment
| Adjustment |
| • |
TCM adaptive values learning : When shift shock has occurred or parts related with the IVT transmission
has been replaced, TCM learning should be performed.
|
| • |
In the following case, TCM learning is required.
|
| – |
IVT transmission assembly replacement
|
| – |
TCM upgrade or replacement
|
| • |
P range learning (learning condition : IVTF temperature : 30 - 90°C (86 - 194°F), shift lever P range,
brake off)
|
| 1) |
Start the engine after checking for the IVT fluid temperature in state of IG ON.
|
| 2) |
Engine rpm will rise to approximately 1000 rpm after starting the engine.
|
| 3) |
After 30 seconds to 2 minutes, the learning is completed when the engine rpm reaches the IDLE level.
(Learning completion can be confirmed from the "Sensor Data" of KDS )
|
Do not apply accel pedal and brakes or operate shift levers during P range, learning.
(If operated during learning, it needs to be re-engaged after starting off)
|

Transaxle Control Module (TCM) Description and Operation
| Description |
| • |
Monitors the vehicle's operating conditions to determine the optimal gear setting.
|
| • |
Performs a gear change if the current gear setting differs from the identified optimal gear setting.
|
| • |
Determines the need for torque converter clutch activation and engages the clutch accordingly.
|
| • |
Calculates the optimal line pressure level by constantly monitoring the torque level and adjusts the
pressure accordingly.
|
| • |
Diagnoses the faults and failures for IVT.
|
| Operation |
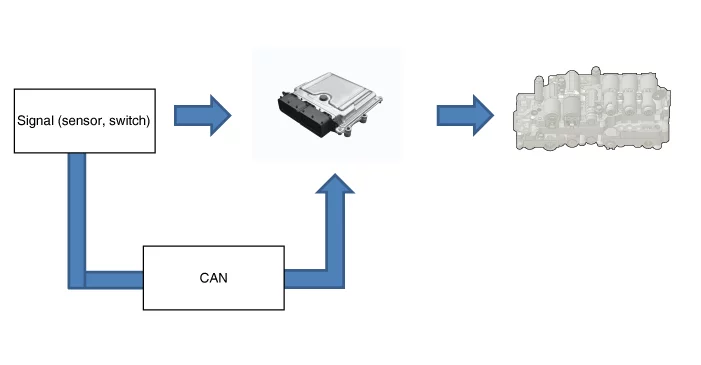
Transaxle Control Module (TCM) On Vehicle Inspection
| Inspection |
| 1. |
TCM ground circuit test : Measure the resistance between TCM and chassis ground.
(Inspect the terminal connected to chassis ground with the back of harness connector as the inspection
point of TCM side.)
|
| 2. |
TCM connector test : Disconnect the TCM connector and visually check the ground terminals on TCM side and
harness side for bent pins or poor contact pressure.
|
| 3. |
If problem is not found in Steps 1 and 2, the TCM could be faulty.If so, replace the TCM with a new one,
and then check the vehicle again. If the vehicle operates normally then the problem was likely with the TCM.
|
| 4. |
Reinspection of original TCM : Install the original TCM (probably broken) into a known-good vehicle and
check the vehicle. If the problem occurs again, replace the original TCM with a new one.
If the problem does not reoccur, this is an intermittent problem and other part may be faulty.
|
Transaxle Control Module (TCM) Removal and Installation
| Removal |
The TCM is integrated into the ECM.
|

| 1. |
Remove the Engine Control Module (ECM).
(Refer to Engine Control / Fuel System - "Engine Control Module
(ECM)")
|
| Installation |
| 1. |
Install the ECM.
(Refer to Engine Control / Fuel System - "Engine Control Module
(ECM)")
|
E-Module Specification
| Specification |
| Drive Pulley Speed Sensor |
|
Item |
Specification |
|
Type |
Hall sensor |
| Output voltage (V) |
High : 1.18 - 1.68 (Nor : 1.4) |
|
Low : 0.59 - 0.84 (Nor : 0.7) |
| Turbine Speed Sensor |
|
Item |
Specification |
|
Type |
Hall sensor |
| Output voltage (V) |
High : 1.18 - 1.68 (Nor : 1.4) |
|
Low : 0.59 - 0.84 (Nor : 0.7) |
| Oil Temperature Sensor |
|
Item |
Specification |
|
Type |
NTC thermistor |
| Temperature [°C (°F)] / Resistance (kΩ) |
-40 (-40) / 139.5 |
|
-20 (-4) / 47.4 |
|
|
0 (32) / 18.6 |
|
|
20 (68) / 8.1 |
|
|
40 (104) / 3.8 |
|
|
60 (140) / 1.98 |
|
|
80 (176) / 1.08 |
|
|
100 (212) / 0.63 |
|
|
120 (248) / 0.38 |
|
|
140 (284) / 0.25 |
|
|
160 (320) / 0.16 |
E-Module Components and Components Location
| Component Location |
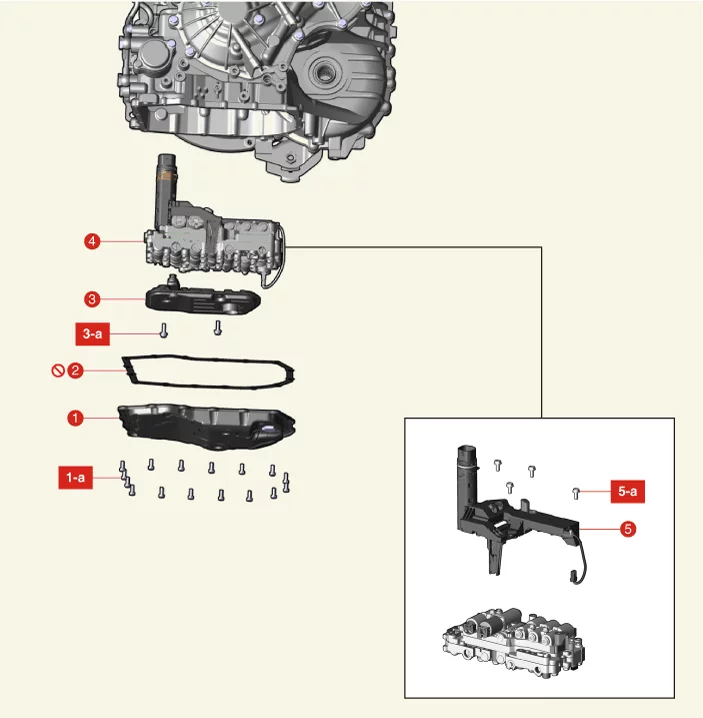
| 1. Valve Body Cover 1-a. 9.8 - 11.8 N·m (1.0 - 1.2 kgf·m, 7.2 - 8.7 lb·ft) 2. Valve Body Cover Gasket |
3. IVTF Filter 3-a. 9.8 - 11.8 N·m (1.0 - 1.2 kgf·m, 7.2 - 8.7 lb·ft) 4. Valve Body 4-a. 9.8 - 11.8 N·m (1.0 - 1.2 kgf·m, 7.2 - 8.7 lb·ft) 5. E-Module 5-a. 9.8 - 11.8 N·m (1.0 - 1.2 kgf·m, 7.2 - 8.7 lb·ft) |
E-Module Description and Operation
| Description |
| Drive Pulley Speed Sensor |
| • |
Integrated into the E-Module.
|
| • |
The sensor detects the rotation speed of the drive pulley in the IVT and transmits it to TCM
|
| Turbine Speed Sensor |
| • |
Integrated into the E-Module.
|
| • |
Turbine speed sensor detects the speed of the turbine in the IVT and transmits it to TCM.
|
| Oil Temperature Sensor |
| • |
Integrated into the E-Module.
|
| • |
Oil temperature sensor detects the IVTF temperature and transmits it to TCM.
|
E-Module Removal and Installation
| Removal |
|
| 1. |
Remove the valve body assembly.
(Refer to Hydraulic System - "Valve body")
|
| 2. |
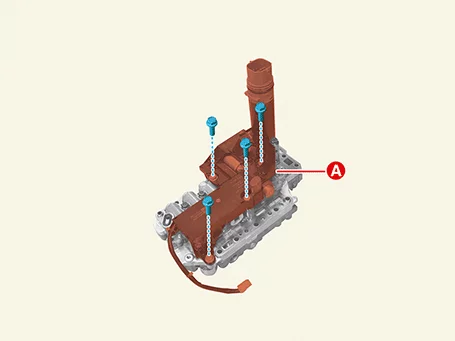
Disconnect the pressure sensor connector (A).
|
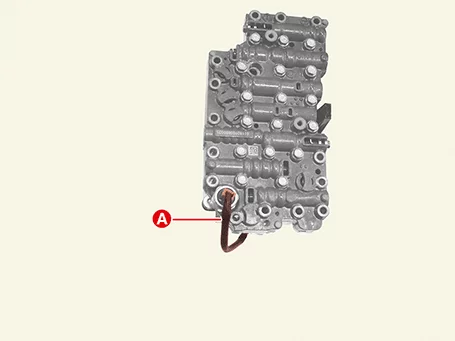
| 3. |
Remove the E-Module (A) after removing the bolts.
|
| Installation |
| 1. |
Install in reverse order of removal.
|
Driven Pulley Pressure Sensor Specification
| Specification |
|
Item |
Specification |
|
Pressure (Mpa) |
0 - 6 |
|
Operating temperature [°C (°F)] |
-40 to 140 (-40 to 284) |
|
Output voltage (V) |
5 |
Driven Pulley Pressure Sensor Components and Components Location
| Component Location |
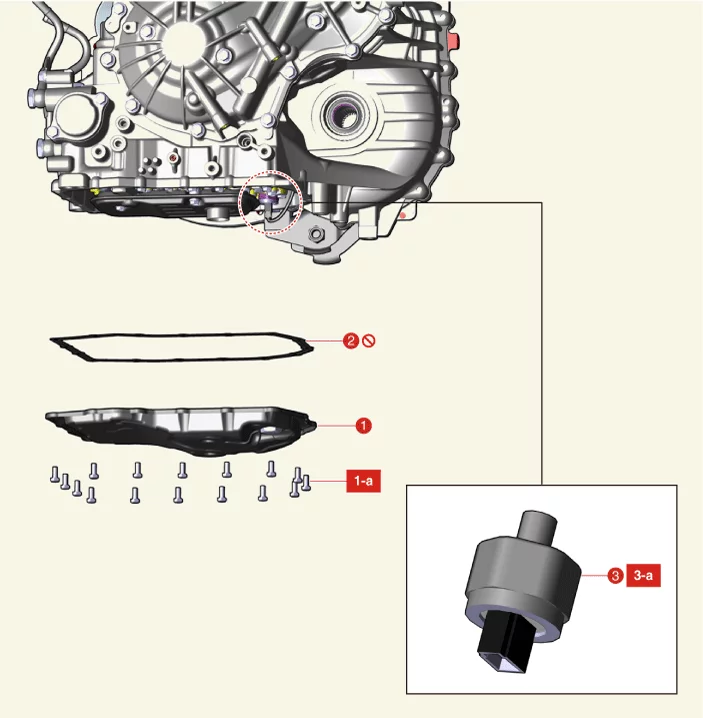
| 1. Valve Body Cover 1-a. 9.8 - 11.8 N·m (1.0 - 1.2 kgf·m, 7.2 - 8.7 lb·ft) 2. Valve Body Cover Gasket |
3. Driven Pulley Pressure Sensor 3-a. 11.8 - 13.7 N·m (1.2 - 1.4 kgf·m, 8.7 - 10.1 lb·ft) |
Driven Pulley Pressure Sensor Description and Operation
| Description |
Driven Pulley Pressure Sensor Removal
| Removal |
|
| 1. |
Remove the engine room under cover.
(Refer to Engine Mechanical System - "Engine Room Under Cover")
|
| 2. |
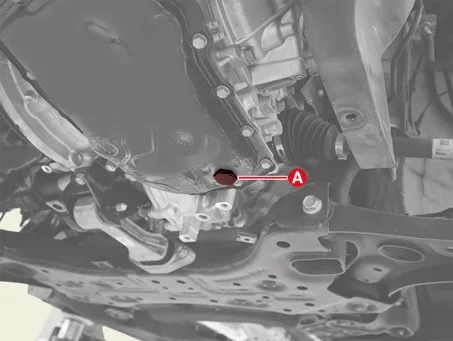
Remove the IVTF drain plug (A), allow the fluid to drain out and then reinstall the drain plug.
|
| 3. |
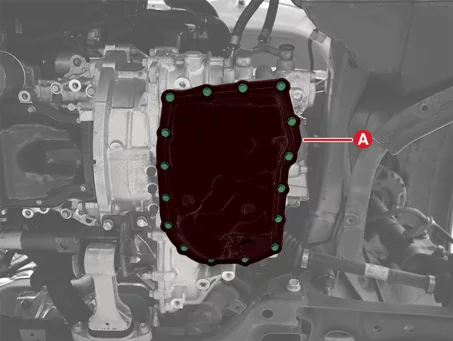
Remove the valve body cover (A) after removing the bolts.
|
| 4. |
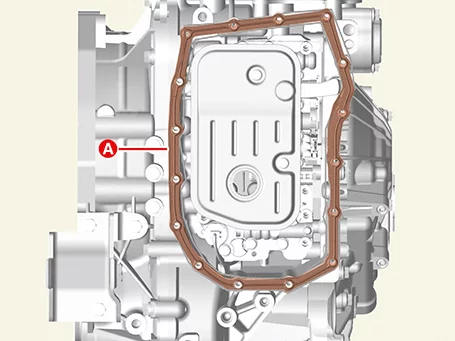
Remove the valve body cover gasket (A).
|
| 5. |
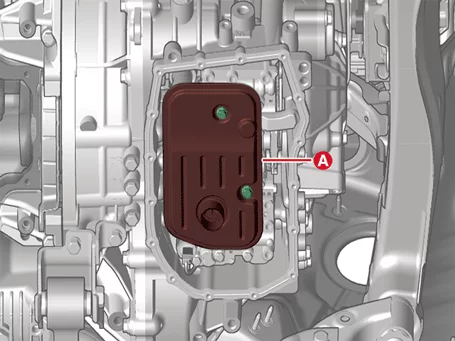
Remove the IVTF filter (A) after removing the bolts.
|
| 6. |
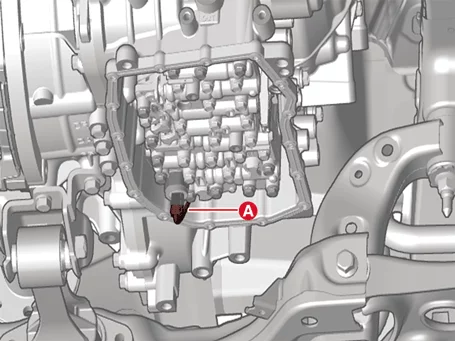
Disconnect the driven pulley pressure sensor connector (A).
|
| 7. |
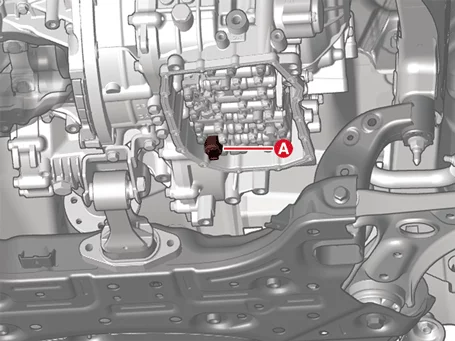
Remove the driven pulley pressure sensor (A).
|
Driven Pulley Pressure Sensor Installation
| Installation |
|
| 1. |
Install the driven pulley pressure sensor (A).
|
| 2. |
Connect the driven pulley pressure sensor connector (A).
|
| 3. |
Install the IVTF filter (A).
|
| 4. |
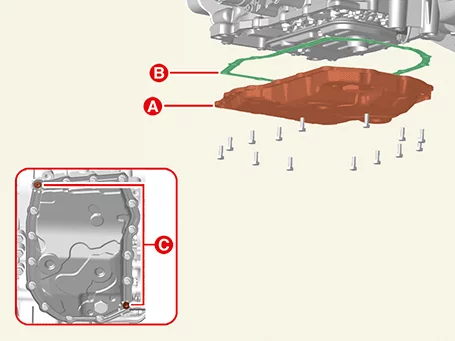
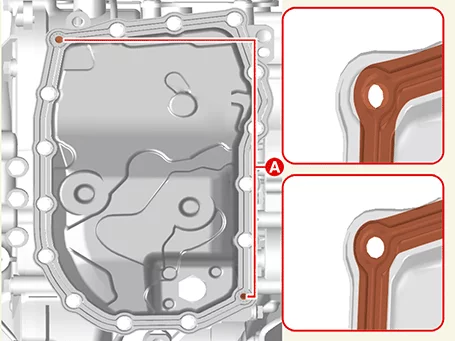
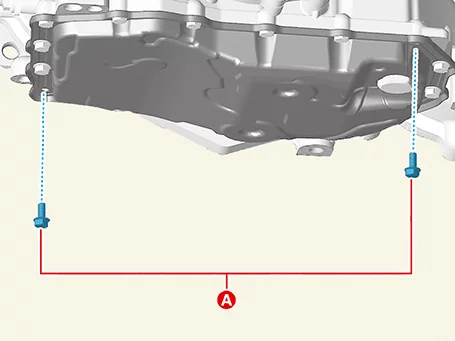
Install the valve body cover in the following order.
|
| 5. |
Check the IVTF level after refilling the intelligent variable transmission with fluid.
(Refer to Hydraulic System - "Fluid")
|
| 6. |
Check for leakage of IVT fluid from engine start.
|
| 7. |
Install the engine room under cover.
(Refer to Engine Mechanical System - "Engine Room Under Cover")
|
| 8. |
Perform the pressure sensor characteristics input using the KDS. (When replacing the pressure sensor)
(S/W Management → Intelligent Variable Transmission → Pressure Sensor Characteristics Input)
|
Driven Pulley Speed Sensor Specification
| Specification |
|
Item |
Specification |
|
Type |
Hall sensor |
|
Supply voltage (V) |
9 |
| Output signal (mA) |
High : 11.8 - 16.8 |
|
Low : 5.9 - 8.4 |
Driven Pulley Speed Sensor Components and Components Location
| Component Location |
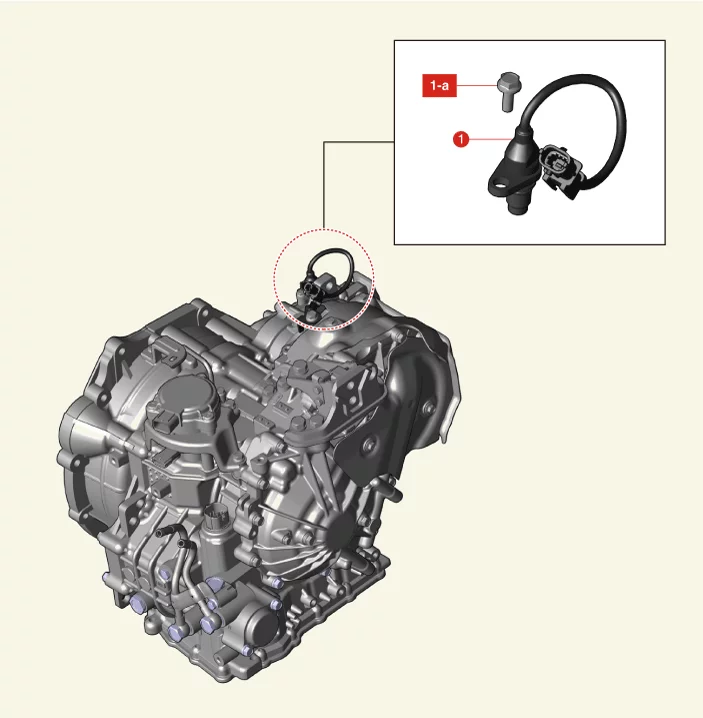
| 1. Driven Pulley Speed Sensor |
1-a. 9.8 - 11.8 N·m (1.0 - 1.2 kgf·m, 7.2 - 8.7
lb·ft) |
Driven Pulley Speed Sensor Description and Operation
| Description |
Driven Pulley Speed Sensor On Vehicle Inspection
| On Vehicle Inspection |
| 1. |
Check the sensor waveform with KDS.
|
Driven Pulley Speed Sensor Removal and Installation
| Removal |
| 1. |
Remove the air cleaner assembly.
(Refer to Engine Mechanical System - "Air Cleaner")
|
| 2. |
Remove the battery and battery tray.
(Refer to Engine Electrical System - "Battery")
|
| 3. |
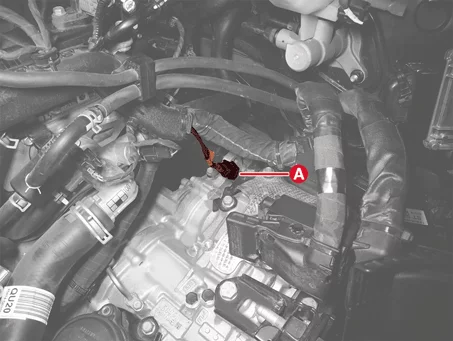
Disconnect the driven pulley speed sensor connector (A).
|
| 4. |
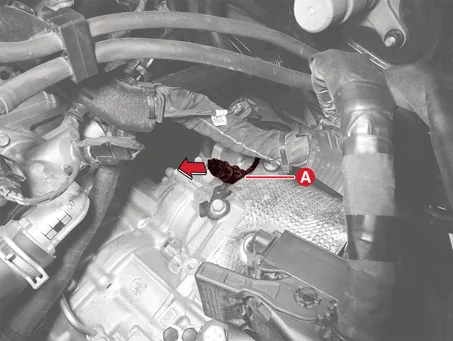
Remove the driven pulley speed sensor connector (A) from the bracket.
|
| 5. |
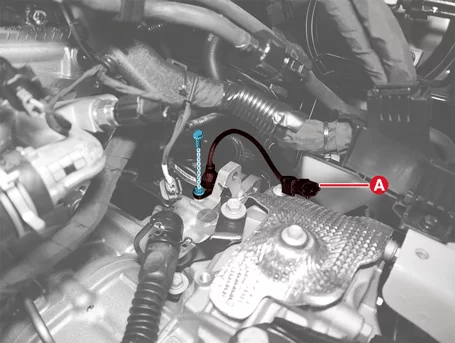
Remove the driven pulley speed sensor (A) after removing the bolt.
|
| Installation |
| 1. |
Install in the reverse order of removal.
|
Position Switch Specification
| Specification |
|
Item |
Specification |
|
| Power supply (V) |
4.5 - 5.5 |
|
| Output type |
Shifting range (P/R/N/D) |
Non-contact (2 channel PWM signal) |
|
Start, Reverse |
Contact |
|
Position Switch Components and Components Location
| Component |
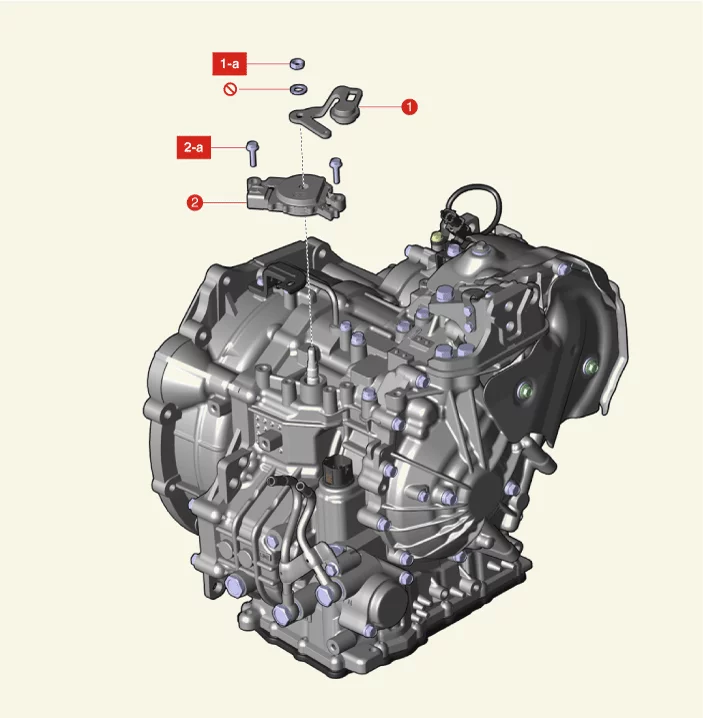
| 1. Manual Control Lever 1-a. 17.7 - 24.5 N·m (1.8 - 2.5 kgf·m, 13 - 18.1 lb·ft) |
2. Position Switch 2-a. 9.8 - 11.8 N·m (1.0 - 1.2 kgf·m, 7.2 - 8.7 lb·ft) |
Position Switch Troubleshooting
| Troubleshooting |
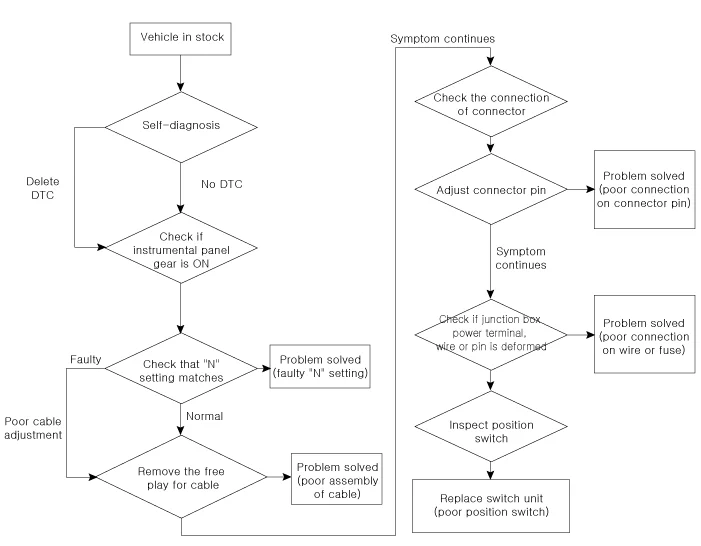
Position Switch On Vehicle Inspection
| On Vehicle Inspection |
| 1. |
The Intelligent Variable Transmission system can be more quickly diagnosed for problems by using the
vehicle diagnostic system (KDS). (Refer to "DTC guide")
|
| Component Inspection |
Inspect the following items by referring to inspection flow chart.
(Refer to Position Switch - "Troubleshooting")
|
| 1. |
Check the diagnostic trouble codes (DTC) using KDS.
|
| 2. |
Check that "N" range setting matches.
(Refer to Position Switch - "Installation")
|
| 3. |
Check the free play for shift cable.
(Refer to Shift Cable - "Installation")
|
| 4. |
Check the condition of connector.
|
| 5. |
Inspect the ground of rear combination lamp circuit.
|
| 6. |
Inspect the wiring connection of junction box power terminal and fuse.
|
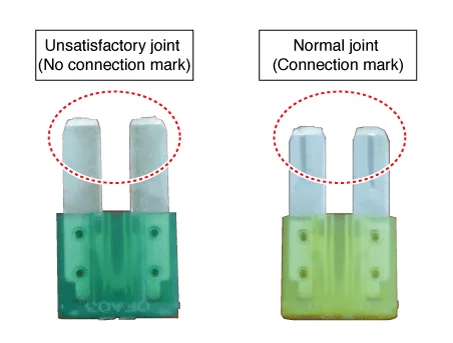
| 7. |
Check the position switch circuit signal.
|
||||||||||||||||||||||||
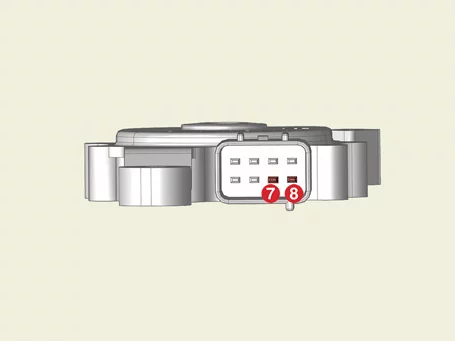
Position Switch Removal
| Removal |
| 1. |
Place the shift lever in the 'N' position.
|
| 2. |
Disconnect the battery negative ( - ) terminal.
|
| 3. |
Remove the air cleaner assembly.
(Refer to Engine Mechanical System - "Air Cleaner")
|
| 4. |
Disconnect the position switch connector (A).
|
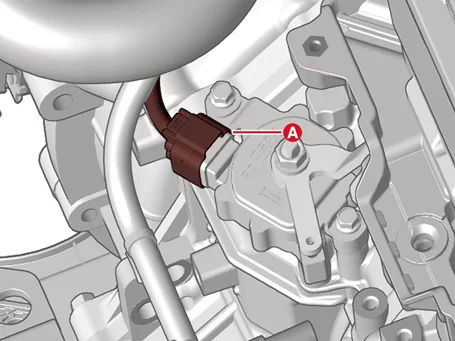
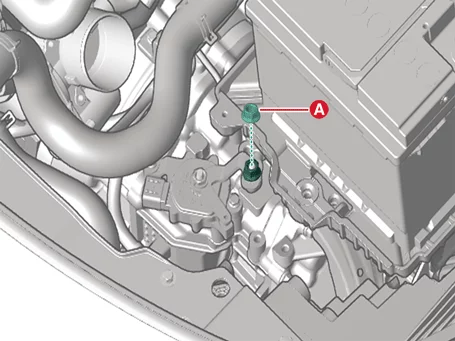
| 5. |
Remove the shift cable by removing the nut (A).
|
| 6. |
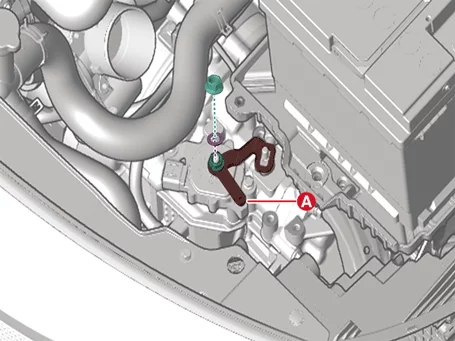
Remove the manual control lever (A) and the washer after removing the nut.
|
| 7. |
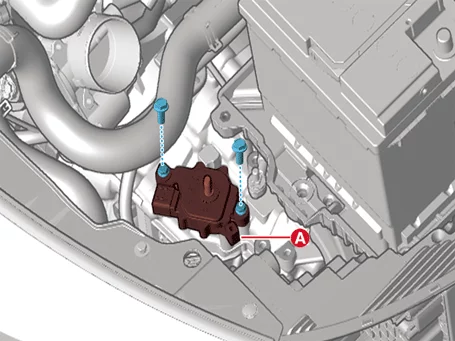
Remove the position switch (A) after removing the bolts.
|
Position Switch Installation
| Special Service Tool |
|
Tool Name / Number |
Illustration |
Description |
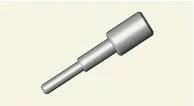
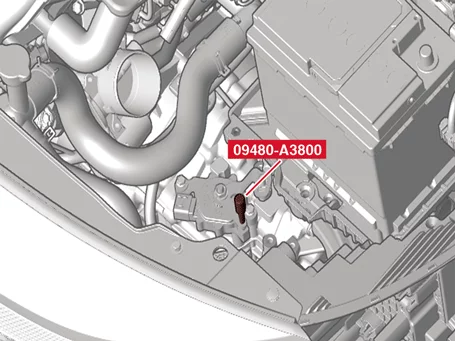
| Position switch guide pin 09480 - A3800 |
|
Used for fixing N range when installing position switch |
| Installation |
| 1. |
Check that the shift lever is placed in the N range.
|
| 2. |
Install the position switch (A).
|
| 3. |
Install the manual control lever (A).
|
| 4. |
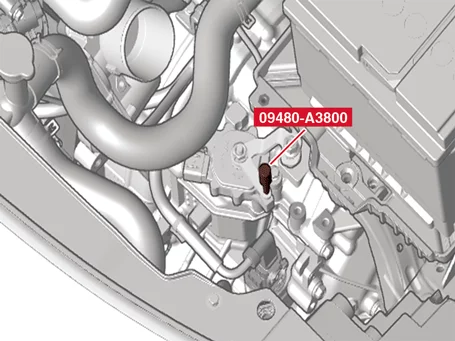
Align the hole in the manual control lever with the "N" position hole of the position switch and then
insert the SST (09480 - A3800).
|
| 5. |
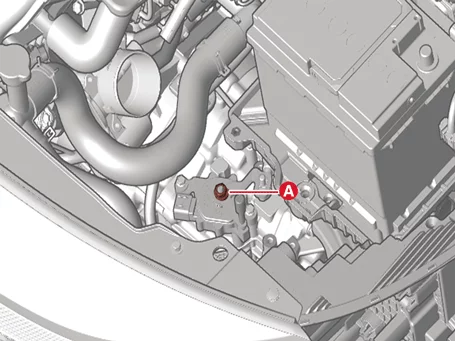
Tighten the manual control lever nut (A) with the specified torque.
|
| 6. |
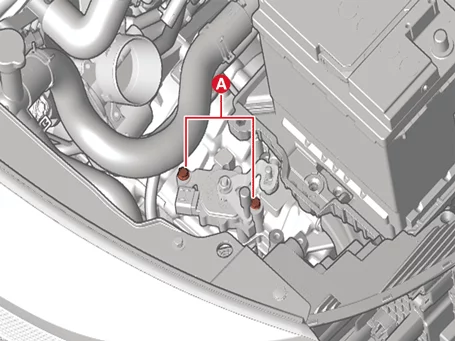
Tighten the position switch bolts (A) with the specified torque.
|
| 7. |
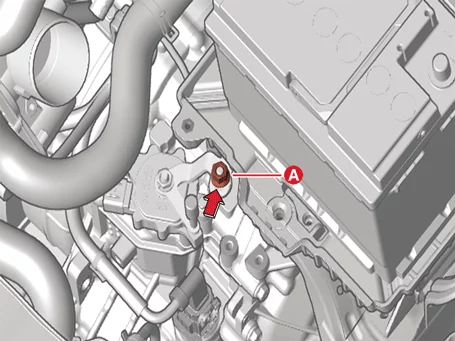
Tighten the nut (A) with the specified torque after removing free play by pushing the shift cable in the
direction of the arrow.
|
| 8. |
Remove the SST (09480 - A3800).
|
| 9. |
Connect the position switch connector (A).
|
| 10. |
Install the air cleaner assembly.
(Refer to Engine Mechanical System - "Air Cleaner")
|
Parking Sprag Removal and Installation
| Removal |
| 1. |
Place the shift lever in the 'N' position.
|
| 2. |
Remove the IVTF drain plug, allow the fluid to drain out and then reinstall the drain plug.
(Refer to Hydraulic System - "Fluid")
|
| 3. |
Remove the Intelligent Variable Transmission (IVT).
(Refer to Intelligent Variable Transmission (IVT) - "Removal")
|
| 4. |
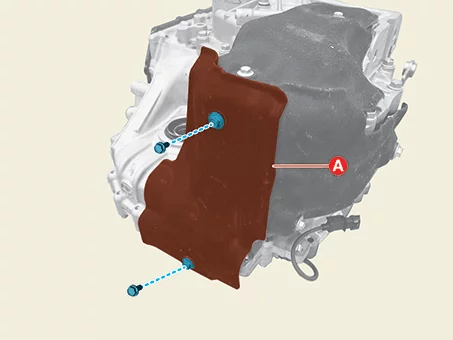
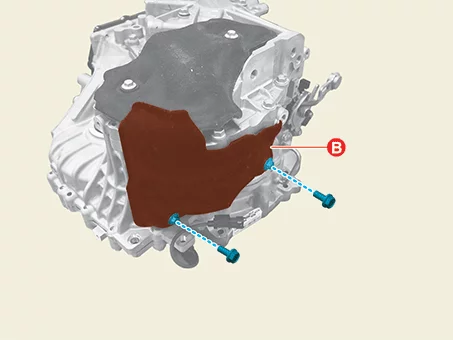
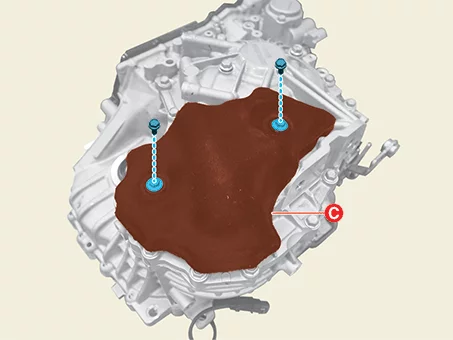
Remove the sound absorption cover (A, B, C).
|
| 5. |
Remove the rear housing (A).
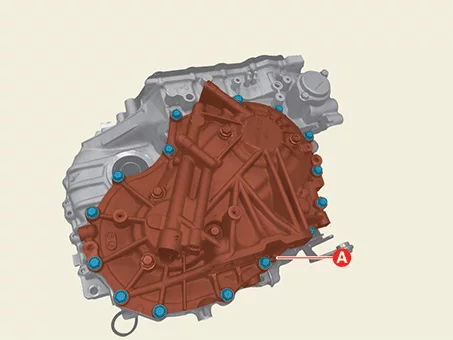
|
| 6. |
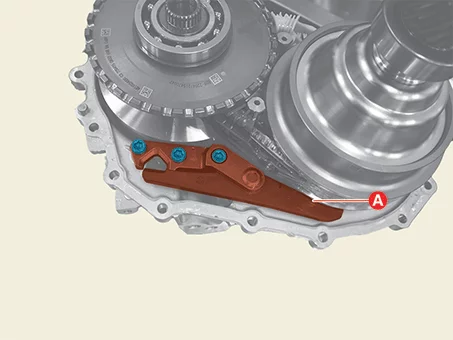
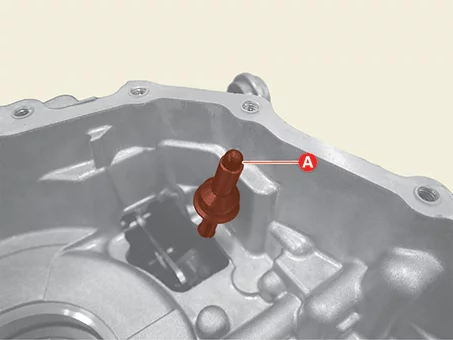
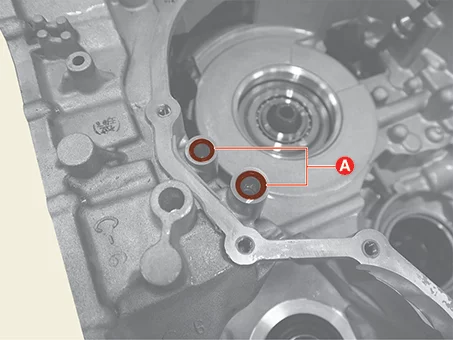
Remove the parking sprag (A).
|
| 7. |
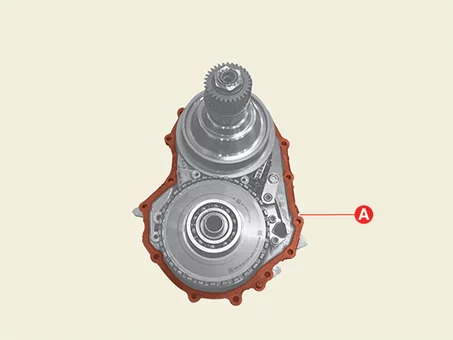
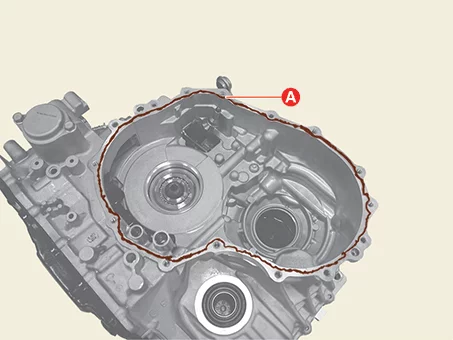
Use a scraper to remove the remaining sealant (A) on the rear housing of the IVT.
|
| Installation |
| 1. |
Install in the reverse order of removal.
|
| 2. |
Check the IVTF level after refilling the IVT with fluid.
(Refer to Transmission Gear Oil - "Replacement")
|
Parking Rod Cam Removal and Installation
| Removal |
| 1. |
Place the shift lever in the 'N' position.
|
| 2. |
Remove the IVTF drain plug, allow the fluid to drain out and then reinstall the drain plug.
(Refer to Hydraulic System - "Fluid")
|
| 3. |
Remove the Intelligent Variable Transmission (IVT).
(Refer to Intelligent Variable Transmission (IVT) - "Removal")
|
| 4. |
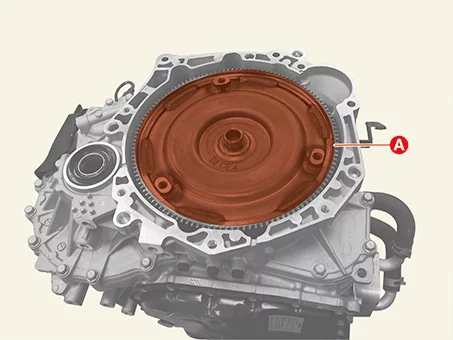
Remove the torque convertor (A) from convertor housing.
|
| 5. |
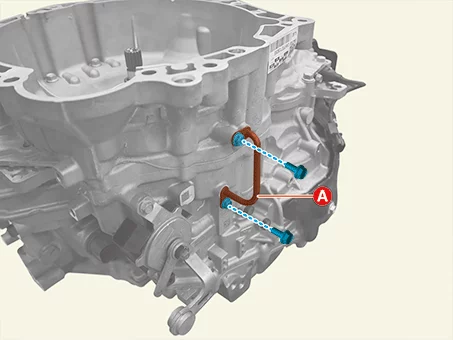
Remove the air breather pipe (A).
|
| 6. |
Remove the manual control lever (A) and the washer after removing the nut.
|
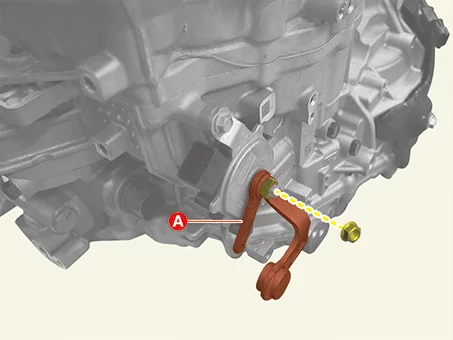
| 7. |
Remove the position switch (A) after removing the bolts.
|
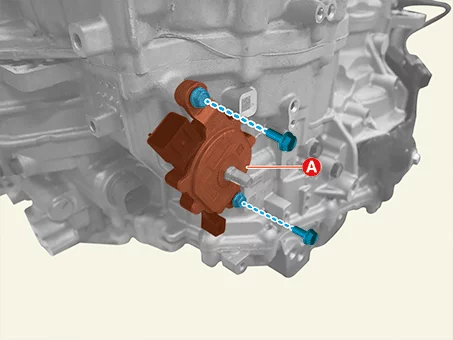
| 8. |
Remove the sound absorption cover (A).
|
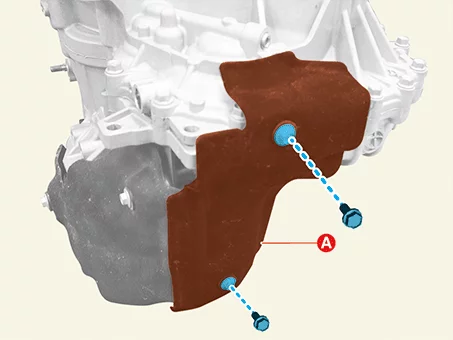
| 9. |
Remove the torque convertor housing (A).
|
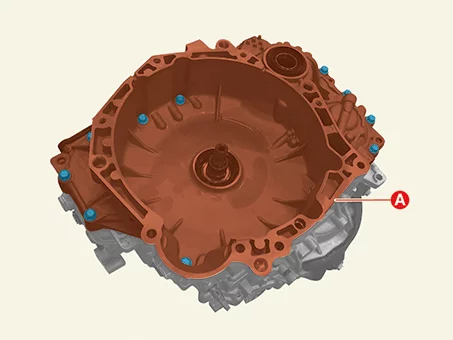
| 10. |
Remove the bolts (A).
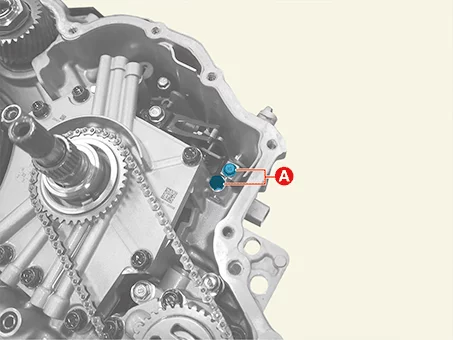
|
| 11. |
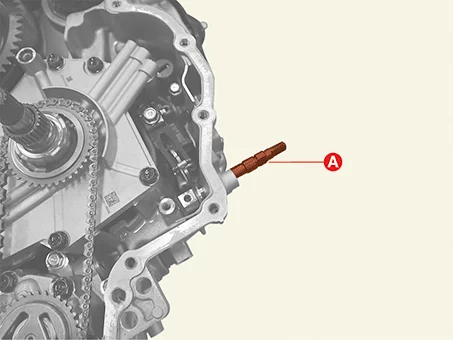
Remove the manual control shaft (A).
|
| 12. |
Remove the detent spring assembly (A).
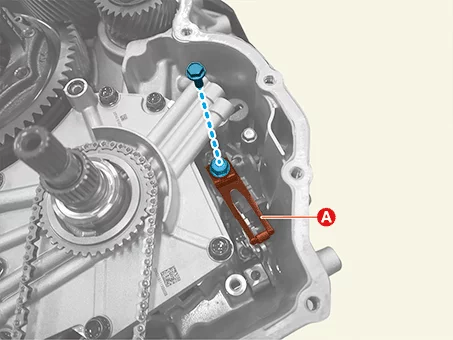
|
| 13. |
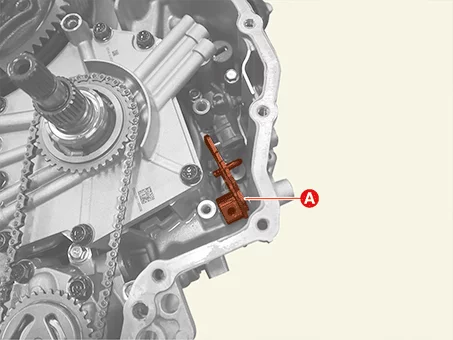
Remove the parking rod assembly (A).
|
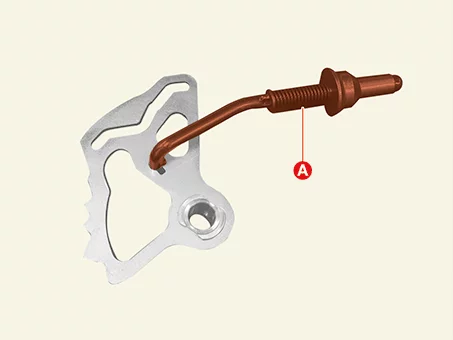
| 14. |
Remove the parking rod cam (A).
|
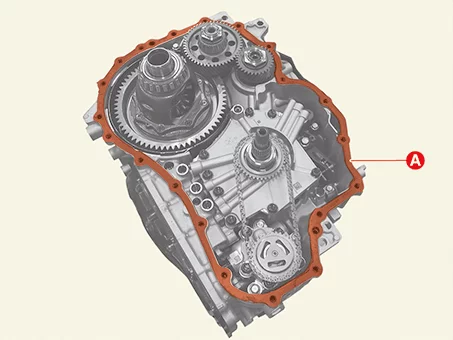
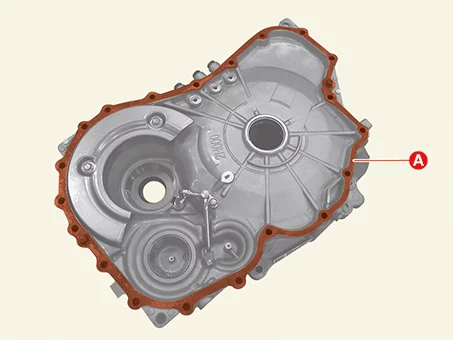
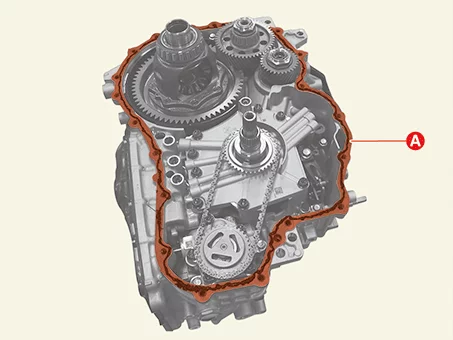
| 15. |
Use a scraper to remove the remaining sealant (A) on the housing of the IVT.
|
| Installation |
| 1. |
Install in the reverse order of removal.
|
| 2. |
Check the IVTF level after refilling the IVT with fluid.
(Refer to Transmission Gear Oil - "Replacement")
|
Shift Lever Components and Components Location
| Component |
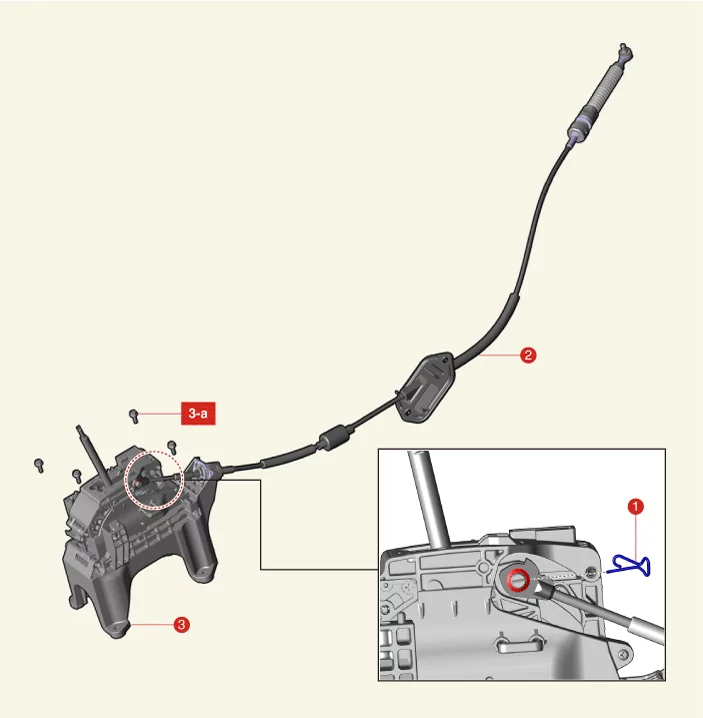
| 1. Snap Pin 2. Shift Cable |
3. Shift Lever 3-a. 8.8 - 13.7 N·m (0.9 - 1.4 kgf·m, 6.5 - 10.1 lb·ft) |
Shift Lever Removal and Installation
| Removal |
| 1. |
Place the shift lever in the 'N' position.
|
| 2. |
Disconnect the battery negative ( - ) terminal.
|
| 3. |
Remove the floor console assembly.
(Refer to Body - “Floor Console Assembly”)
|
| 4. |
Disconnect the connector (A).
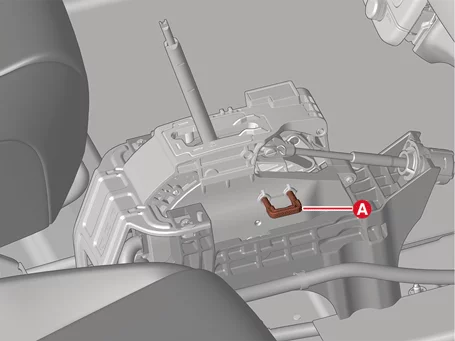
|
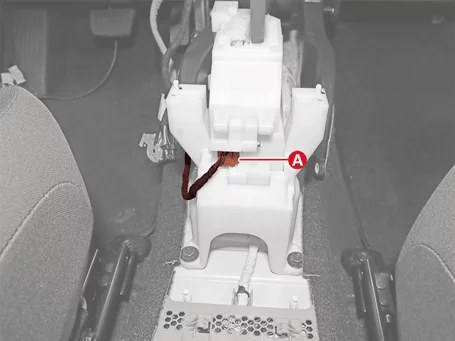
| 5. |
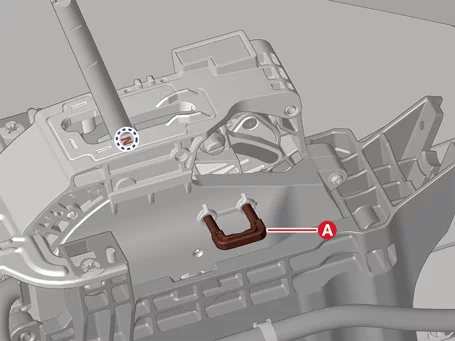
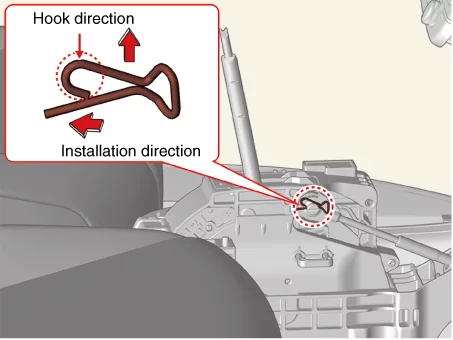
Remove the wiring clip (A).
|
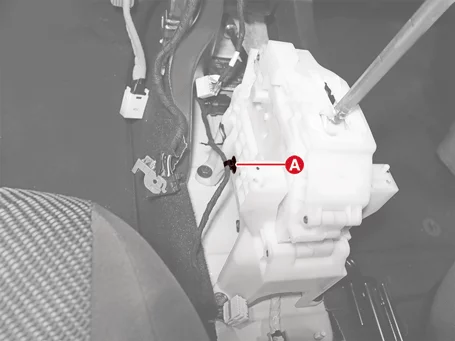
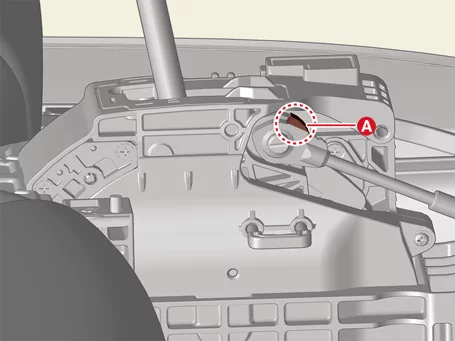
| 6. |
Remove the snap pin (A).
|
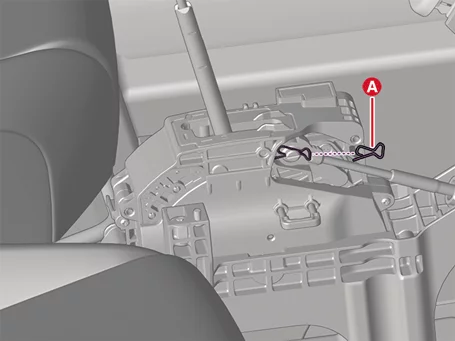
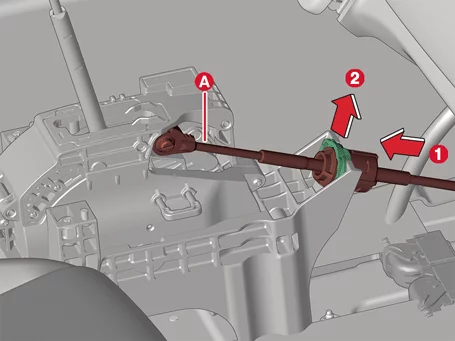
| 7. |
Remove the shift cable (A) from the shift lever.
|
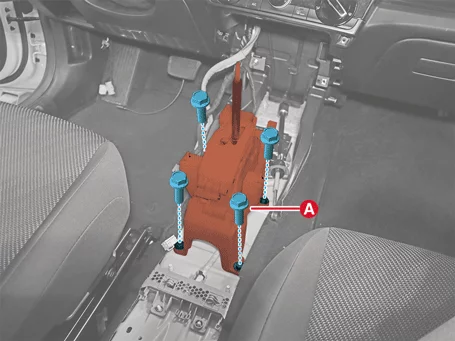
| 8. |
Remove the shift lever assembly (A) after removing the bolts.
|
| Installation |
| 1. |
Install in reverse order of removal.
|
Shift Cable Components and Components Location
| Component |
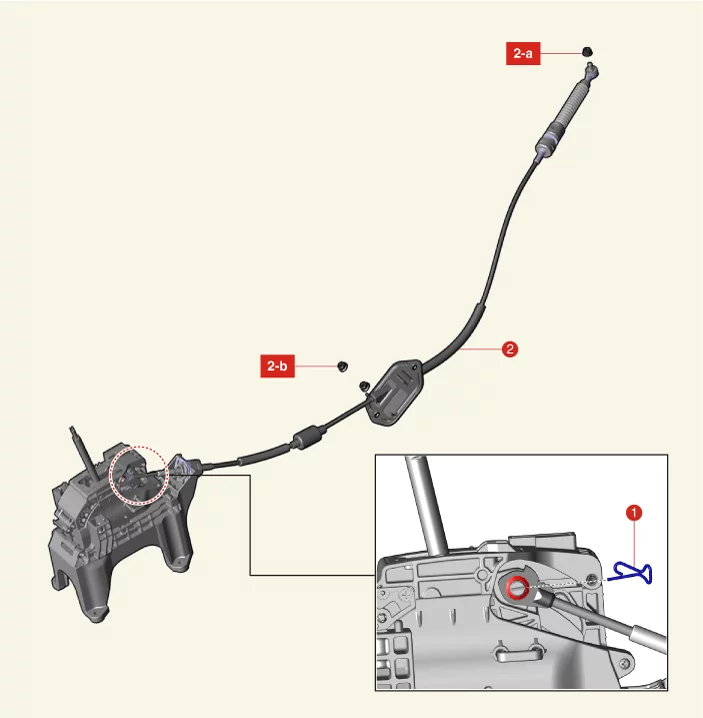
| 1. Snap Pin 2. Shift Cable |
2-a. 9.8 - 13.7 N·m (1.0 - 1.4 kgf·m, 7.2 - 10.1
lb·ft) 2-b. 11.8 - 14.7 N·m (1.2 - 1.5 kgf·m, 8.7 - 10.8 lb·ft) |
Shift Cable Removal
| Removal |
| 1. |
Place the shift lever in the 'N' position.
|
| 2. |
Remove the air cleaner assembly.
(Refer to Engine Mechanical System - "Air Cleaner")
|
| 3. |
Remove the battery and battery tray.
(Refer to Engine Electrical System - "Battery")
|
| 4. |
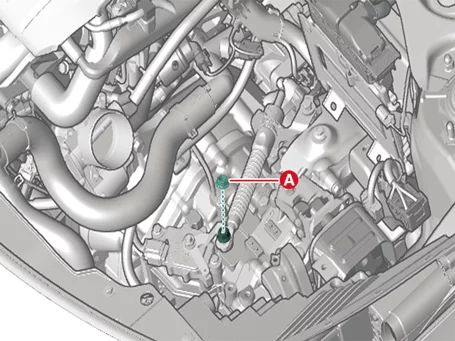
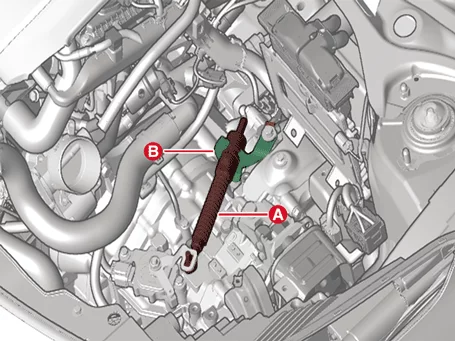
Remove the shift cable by removing the nut (A).
|
| 5. |
Remove the shift cable (A) from the bracket (B).
|
| 6. |
Remove the console upper cover.
(Refer to Body - "Floor Console Assembly")
|
| 7. |
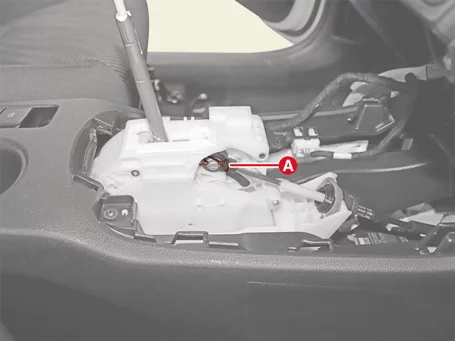
Remove the snap pin (A).
|
| 8. |
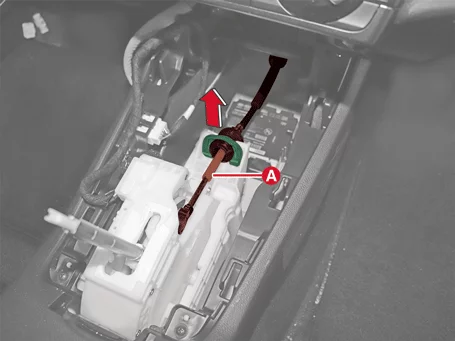
Remove the shift cable (A) from the shift lever.
|
| 9. |
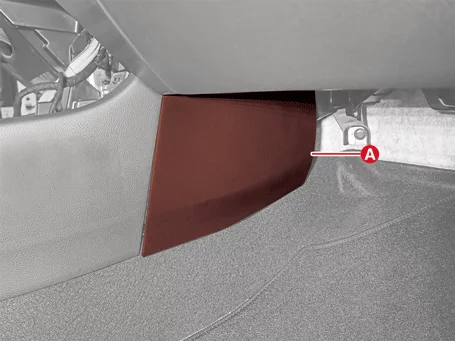
Remove the floor console side cover (A).
|
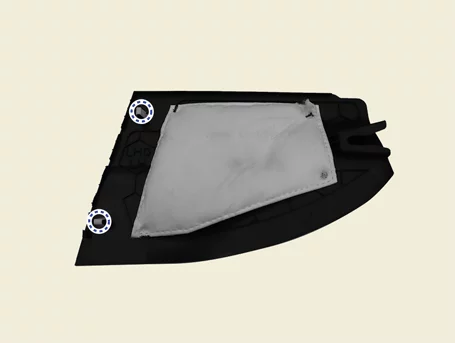

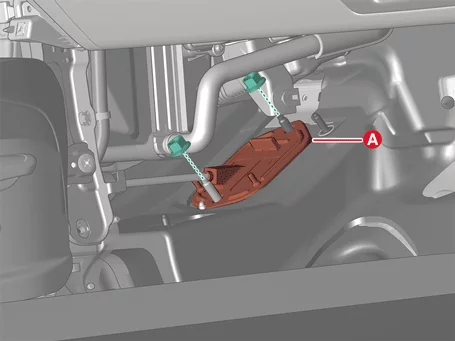
| 10. |
Remove the shift cable retainer (A) after removing the nuts. Then, remove the shift cable by pulling it
toward the vehicle interior.
|
Shift Cable Installation
| Special Service Tool |
| Tool Name / Number |
Illustration |
Description |
| Position switch guide pin 09480 - A3800 |
|
Used for fixing N range when installing position switch |
| Installation |
| 1. |
Checking shift lever and the manual control lever are in the N range before installation.
|
| 2. |
Install the shift cable retainer (A).
|
| 3. |
Install the shift cable (A) to the shift lever.
|
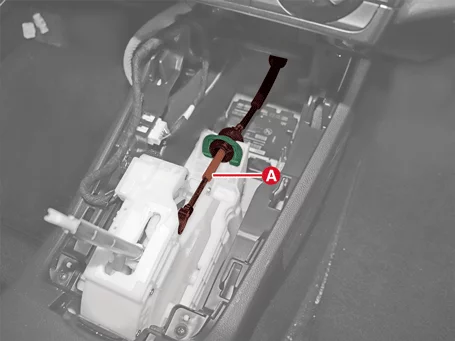
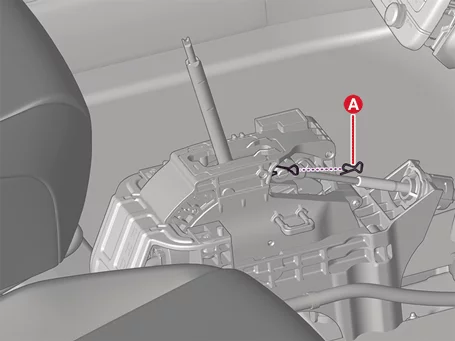
| 4. |
Insert the snap pin (A).
|
| 5. |
Install the shift cable (A) to the bracket (B).
|
| 6. |
Align the hole in the manual control lever with the N position hole of the position switch and then
insert the SST (09480 - A3800).
|
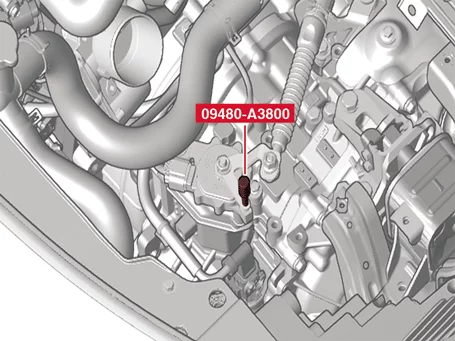
| 7. |
Tighten the nut (A) to the specified torque after removing free play by pushing the shift cable in the
direction of the arrow.
|
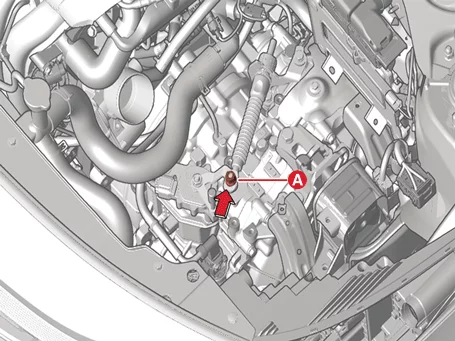
| 8. |
Remove the SST (09480 - A3800).
|
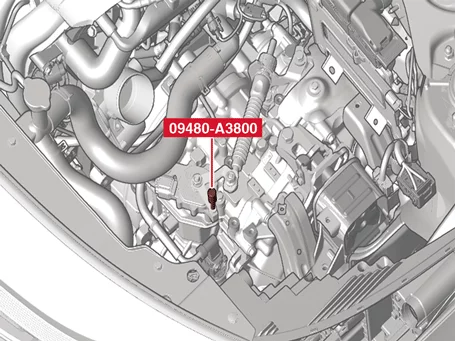
| 9. |
Install the console upper cover.
(Refer to Body - "Console Upper Cover")
|
| 10. |
Install the battery and battery tray.
(Refer to Engine Electrical System - "Battery")
|
| 11. |
Install the air cleaner assembly.
(Refer to Engine Mechanical System - "Air Cleaner")
|
| 12. |
Check that operating surely at each range of the inhibitor switch corresponding to each position of shift
lever.
|


Other information:
Kia Seltos SP2 (2021-2026) Service Manual: Windshield defrosting and defogging
When the Kia Seltos windshield is covered with frost, fog, or moisture, the front view may become blurred. Remove frost and moisture before driving to maintain clear visibility and safer vehicle control. WARNING Windshield heating Do not use the or position during cooling operation in extremely humid weather. The temperature difference between the outside air and the windshield may cause the outer surface of the windshield to fog, reducing visibility.Kia Seltos SP2 (2021-2026) Service Manual: Forward/Reverse Parking Distance Warning (PDW)
Forward/Reverse Parking Distance Warning helps warn the driver if a person, animal, or object is detected within a certain distance from the ultrasonic sensors while the Kia Seltos is moving forward or in reverse. [1]: Front ultrasonic sensors [2]: Rear ultrasonic sensors Refer to the images above for the detailed location of the detecting sensors.