Owner's library Kia Seltos Manuals Owner's manual pages, service notes, maintenance references and practical Kia Seltos help in one clean library.

Kia Seltos reference pages

Manuals, maintenance notes and quick owner help.

Find Kia Seltos operating instructions, warning light explanations, service information and owner guidance without digging through a full PDF.

Kia Seltos: Body Electrical System / Power Door Locks

Contents:

Power Door Look Module Removal and Installation

Removal
Front Door Lock Module
1.
Remove the front door latch.
(Refer to Body - "Front Door Latch")
Rear Door Lock Module
1.
Remove the rear door latch.
(Refer to Body - "Rear Door Latch")
Tailgate Lock Module
1.
Remove the tailgate latch.
(Refer to Body - "Tailgate Latch")
Hood Lock Module
1.
Remove the hood latch.
(Refer to Body - "Hood Latch Assembly")
Installation
1.
Install in reverse order of removal.

Power Door Look Module Inspection

Inspection
Front Door Lock Module
1.
Remove the front door module.
(Refer to Body - "Front Door Module")
2.
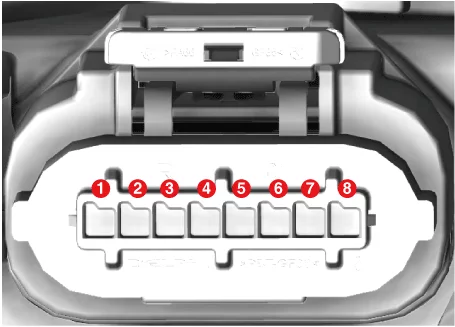
Disconnect the connector from the door lock module.

Body Electrical System — Power Door Locks / Power Door Look Module / Inspection illustration

Terminal
Function
LH
RH
1
-
Motor (CL)
2
-
Motor (COM)
3
Switch (COM)
-
4
Lock/Unlock
Switch (AJAR)
5
Switch (AJAR)
Lock/Unlock
6
-
Switch (COM)
7
Motor (COM)
-
8
Motor (CL)
-

3.
Apply battery voltage to each terminal as shown in the table and verify that the mirror operates properly.
[LH]
Terminal
Function
Central Lock
Central Unlock
8
+
-
7
-
+
3 - 4
ON → OFF
OFF → ON
3 - 5
Door open & half latching : ON
Full latching : OFF

[RH]
Terminal
Function
Central Lock
Central Unlock
1
+
-
2
-
+
6 - 5
ON → OFF
OFF → ON
6 - 4
Door open & half latching : ON
Full latching : OFF

Rear Door Lock Module
1.
Remove the rear door module.
(Refer to Body - "Rear Door Module")
2.
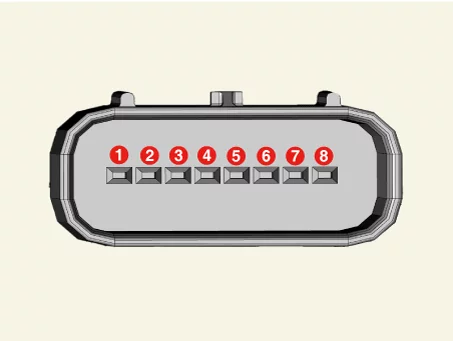
Disconnect the connector from the rear door lock module.

Body Electrical System — Power Door Locks / Power Door Look Module / Inspection illustration

[Central Lock]
Terminal
Function
LH
RH
1
-
Motor (CL)
2
-
Motor (COM)
3
Switch (COM)
-
4
Lock/Unlock
Switch (AJAR)
5
Switch (AJAR)
Lock/Unlock
6
-
Switch (COM)
7
Motor (COM)
-
8
Motor (CL)
-

[Power Child Lock]
Terminal
Function
LH
RH
1
Switch (PCL)
Motor (CL)
2
Switch (COM)
Motor (COM)
3
Lock/Unlock
COM (PCL)
4
Switch (AJAR)
Motor (PCL)
5
COM (PCL)
Switch (AJAR)
6
Motor (PCL)
Lock/Unlock
7
Motor (COM)
Switch (COM)
8
Motor (CL)
Switch (PCL)

3.
Apply battery voltage to each terminal as shown in the table and verify that the mirror operates properly.
[LH]
Terminal
Function
Central Lock
Central Unlock
8
+
-
7
+
-
2 - 3
ON → OFF
OFF → ON
2 - 4
Door open & half latching : ON
Full latching : OFF

[RH]
Terminal
Function
Central Lock
Central Unlock
1
+
-
2
-
+
7 - 6
ON → OFF
OFF → ON
7 - 5
Door open & half latching : ON
Full latching : OFF

Tailgate Lock Module
1.
Remove the tailgate lid trim.
(Refer to Body - " Tailgate Lid Trim")
2.
Disconnect the tailgate latch connector.
[Power Tailgate]

Body Electrical System — Power Door Locks / Power Door Look Module / Inspection illustration

Terminal
Function
1
Motor ( - )
2
Motor ( + )
3
Switch (REF)
4
COM
5
Switch (AJAR)
6
Switch (HOME)
7
COM
8
Switch (PAWL)

3.
Apply battery voltage to each terminal as shown in the table and verify that the mirror operates properly.
1) Lock
Terminal
Function
Unlatching
Unlatching → Half Latching
Half Latching→ Full Latching
Full Latching → Return
Return Position
2
X
-
-
+
X
1
+
+
-
7 - 8
ON
ON → OFF
OFF
OFF
OFF
6 - 7
ON
ON
ON
ON → OFF
OFF
4 - 5
ON
ON
ON → OFF
OFF
OFF
3 - 4
ON
ON
ON → OFF
OFF
OFF

2) Open
Terminal
Function
Unlatching
Full Latching → Unlatching
Unlatching → Return
Return Position
2
X
+
-
X
1
-
+
7 - 8
OFF
OFF → ON
ON
ON
6 - 7
OFF
OFF → ON
ON → OFF
OFF → ON
4 - 5
OFF
OFF → ON
ON
ON
3 - 4
OFF
OFF → ON
ON
ON

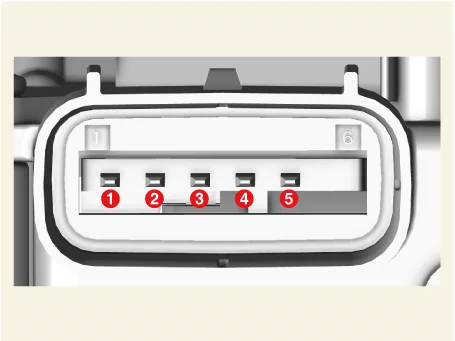
[Non-Power Tailgate]

Body Electrical System — Power Door Locks / Power Door Look Module / Inspection illustration

Terminal
Function
Full Lock
Half Lock
Full Open
1
+
+
X
3
-
-
X
2 - 4
OFF
OFF
ON
5 - 4
OFF
ON
ON

Hood Lock Module
1.
Remove the hood latch assembly.
(Refer to Body - "Hood Latch Assembly")
2.
Check for continuity between terminals No. 1 and No. 2. If there is no continuity, replace the hood latch switch.

Power Door Lock Switch Removal and Installation

Removal
[Driver's Side]
1.
Remove the power window main switch assembly.
(Refer to Power Window - "Power Window Switch" )
[Passenger's side]
1.
Remove the power window sub switch assembly.
(Refer to Power Window - "Power Window Switch" )
Installation
1.
Install in reverse order of removal.

Other information:

Kia Seltos SP2 (2021-2026) Service Manual: Sunroof

If your Kia Seltos is equipped with a sunroof, you can slide or tilt the sunroof glass using the sunroof switch located on the overhead console. This feature adds extra light and ventilation to the cabin, but it should always be operated carefully and only when conditions are safe. The sunroof can be operated only when the ignition switch or the ENGINE START/STOP button is in the ON or START position.

Kia Seltos SP2 (2021-2026) Service Manual: Windows

The doors of the Kia Seltos are equipped with power windows that can be operated using the window switches. The power window system provides convenient control for the driver and passengers, while the driver can also restrict rear window operation when needed. Driver's door power window switch Front passenger's door power window switch Rear door left power window switch Rear door right power window switch Window opening and closing Automatic power window up*/down* Power window lock switch *: if equipped NOTICE In cold and wet weather, the power windows may not operate properly because of freezing conditions.