Contents:
Components and Components Location
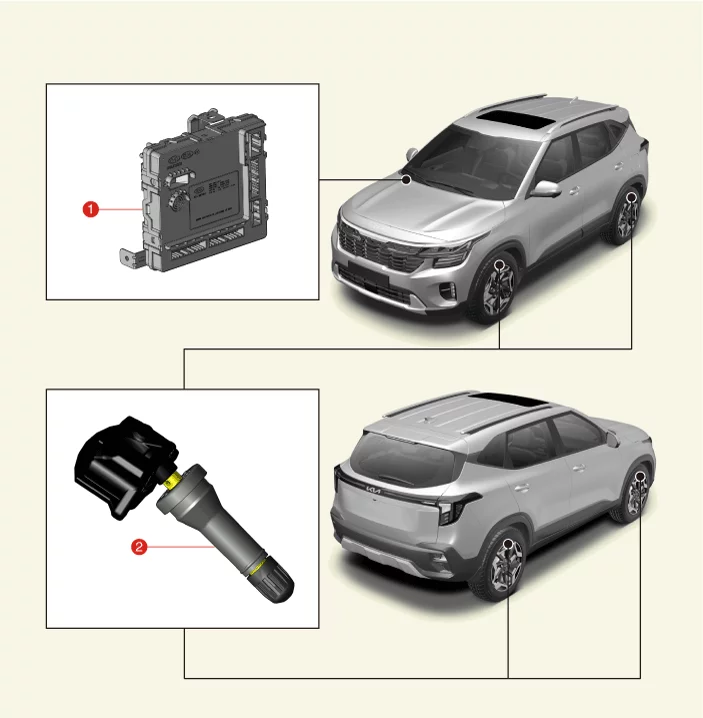
1. Integrated Body Control Unit (IBU)
|
2. TPMS Sensor (4)
|
Description and Operation
The Tire Pressure Monitoring System (TPMS) monitors the pressure and temperature inside the tire in order to warn
the driver of changes in pressure which may influence the operation of the vehicle. The TPMS control module analyzes
wireless information from sensors, the system detects the pneumatic pressure of the tires and warns the driver of if
the pneumatic pressure drops below the standard level.
Low-pressure Warning Lamp on the Dashboard
Dashboard Tire Low-pressure Warning Light
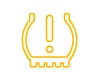
TPMS light ON/OFF conditions
| 1. |
Lamp ON
|
•
|
The lamp turns ON when the tire pressure decreases below the standard level.
|
|
| 2. |
Lamp OFF
|
•
|
Low pneumatic pressure: The warning lamp turns OFF when the tire pressure exceeds the pressure
required to turn off the lamp.
|
|
TPMS Fault Warning Lamp
| 1. |
Warning Conditions and Display
|
•
|
When the system detects a defect in the external operating environment (low battery voltage,
abnormal vehicle speed, etc), the warning lamp blinks for about 1 minute and then turns ON.
|
|
| 2. |
Lamp OFF
|
•
|
The warning lamp turns OFF when the DTC is resolved. The DTC is automatically resolved when the
system does not receive any fault signals for 30 or more ignition cycles after it changes from the
previous fault code.
|
|
•
|
If this condition occurs while driving, you should check the cause of the fault even
after the DTC is resolved.
(Turn the ignition from OFF to ON. Then, check the lamp status.)
|
|
•
|
The warning lamp turns off once the DTC is resolved. The warning lamp stays on until you
complete the check necessary to resolve the DTC.
|
|
•
|
If the DTC is resolved, the warning lamp turns OFF during the same ignition cycle.
|
|
•
|
If the vehicle starts within 19 minutes after the replacement of the wheel of the stopped
vehicle, the TPMS Malfunction Indicator on the instrument cluster illuminates.
|
|
–
|
The above symptom is due to communication failure between the BCM and the replaced TPMS
ID.
|
|
–
|
This communication failure indicator turns off in 19 minutes after the vehicle stops
through the BCM’s automatic learning process of TPMS ID.
(When driving the vehicle after stopping for over 19 minutes, the indicator turns off
automatically.)
|
|
|
Wheel position warning lamp
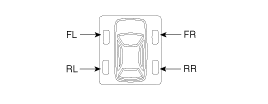
| 1. |
Lamp ON
|
•
|
It is ON simultaneously with the tread lamp.
|
|
•
|
It Indicates the position of tires with low pressure and air leaks.
|
|
| 2. |
Lamp OFF
|
•
|
OFF simultaneously with the tread lamp.
|
|
If the wheel position changes while driving, the system assumes the previous state, but the
warning light illuminates correctly when the current driving position is determined.
|
|
•
|
Tread warning lights and wheel position warning lights may light up due to sudden changes
in the outside temperature (especially in winter) and influences from driving.
|
|
•
|
When the warning lamp turns on, check the inflation pressure and then inflate it to the
specified tire pressure.
|
|
|
System Defect
| 1. |
General Operation
|
•
|
The system detects many input elements to identify potential defects.
|
|
•
|
The priority of a defect depends on its cause.
|
|
•
|
Certain defects are not diagnosed as DTCs.
|
The following are major defects:
|
•
|
In order to diagnose more symptoms of the fault when the ignition line malfunctions, you must
check the warning lamp when you turn the ignition on.
|
|
•
|
Check whether the warning lamp turns on and then off.
|
|
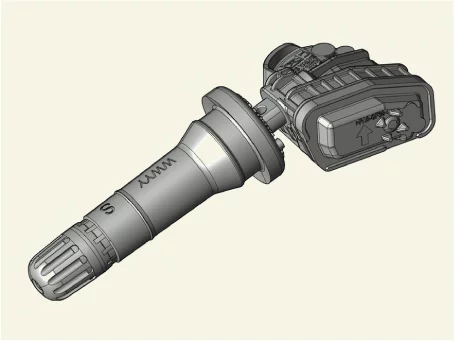
TPMS Sensor Description and Operation
| 1. |
Function
|
•
|
TPMS sensor (Transmitter) detects the motion and sends the pressure, temperature data via RF
signal to ECU.
|
|
•
|
By comparing ABS wheel pulses with sensor RF signal transmission locations, wheel automatic
position learning is conducted to recognize the corresponding wheel position.
|
|
| 2. |
Configurations and Features
|
•
|
There are four (4) TPMS sensors mounted in each wheel of the vehicle.
|
|
•
|
The frequency conversion type is FSK, and the carrier frequency is 433.92 MHz.
|
|
| 3. |
Mode
It consists of off mode, stop mode, rotation mode, and learning mode.
Illustration
|
Function
|
Valve type
|
Snap-in type [rubber valve]
|
Screw
|
Screw T10 [Continental Certified Parts]
|
MCU
|
ATIC 149.0 [Infineon]
|
Battery type
|
Type CR2032
|
|
TPMS Automatic Location Learning
|
•
|
Wheel angular velocity of wheels are different from each other in the following cases:
|
| 1) |
Slip for each axis occurs differently.
|
| 2) |
Rotation radius (the radius of curve) for each wheel is different.
|
| 3) |
Tire wear, internal pressure, tire specifications, etc. for each tire are different.
|
|
•
|
TPMS sensor is transmitted to RF signal at only specific phase (the angle of the tire) in the learning
mode.
|
|
•
|
TPMS receiver checks each tire phase (tire angle) information on receiving RF signals from the sensor.
|
|
•
|
Every time RF signals from sensor IDs 1, 2, 3, and 4 are received, the ID with the highest correlation
among the phase of each collected wheel is transmitted. (In other words, each time RF signal is received,
the phase of the tire is transmitted to the most constant wheel.)
|
|
•
|
TPMS sensor transmits the RF signal at intervals of 16 seconds in the learning mode.
|
TPMS Automatic Location Operating
|
•
|
After stopping or parking for more than 19 minutes, automatic learning function in every driving position
is performed.
|
|
•
|
The sensor is converted to Parking Mode when stopped or parked for more than 15 minutes. When
acceleration of over 4g (15-20 ㎞/h) is detected in Parking Mode, it is converted to First Block Mode.
|
TPMS Sensor Inspection
How to inspect the tire pressure sensor after installation
After installation, the TPMS sensor installation is normal, and fault conditions are determined by the following
conditions :
| 1. |
The rubber of the valve shall fit the rim and the housing surface shall not.
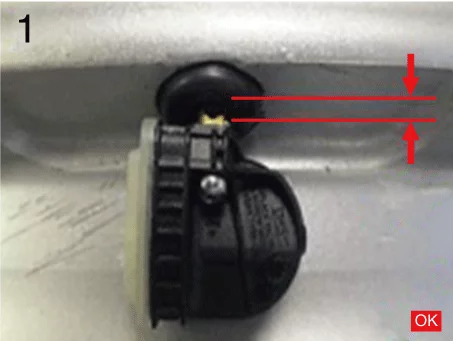
|
| 2. |
The valve shall fit on the rim hole correctly.
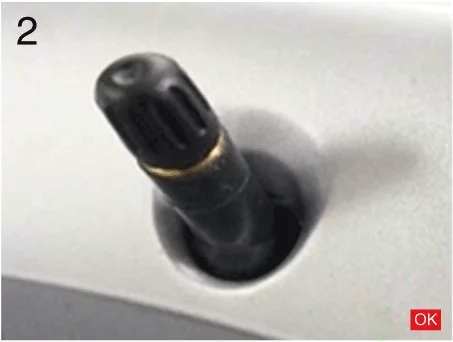
|
| 3. |
The sensor housing shall be parallel to the rim surface.
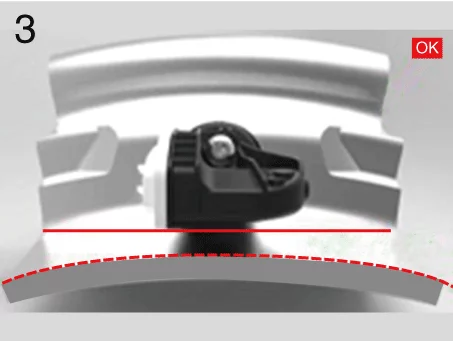
|
TPMS Sensor Replacement
| 1. |
Remove the tires.
(Refer to Wheel and Tires - "Tire")
|
| 2. |
Remove the TPMS sensor mounting screw (A).
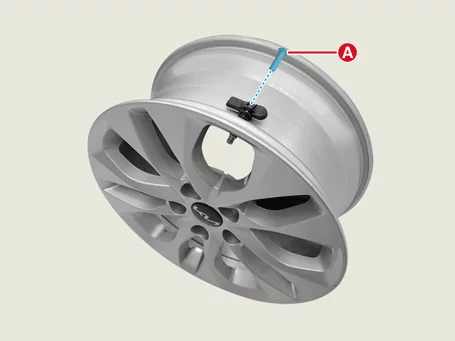
|
•
|
When installing the bead brake, make sure that it does not come in contact with the TPMS
sensor.
|
|
•
|
Be careful not to damage the TPMS sensor when installing the bead brake near the TPMS
sensor.
|
|
|
| 3. |
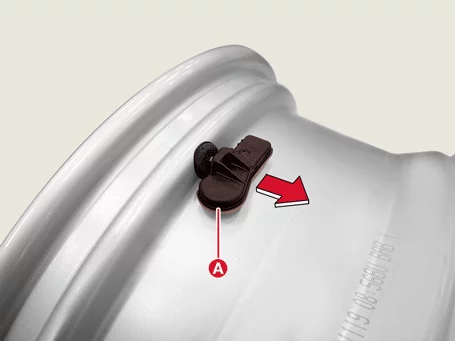
Remove the sensor housing (A) in the direction of the arrow.
|
| 4. |
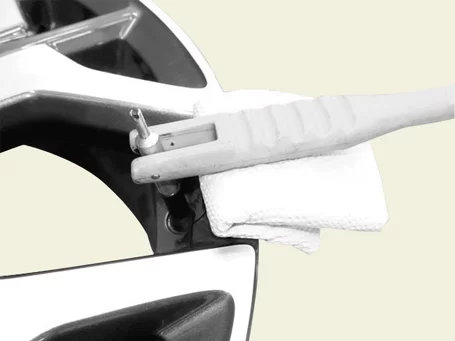
Using a valve mounting tool, pull the sensor housing through the hole.
|
| 5. |
Apply the surface of the new valve with lubricant and install it in the valve hole of the wheel.
Specified Lubricant : Soapy water or YH100 (Lubricants
for tire assembling)
|
|
•
|
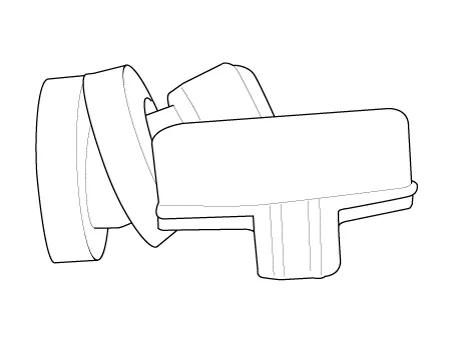
If the lower part of the TPMS sensor valve is not properly mounted on the wheel as shown
below, sealing will not work properly.
|
|
•
|
All of the valleys of the valve body must be pulled through the hole.
|
|
•
|
After applying lubricant, install the valve within 5 minutes.
(After 5 minutes, relubricate)
|
|
|
| 6. |
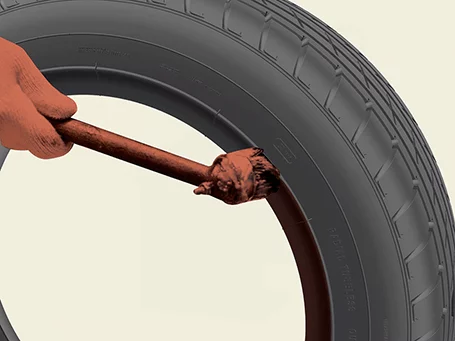
Apply soapy water or lubricant to the upper and lower beads of the tire.
|
| 7. |
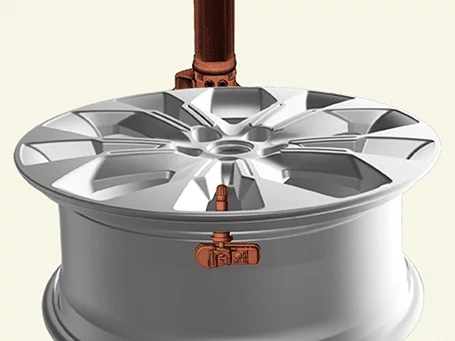
Place the TPMS sensor at 5 o'clock from the head of the tire changer to mount the bottom bead.
|
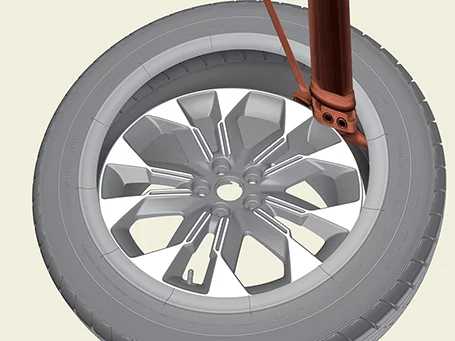
| 8. |
Rotate the rim clockwise, and push down on the tire at the 3 o’clock position to install the bottom bead.
|
Install the tire on the wheel so that the bead touches the rim edge (6 o'clock direction) behind
the sensor.
|
|
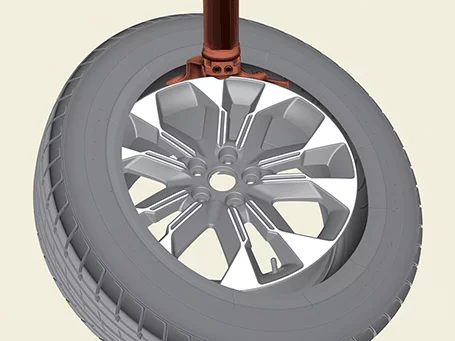
| 9. |
Push down the tire at 3 o'clock position and then rotate the rim clockwise to install the upper bead.
|
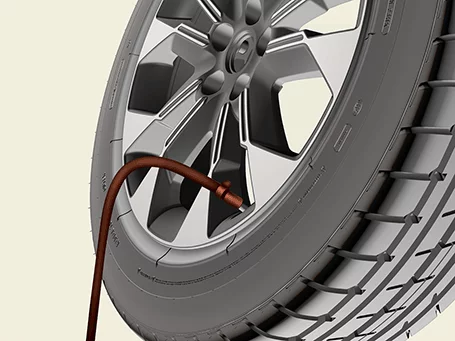
| 10. |
Inflate the tire until the beads fit.
|
| 11. |
Adjust the tire pressure according to the standard pressure.
Size
|
Specification
|
Front
|
Rear
|
205/60 R16
|
230 kPa (33 psi)
|
230 kPa (33 psi)
|
215/55 R17
|
240 kPa (35 psi)
|
230 kPa (33 psi)
|
235/45 R18
|
230 kPa (33 psi)
|
230 kPa (33 psi)
|
|
| 12. |
If automatic TPMS learning is not performed, manually register the TPMS sensor by performing orders
below.
(S/W Management → IBU-TPMS → Register Sensor)
|
Refer to the KDS screen for operating conditions and details.
|
|
| 13. |
Install the wheel and tires.
(Refer to Wheel and Tires - "Tire")
|
TPMS Sensor Adjustment
(S/W Management → Integrated Body Control Unit-TPMS → Wheel Sensor ID Writing)
(S/W Management → Integrated Body Control Unit-TPMS → Vehicle Name Writing)
(S/W Management → Integrated Body Control Unit-TPMS → Sensor Status)
(S/W Management → Integrated Body Control Unit-TPMS → Register Sensor)
(S/W Management → Integrated Body Control Unit-TPMS → TPMS TEST)
|
Refer to the KDS screen for operating conditions and details.
|
TPMS Receiver Description and Operation
TPMS monitors the pressure and temperature of tires to warn of pressure changes that may affect driving
conditions.
The messages calculated from the processed data are shown in the cluster through one warning lamp.
Also, checking the ECU input and output signals by ERROR.
And receive pressure data sensored while parking.
The ECU processes the data received from the wheel sensors, determines the condition of the tires, and delivers
the required warning messages to the driver via the CAN line or hardwire control line.
TPMS Receiver : Integrated with IBU (Integrated Body Control Unit)
| 1. |
Initial state
|
•
|
Platform information and sensor ID are not entered.
|
|
| 2. |
Normal operation state
|
•
|
In order to detect tire pressure and DTC, the receiver must be in normal operation.
|
|
•
|
The receiver can check the sensor location and data.
|
|
| 1. |
General Function
|
•
|
Auto-learn takes place only once per ignition cycle.
|
|
•
|
On successful completion, 4 road wheel sensor ID's are stored into memory for monitoring.
|
|
•
|
Until auto-learn completes, previously learned sensors are monitored for under inflation / leak
warnings.
|
|
•
|
Temporary tire pressure expansion and DTC status are not indicated.
|
|
| 2. |
General conditions for learning new sensors
|
•
|
Automatic learning only operates at speeds above 25 km/h (15.5 mph).
|
|
•
|
The typical time it takes to learn a new sensor is up to 10 minutes at speeds of 25 km/h (15.5
mph) or more.
|
|
| 3. |
General conditions for deleting learning about the removed sensor.
|
•
|
Drive at a speed of 20 - 30 km/h (12.42 - 18.64 mph) for less than 10 minutes.
|
|
•
|
It depends on the vehicle speed or the number of sensors recorded in the receiver.
|
|
TPMS Receiver On Vehicle Inspection
| 1. |
Save the vehicle code, VIN, and sensor ID in the receiver and check whether it is properly stored.
|
| 2. |
Check that the status of the TPMS receiver (IBU, Integrated Body Control Unit) is in normal operation.
|
| 3. |
Check whether the TPMS warning light is off and DTC code.
|
TPMS Receiver Removal and Installation
| 1. |
If the TPMS receiver needs to be replaced, replace the integrated body control unit (IBU).
(Refer to Body Electrical System - "Integrated Body Control Unit
(IBU)")
|
| 1. |
Install in reverse order of removal.
|
| 2. |
After replacing the integrated body control unit (IBU), perform the below using the KDS.
| (1)
|
SMK : Smart Key registration
(Refer to Body Electrical System - "Smart Key")
|
| (2)
|
TPMS : Sensor ID registration
(Refer to TPMS Sensor - "Adjustment")
|
| (3)
|
TPMS : Vehicle name writing
(Refer to TPMS Sensor - "Adjustment")
|
|
TPMS Receiver Adjustment
(S/W Management → Integrated Body Control Unit-TPMS → Wheel Sensor ID Writing)
(S/W Management → Integrated Body Control Unit-TPMS → Vehicle Name Writing)
(S/W Management → Integrated Body Control Unit-TPMS → Sensor Status)
(S/W Management → Integrated Body Control Unit-TPMS → Register Sensor)
(S/W Management → Integrated Body Control Unit-TPMS → TPMS TEST)
|
Refer to the KDS screen for operating conditions and details.
|
Other information:
Kia Seltos SP2 (2021-2026) Service Manual: Smart key immobilizer system
The Kia Seltos smart key immobilizer system helps protect the vehicle from theft. If an incorrectly coded key or an unauthorized electronic device is used, the vehicle's power system may be disabled and the engine may not start.
When the ENGINE START/STOP button is placed in the ON position, the immobilizer system indicator should illuminate briefly and then turn off.
Kia Seltos SP2 (2021-2026) Service Manual: General Safety Information and Caution
Precautions when repairing the SRS
When repairing the SRS, pay attention to the following items.
If the items below are not observed, there is a possibility of serious injury due to unexpected airbag
deployment, and the airbag may not operate.



